# CRONUS

# CRONUS-Cliente-Servidor

<span style="font-size: 12pt; color: #000000;">**<span style="font-size: 12pt;">Cliente/Servidor</span>**</span>

<span style="font-size: 12pt; color: #000080; font-family: arial, helvetica, sans-serif;">Menú Principal</span>

- <span style="font-size: 12pt; color: #000080; font-family: arial, helvetica, sans-serif;">[Sistema](https://ayuda.cronuserp.com/books/wiki-cronus-erp/page/cronus-sistema)</span>
- <span style="font-size: 12pt; color: #000080; font-family: arial, helvetica, sans-serif;">[Mantenimientos](https://ayuda.cronuserp.com/books/wiki-cronus-erp/page/cronus-mantenimientos)</span>
- <span style="font-size: 12pt; color: #000080; font-family: arial, helvetica, sans-serif;">[Movimientos](https://ayuda.cronuserp.com/books/wiki-cronus-erp/page/cronus-movimientos)</span>
- <span style="font-size: 12pt; color: #000080; font-family: arial, helvetica, sans-serif;">[Otros](https://ayuda.cronuserp.com/books/wiki-cronus-erp/page/cronus-otros)</span>
- <span style="font-size: 12pt; color: #000080; font-family: arial, helvetica, sans-serif;">[Útil](https://ayuda.cronuserp.com/books/wiki-cronus-erp/page/cronus-util)</span>
- <span style="font-size: 12pt; color: #000080; font-family: arial, helvetica, sans-serif;">[Reportes](https://ayuda.cronuserp.com/books/wiki-cronus-erp/page/cronus-reportes)</span>
- <span style="font-size: 12pt; color: #000080; font-family: arial, helvetica, sans-serif;">[Ayuda](https://ayuda.cronuserp.com/books/wiki-cronus-erp/page/cronus-ayuda)</span>

<span style="font-size: 12pt; color: #000080; font-family: arial, helvetica, sans-serif;">Opciones en Menú</span>

- <span style="font-size: 12pt; color: #000080; font-family: arial, helvetica, sans-serif;">[Saldos](https://ayuda.cronuserp.com/books/wiki-cronus-erp/page/cronus-saldos)</span>

<span style="font-size: 12pt; color: #000080; font-family: arial, helvetica, sans-serif;">Otras funciones</span>

- [<span style="font-size: 12pt; color: #000080; font-family: arial, helvetica, sans-serif;">Puntos</span>](https://ayuda.cronuserp.com/books/wiki-cronus-erp/page/cronus-puntos)

# CRONUS-Mantenimientos

---

- <span style="font-size: 12pt; font-family: arial, helvetica, sans-serif;">**<span style="color: #000000;">Inventarios</span>**</span>
    - <span style="font-size: 12pt; font-family: arial, helvetica, sans-serif; color: #000080;">[Fórmulas de costeo](https://ayuda.cronuserp.com/REVISAR_MANUAL)</span>
    - <span style="font-size: 12pt; font-family: arial, helvetica, sans-serif; color: #000080;">[Productos ](https://ayuda.cronuserp.com/books/inventarios/page/web-inventario-productos-productos)</span>
    - [<span style="font-size: 12pt; font-family: arial, helvetica, sans-serif; color: #000080;">Productos en promoción</span>](https://ayuda.cronuserp.com/books/inventarios/page/marcar-productos-en-promocion)
    - <span style="font-size: 12pt; font-family: arial, helvetica, sans-serif; color: #000080;">[Rango de costo por productos](https://ayuda.cronuserp.com/books/inventarios/page/web-inventario-distribucion-rangos-de-costos)</span>

---

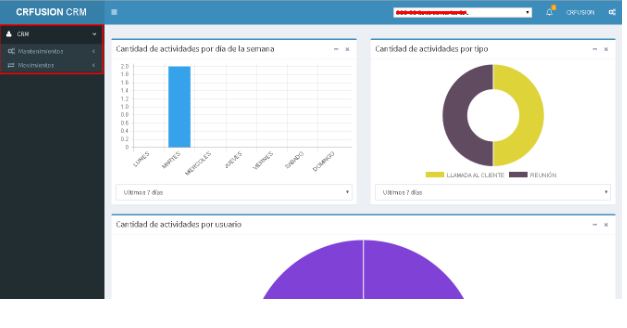
- <span style="color: #000080;">[<span style="font-size: 12pt; font-family: arial, helvetica, sans-serif;">CRM</span>](https://ayuda.cronuserp.com/books/wiki-cronus-erp/page/crfusion-cronus-crm)</span>

---

- <span style="font-size: 12pt; font-family: arial, helvetica, sans-serif;">**<span style="color: #000000;">Facturación</span>**</span>
    - <span style="font-size: 12pt; font-family: arial, helvetica, sans-serif; color: #000080;">[Agentes](https://ayuda.cronuserp.com/books/cxc/page/web-cxc-mantenimientos-facturacion-agentes-agentes)</span>
    - <span style="font-size: 12pt; font-family: arial, helvetica, sans-serif; color: #000080;">[Carriers, Tarjetas y Otras Formas de Pago](https://ayuda.cronuserp.com/books/cxc/page/web-cxc-mantenimientos-facturacion-recibos-carriers-tarjetas-y-otras-formas-de-pago)</span>
    - <span style="font-size: 12pt; font-family: arial, helvetica, sans-serif; color: #000080;">[Transportes](https://ayuda.cronuserp.com/books/cxc/page/web-cxc-mantenimientos-facturacion-ventas-transporte)</span>

---

- <span style="color: #000000; font-size: 12pt;">**<span style="font-family: arial, helvetica, sans-serif;">Clientes</span>**</span>
    - [<span style="font-size: 12pt; font-family: arial, helvetica, sans-serif; color: #000080;">Clientes</span>](https://ayuda.cronuserp.com/books/cxc/page/web-cxc-mantenimientos-clientes-clientes)

---

- <span style="color: #000000; font-size: 12pt; font-family: arial, helvetica, sans-serif;">**Proveedores**</span>
    - <span style="color: #000080; font-size: 12pt;">[<span style="font-family: arial, helvetica, sans-serif;">Categorías </span>](https://ayuda.cronuserp.com/REVISAR_MANUAL)</span>

---

- <span style="color: #000000; font-size: 12pt; font-family: arial, helvetica, sans-serif;">**Órdenes de compra**</span>
- [<span style="color: #000080; font-family: arial, helvetica, sans-serif;"><span style="font-size: 16px;">Prorrateo flete en OC </span></span>](https://ayuda.cronuserp.com/books/cxp/page/distribucion-flete-en-la-orden-de-compra)

# CRONUS-Movimientos

- <span style="color: #000080; font-size: 12pt; font-family: arial, helvetica, sans-serif;">[Facturación/Documentos](https://ayuda.cronuserp.com/books/wiki-cronus-erp/page/Cronus-Movimientos-Facturacion-documentos-Facturacion)</span>
- [<span style="color: #000080; font-size: 12pt; font-family: arial, helvetica, sans-serif;">Devolución de mercadería</span>](https://ayuda.cronuserp.com/books/wiki-cronus-erp/page/cronus-movimientos-facturacion-documentos-devoluciones "CRONUS-Movimientos-Facturacion-documentos-Devoluciones")
- [<span style="color: #000080; font-size: 12pt; font-family: arial, helvetica, sans-serif;">Boletas de Despacho</span>](https://ayuda.cronuserp.com/books/wiki-cronus-erp/page/cronus-movimientos-documentos-boletas-de-despacho)

---

- <span style="font-size: 12pt; color: #000080; font-family: arial, helvetica, sans-serif;">[Listas de documentos/movimientos](https://ayuda.cronuserp.com/books/wiki-cronus-erp/page/cronus-movimientos-lista-de-documentosmovimientos "CRONUS Movimientos Lista de documentos/movimientos")</span>

---

- <span style="font-size: 12pt; color: #000080; font-family: arial, helvetica, sans-serif;">[Apartados](https://ayuda.cronuserp.com/books/wiki-cronus-erp/page/cronus-movimientos-apartados-configuracion "CRONUS-Movimientos-Apartados-Apartados-Configuracion")</span>

---

- <span style="font-size: 12pt; color: #000080; font-family: arial, helvetica, sans-serif;">[Proformas](https://ayuda.cronuserp.com/books/wiki-cronus-erp/page/CRONUS-Movimientos-Proformas)</span>

---

- <span style="color: #000000; font-size: 12pt; font-family: arial, helvetica, sans-serif;">**Cajas[:](REVISAR_MANUAL)**</span>
    - <span style="font-size: 12pt; color: #000080; font-family: arial, helvetica, sans-serif;">[Recibos](https://ayuda.cronuserp.com/books/wiki-cronus-erp/page/CRONUS-Movimientos-Cajas-Recibos)</span>
    - [<span style="font-size: 12pt; color: #000080; font-family: arial, helvetica, sans-serif;">Nota de débito en RB con saldo para devolución de efectivo</span>](https://ayuda.cronuserp.com/books/wiki-cronus-erp/page/cronus-nd-por-devolucion-de-efectivo "Cronus_ND por devolución de efectivo")
    - <span style="font-size: 12pt; color: #000080; font-family: arial, helvetica, sans-serif;">[Cierres de caja](https://ayuda.cronuserp.com/books/wiki-cronus-erp/page/CRONUS-Movimientos-Cajas-Cierres-de-caja)</span>

---

- <span style="color: #000000; font-size: 12pt; font-family: arial, helvetica, sans-serif;">**Inventarios**</span>
    - <span style="font-size: 12pt; color: #000080; font-family: arial, helvetica, sans-serif;">[Movimientos de inventario](https://ayuda.cronuserp.com/books/inventarios/page/web-inventario-movimientos-movimientos-de-inventario)</span>
    - <span style="font-size: 12pt; color: #000080; font-family: arial, helvetica, sans-serif;">[Movimiento por diferencia de costos](https://ayuda.cronuserp.com/books/inventarios/page/web-inventario-movimientos-movimiento-por-diferencia-de-costo)</span>
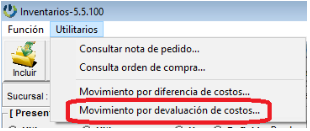
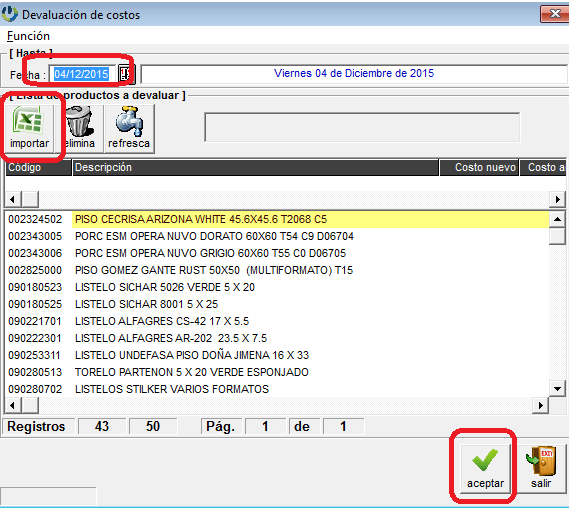
    - <span style="font-size: 12pt; color: #000080; font-family: arial, helvetica, sans-serif;">[Movimiento por devaluación/revaluación de costos](https://ayuda.cronuserp.com/books/inventarios/page/web-inventario-movimientos-movimientos-devaluacionrevaluacion-de-costos)</span>
    - <span style="font-size: 12pt; color: #000080; font-family: arial, helvetica, sans-serif;">[Producción de composición](https://ayuda.cronuserp.com/books/wiki-cronus-erp/page/CRONUS-Movimiento-Inventario-Produccion-de-composicion)</span>
    - <span style="font-size: 12pt; color: #000080; font-family: arial, helvetica, sans-serif;">[Solicitudes de inventario](https://ayuda.cronuserp.com/books/inventarios/page/web-inventario-movimientos-solicitud-de-movimiento-de-inventario)</span>
    - <span style="color: #000080; font-size: 12pt; font-family: arial, helvetica, sans-serif;">[Toma Física](https://ayuda.cronuserp.com/books/wiki-cronus-erp/page/cronus-toma-fisica)</span>
    - <span style="font-size: 12pt; color: #000080; font-family: arial, helvetica, sans-serif;">[Tablero de seguimiento de toma física](https://ayuda.cronuserp.com/books/inventarios/page/web-inventario-movimientos-toma-fisica-tablero-de-seguimiento)</span>
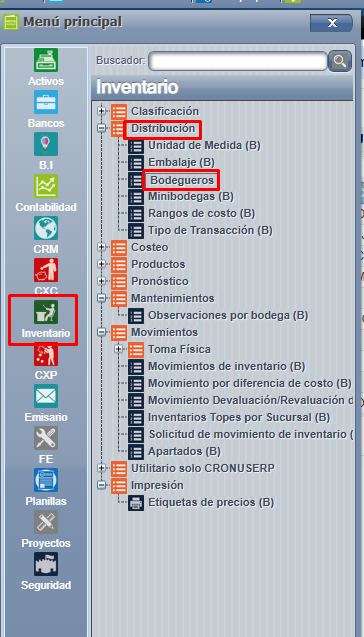
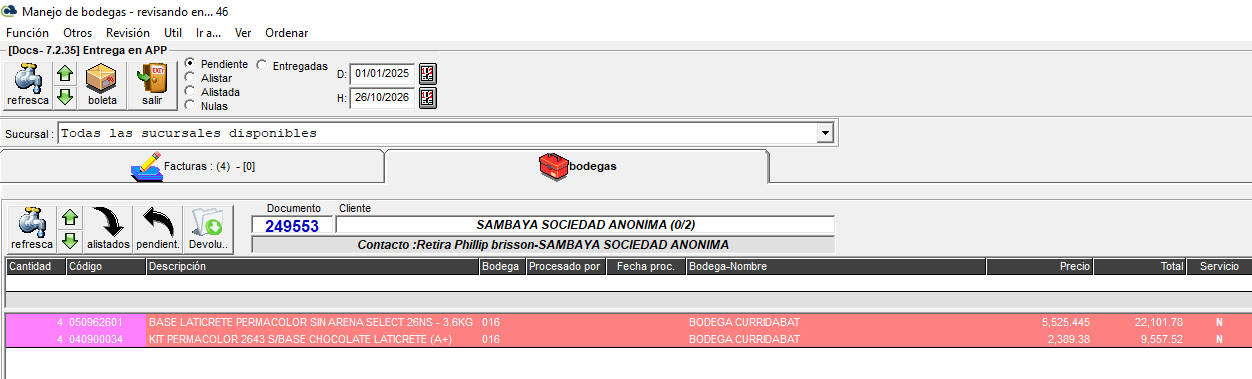
    - <span style="font-size: 12pt; color: #000080; font-family: arial, helvetica, sans-serif;">[Manejo de bodegas](https://ayuda.cronuserp.com/books/wiki-cronus-erp/page/CRONUS-Movimiento-Inventario-Manejo-de-bodegas)</span>

---

- <span style="color: #000080;">[<span style="font-size: 12pt; font-family: arial, helvetica, sans-serif;">Comisiones</span>](https://ayuda.cronuserp.com/books/cxc/page/web-cxc-movimientos-otros-comisiones)</span>

---

- <span style="font-size: 12pt; color: #000080; font-family: arial, helvetica, sans-serif;">[Asiento Contable](https://ayuda.cronuserp.com/books/wiki-cronus-erp/page/CRONUS-Movimientos-Asiento-contable)</span>

---

- <span style="font-size: 12pt; color: #000080; font-family: arial, helvetica, sans-serif;">[Notas de pedido](https://ayuda.cronuserp.com/books/wiki-cronus-erp/page/CRONUS-Movimientos-NOTAS-DE-PEDIDO)</span>

# CRONUS-Otros

<ul> <li><span style="font-size: 12pt; color: #000080;"><span style="font-family: arial, helvetica, sans-serif;"><span style="background-color: #ffffff;"><a style="color: #000080;" href="https://ayuda.cronuserp.com/books/wiki-cronus-erp/page/cronus-otros-consolidado-para-compras">Consolidado para Compras</a></span></span></span></li> <li><a href="https://ayuda.cronuserp.com/books/wiki-cronus-erp/page/cronus-otros-pedir-a-fabrica"><span style="font-size: 12pt; color: #000080;"><span style="font-family: arial, helvetica, sans-serif;"><span style="background-color: #ffffff;">Pedir a F&aacute;brica</span></span></span></a></li> </ul> <hr /> <ul> <li><span style="color: #000080;"><span style="font-size: 12pt;"><span style="font-family: arial, helvetica, sans-serif;"><span style="background-color: #ffffff;"><a style="color: #000080;" href="CRONUS-Otros-Ordenes-de-compra">&Oacute;rdenes de Compra</a></span></span></span></span></li> </ul> <hr /> <ul> <li><span style="color: #000080;"><a style="color: #000080;" href="https://ayuda.cronuserp.com/books/wiki-cronus-erp/page/cronus-web-cxc-monitoreo-de-costos"><span style="font-family: arial, helvetica, sans-serif; font-size: 12pt;">Monitoreo de costos</span></a></span></li> </ul> <hr /> <ul> <li><strong><span style="font-size: 12pt;">Pron&oacute;stico</span></strong><br /> <ul> <li><span style="font-size: 12pt; color: #000080;"><a style="color: #000080;" href="https://ayuda.cronuserp.com/books/wiki-cronus-erp/page/cronus-otros-pronostico-de-inventario-avanzado">Pron&oacute;stico Avanzado</a></span></li> <li><span style="color: #000080;"><a style="color: #000080;" href="https://ayuda.cronuserp.com/books/wiki-cronus-erp/page/pronostico-simple-de-cronus-erp"><span style="font-size: 12pt;">Pron&oacute;stico Simple</span></a></span></li> </ul> </li> </ul> <hr /> <ul> <li><span style="color: #000080;"><span style="font-size: 12pt;"><a style="color: #000080;" href="https://ayuda.cronuserp.com/books/wiki-cronus-erp/page/cronus-otros-actualizaciones-masivas-de-productos">Actualizaciones Masivas de productos</a></span></span></li> </ul> <hr /> <ul> <li><a href="https://ayuda.cronuserp.com/books/wiki-cronus-erp/page/cronus-otros-importador-de-datos-al-sistema"><span style="color: #000080;"><span style="font-family: arial, helvetica, sans-serif; font-size: 12pt;">Importador de datos al sistema</span></span></a></li> <li><span style="color: #000080;"><span style="font-family: arial, helvetica, sans-serif; font-size: 12pt;"><a style="color: #000080;" href="CRONUS-Otros-Woocommerce-Sincronizador">Woocommerce Sincronizador</a></span></span></li> </ul> <hr /> <ul> <li><span style="color: #000080;"><span style="font-family: arial, helvetica, sans-serif; font-size: 12pt;"><a style="color: #000080;" href="CRONUS-WEB-CXC-Otros-Metas-Metas-de-ventas">Metas de ventas por agente y dashboard</a></span></span></li> </ul> <hr /> <ul> <li><span style="color: #000080;"><span style="font-size: 12pt;"><span style="font-family: arial, helvetica, sans-serif;"><a style="color: #000080;" href="https://ayuda.cronuserp.com/books/wiki-cronus-erp/page/cronus-otros-consulta-general-de-alertas">Consulta General de Alertas</a></span></span></span></li> </ul>

# CRONUS-Reportes

<ul> <li><span style="font-size: 12pt; color: #000080;"><a style="color: #000080;" href="CRONUS-Reportes-Precios">Precios</a></span></li> </ul> <hr /> <ul> <li><span style="font-size: 12pt; color: #000080;"><a style="color: #000080;" href="https://ayuda.cronuserp.com/books/wiki-cronus-erp/page/CRONUS-Reportes-Etiquetas-de-Precios
">Etiquetas de precios</a></span></li> </ul> <hr /> <ul> <li><span style="font-size: 12pt; color: #000080;"><a style="color: #000080;" href="https://ayuda.cronuserp.com/books/wiki-cronus-erp/page/CRONUS-Reportes-Generador-de-reportes">Generador de reportes</a></span></li> </ul> <hr /> <ul> <li><span style="font-size: 12pt; color: #000080;"><a style="color: #000080;" href="CRONUS-Reportes-Ventas-por-vendedor">Ventas por vendedor</a></span></li> </ul> <hr /> <ul> <li><span style="font-size: 12pt; color: #000080;"><a style="color: #000080;" href="CRONUS-Reportes-Ventas-por-cliente">Ventas por cliente</a></span></li> </ul> <p>&nbsp;</p>

# CRONUS Erp - Internos

<p><span style="font-size: 12pt; font-family: arial, helvetica, sans-serif;"><em><strong>Parte 1:</strong></em></span></p> <ul> <li><span style="font-size: 12pt; font-family: arial, helvetica, sans-serif; color: #000080;"><a style="color: #000080;" href="https://docs.google.com/document/d/1vM-unpKV3zwgyZAzd97LXT0IsRC1-W2E0b4mbxlUOxc/edit?usp=share_link">Normas de oficina</a></span> <ul> <li><span style="font-size: 12pt; font-family: arial, helvetica, sans-serif; color: #000080;"><a style="color: #000080;" href="https://docs.google.com/document/d/13cwSt_leX22QmMB6UBFCyDGEmg1d8WIKKPdtQ_fo2_4/edit?usp=share_link"> Normas del teletrabajo</a></span></li> </ul> </li> <li><span style="font-size: 12pt; font-family: arial, helvetica, sans-serif; color: #000080;"><a style="color: #000080;" href="https://docs.google.com/document/d/1_Cx2MY9_ITkFTaXfnfwZkGz8zXQzw87gKF7ZoCsHGQA/edit?usp=share_link">Espacio de trabajo&nbsp;</a></span> <ul> <li><span style="font-size: 12pt; font-family: arial, helvetica, sans-serif; color: #000080;"><a style="color: #000080;" href="https://docs.google.com/document/d/158wJcPMkdp-2d8gbGXPm2ZPLgUUDtMATH3L4en0bF0k/edit?usp=share_link">Espacio de trabajo propio</a></span></li> </ul> </li> <li><span style="font-size: 12pt; font-family: arial, helvetica, sans-serif; color: #000080;"><a style="color: #000080;" href="https://docs.google.com/document/d/1Oo98N2liZ3Tbu73_E3ZdjBDAZDDDAh7lHz8JtpKqJqE/edit?usp=share_link">Uso del ba&ntilde;o</a></span></li> <li><span style="font-size: 12pt; font-family: arial, helvetica, sans-serif; color: #000080;"><a style="color: #000080;" href="https://docs.google.com/document/d/1pfH6FkYK3wlH3p4JQoyEs647qSgsShAzXBayA64uZVE/edit?usp=share_link">Uso de la refrigeradora</a></span> <ul> <li><span style="font-size: 12pt; font-family: arial, helvetica, sans-serif; color: #000080;"><a style="color: #000080;" href="https://docs.google.com/document/d/17Km2yT6wQLCXt-rkKOqXS2khII-blaOJ_mq8d3Qid-k/edit?usp=share_link">Consumo de alimentos</a></span></li> </ul> </li> </ul> <p><span style="font-size: 12pt; font-family: arial, helvetica, sans-serif;"><em><strong>Parte 2:</strong></em></span></p> <ul> <li><span style="font-size: 12pt; font-family: arial, helvetica, sans-serif; color: #000080;"><a style="color: #000080;" href="https://docs.google.com/document/d/1yXfZJBI2JCY-dtSbwv6FXU1W0jMRi6mZSmi4xEqdYww/edit?usp=share_link">Relaciones profesionales</a></span> <ul> <li><span style="font-size: 12pt; font-family: arial, helvetica, sans-serif; color: #000080;"><a style="color: #000080;" href="https://docs.google.com/document/d/1zOJJnpf_NuLJs5zMYXbryFATPUyeUC3vTM0rFaZAcoM/edit?usp=share_link">Problemas internos entre compa&ntilde;eros</a></span></li> <li><span style="font-size: 12pt; font-family: arial, helvetica, sans-serif; color: #000080;"><a style="color: #000080;" href="https://docs.google.com/document/d/1O_1TJrH5icb0Fnc9DDWffIc4dGmXgaJSUsGo4_5E5mA/edit?usp=share_link">Relaciones entre compa&ntilde;eros</a></span></li> </ul> </li> <li><span style="font-size: 12pt; font-family: arial, helvetica, sans-serif; color: #000080;"><a style="color: #000080;" href="https://docs.google.com/document/d/1yoKthi5BtPW43tH6IM0VgvwOUaPIUonT-x5dUvKeN2o/edit?usp=share_link">Relaciones cordiales</a></span></li> </ul> <p><span style="font-size: 12pt; font-family: arial, helvetica, sans-serif;"><em><strong>Parte 3:</strong></em></span></p> <ul> <li><span style="font-size: 12pt; font-family: arial, helvetica, sans-serif; color: #000080;"><a style="color: #000080;" href="https://docs.google.com/document/d/1C3itl972G5lsiswZJRG9DLPOFnUxXAH_BZvjMC_IM-k/edit?usp=share_link">Creaci&oacute;n de boletas</a></span></li> <li><span style="font-size: 12pt; font-family: arial, helvetica, sans-serif; color: #000080;"><a style="color: #000080;" href="https://docs.google.com/document/d/1VfGkcPvZNO1U00DlybtABqcLcONcvl9TFvmldvUqzHY/edit?usp=share_link">Manejo de boletas</a></span></li> <li><span style="font-size: 12pt; font-family: arial, helvetica, sans-serif; color: #000080;"><a style="color: #000080;" href="https://docs.google.com/document/d/1awCSWX2KvJS4iJwMeLcSZTErcTRIww0ZT6j-fPGuiLU/edit?usp=share_link">Programas necesarios para trabajar en CRFUSION</a></span></li> <li><span style="font-size: 12pt; font-family: arial, helvetica, sans-serif; color: #000080;"><a style="color: #000080;" href="https://docs.google.com/document/d/1v-gB6cHimn7G4d1K17dk2QSDjg_JBWYfxdF522kam48/edit?usp=share_link">Programas externos en la computadora</a></span></li> </ul> <p><span style="font-size: 12pt; font-family: arial, helvetica, sans-serif;"><em><strong>Parte 4:</strong></em></span></p> <ul> <li><span style="font-size: 12pt; font-family: arial, helvetica, sans-serif; color: #000080;"><a style="color: #000080;" href="CRFUSION-Internos-Parte-4-SAC">SAC</a></span></li> <li><span style="font-size: 12pt; font-family: arial, helvetica, sans-serif; color: #000080;"><a style="color: #000080;" href="CRFUSION-Internos-Parte-4-TI">TI</a></span></li> </ul> <p><span style="color: #000080; font-size: 12pt; font-family: arial, helvetica, sans-serif;"><strong><em><span style="color: #000000;">Procesos especiales Generales:</span></em></strong></span></p> <ul> <li><span style="color: #000080; font-size: 12pt; font-family: arial, helvetica, sans-serif;"><a style="color: #000080;" href="CRFUSION-Internos-especiales-WIKIS">Wikis</a></span></li> <li><span style="color: #000080; font-size: 12pt; font-family: arial, helvetica, sans-serif;"><a style="color: #000080;" href="CRFUSION-Internos-especiales-General-Procesos-de-compra">Proceso de compras de empresa</a></span></li> <li><span style="font-size: 12pt; font-family: arial, helvetica, sans-serif; color: #000080;"><a style="color: #000080;" href="CRFUSION-Internos-especiales-Redes-Sociales-General">Redes Sociales empresariales</a></span></li> <li><span style="font-family: arial, helvetica, sans-serif; font-size: 12pt; color: #000080;"><a style="color: #000080;" href="CRFUSION-Internos-Otros">Otros</a></span></li> </ul> <p><span style="color: #000000;"><em><strong><span style="font-family: arial, helvetica, sans-serif; font-size: 12pt;">CRFUSION:</span></strong></em></span></p> <ul> <li><span style="font-family: arial, helvetica, sans-serif; font-size: 12pt; color: #000080;"><a style="color: #000080;" href="CRFUSION-Internos-Repositorio-Configuracion">Repositorio: Configuraci&oacute;n</a></span></li> <li><a href="CRFUSION-Internos-Actualizaciones"><span style="font-family: arial, helvetica, sans-serif; font-size: 12pt; color: #000080;">Actualizaciones</span></a></li> </ul>

# CRONUS Mantenimiento Inventario Productos Composición

![](https://ayuda.cronuserp.com/uploads/images/migrated/Screenshot_2.png)<span style="font-size: 12pt; font-family: arial, helvetica, sans-serif;">Para crear una composición debemos ingresar al menú de "PRODUCTOS", aquí debemos darle click al ícono de la llave para que nos desbloquee las opciones dentro de dicha pantalla : </span>

<span style="font-size: 12pt; font-family: arial, helvetica, sans-serif;">Una vez que desbloqueamos nuestra pantalla de productos, buscamos el producto que deseamos crear la composición, lo marcamos posicionándonos sobre él de tal manera que se nos marque en color amarillo y una vez marcado el producto principal; nos dirigimos al menú de Utilitarios =&gt; Producción =&gt; Composición:</span>

[![Screenshot_3.png](https://ayuda.cronuserp.com/uploads/images/gallery/2025-08/scaled-1680-/screenshot-3.png)](https://ayuda.cronuserp.com/uploads/images/gallery/2025-08/screenshot-3.png)<span style="font-size: 12pt; font-family: arial, helvetica, sans-serif;"></span>

<span style="font-size: 12pt; font-family: arial, helvetica, sans-serif;">Cuando ingresamos a Composición el sistema nos mostrará la siguiente pantalla: </span>

 ![](https://ayuda.cronuserp.com/uploads/images/migrated/Screenshot_4.png)<span style="font-size: 12pt; font-family: arial, helvetica, sans-serif;"></span>

<span style="font-size: 12pt; font-family: arial, helvetica, sans-serif;">Aquí debemos buscar los productos que deseamos que se componga nuestro producto principal de tal manera que buscamos por palabras claves en el campo de producto (como se muestra en la imagen) y una vez encontrado lo enviamos a la parte de abajo con un doble click sobre él: </span>

 ![](https://ayuda.cronuserp.com/uploads/images/migrated/Screenshot_5.png)<span style="font-size: 12pt; font-family: arial, helvetica, sans-serif;"></span>

<span style="font-size: 12pt; font-family: arial, helvetica, sans-serif;">Y el sistema lo mostrará en el siguiente campo: </span>

 ![](https://ayuda.cronuserp.com/uploads/images/migrated/Screenshot_6.png)<span style="font-size: 12pt; font-family: arial, helvetica, sans-serif;"></span>

<span style="font-size: 12pt; font-family: arial, helvetica, sans-serif;">Donde debemos elegir como se muestra en la imagen de arriba:</span>

1. <span style="font-size: 12pt; font-family: arial, helvetica, sans-serif;">La cantidad a escoger.</span>
2. <span style="font-size: 12pt; font-family: arial, helvetica, sans-serif;">Si deseamos que sea opcional o no (es decir que sea obligatorio a la hora de la selección del producto ) . </span>
3. <span style="font-size: 12pt; font-family: arial, helvetica, sans-serif;">Y le damos al botón de "**Guardar Cambio** " . </span>
 
<span style="font-size: 12pt; font-family: arial, helvetica, sans-serif;">Una vez que guardamos el cambio el sistema lo va a ir mostrando de esta manera: </span>

 ![](https://ayuda.cronuserp.com/uploads/images/migrated/Screenshot_7.png)<span style="font-size: 12pt; font-family: arial, helvetica, sans-serif;"></span>

<span style="font-size: 12pt; font-family: arial, helvetica, sans-serif;">También tenemos la opción de guardar por clasificación, en esta debemos escoger la familia, categoría y subcategoría que lo componen y mismos pasos que el proceso anterior por producto, que seguidamente escogemos la cantidad a escoger, check opcional y presionamos guardar cambios.</span>

 ![](https://ayuda.cronuserp.com/uploads/images/migrated/Screenshot_8.png)<span style="font-size: 12pt; font-family: arial, helvetica, sans-serif;"></span>

<span style="font-size: 12pt; font-family: arial, helvetica, sans-serif;">Una vez guardados los cambios nos va a ir mostrando las selecciones en la pantalla de abajo : </span>

 ![](https://ayuda.cronuserp.com/uploads/images/migrated/Screenshot_9.png)[![insumed.png](https://ayuda.cronuserp.com/uploads/images/gallery/2025-08/scaled-1680-/insumed.png)](https://ayuda.cronuserp.com/uploads/images/gallery/2025-08/insumed.png)[](https://ayuda.cronuserp.com/uploads/images/gallery/2025-08/insumed.png)<span style="font-size: 12pt; font-family: arial, helvetica, sans-serif;"></span>

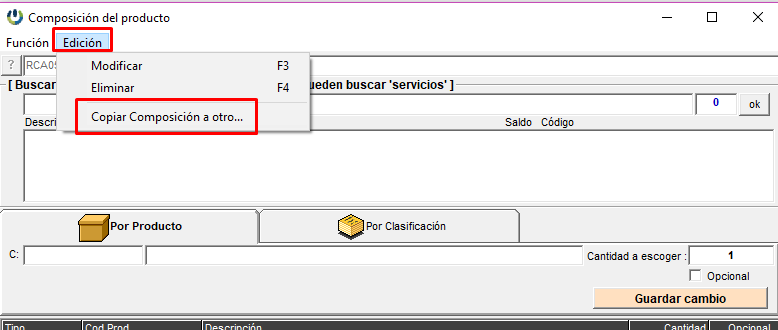
<span style="font-size: 12pt; font-family: arial, helvetica, sans-serif;">Podemos copiar las composiciones de un producto a los demás con la opción que vemos arriba en la opción de EDICIÓN y aquí damos click en "Copiar composición a otro":</span>

<span style="font-size: 12pt; font-family: arial, helvetica, sans-serif;"></span>

<span style="font-size: 12pt; font-family: arial, helvetica, sans-serif;">Una vez que le damos click en este icono el sistema nos muestra la siguiente pantalla, donde debemos digitar el código del producto al que deseamos copiarle la composición y le damos "**OK**":</span>

<span style="font-size: 12pt; font-family: arial, helvetica, sans-serif;">![insumed 2.png](/files/CRONUS-Mantenimiento-Inventario-Productos-Composicion/insumed%202.png)</span>

<span style="font-size: 12pt; font-family: arial, helvetica, sans-serif;">Mediante esa alternativa tenemos la opción de copiar nuestras composiciones a los productos que deseamos.</span>

<span style="font-size: 12pt; font-family: arial, helvetica, sans-serif;">**<span style="color: #ff0000;">Puntos importantes a tomar en cuenta: </span>**</span>

1. <span style="color: #000000; font-size: 12pt; font-family: arial, helvetica, sans-serif;">No puede repetirse la composición del producto en la escogencia del mismo, es decir, no puede ser los mismos parámetros en la opción de "por producto" y "por clasificación" , en caso de usar los dos parámetros. </span>
2. <span style="font-size: 12pt; font-family: arial, helvetica, sans-serif;">Se puede escoger cualquiera de las dos opciones, no es obligatorio las dos. </span>
3. <span style="font-size: 12pt; font-family: arial, helvetica, sans-serif;">Si guardan las dos, cuando realicen la escogencia al facturar el sistema los obligará a incluir los dos campos, si los dejaron como "obligatorio" (check desmarcado de opcional). </span>
4. <span style="font-size: 12pt; font-family: arial, helvetica, sans-serif;">Se puede agregar o modificar la composición cuando así lo necesiten. </span>
5. <span style="font-size: 12pt; font-family: arial, helvetica, sans-serif;">Para eliminar o modificar una línea de la composición, basta con posicionarse sobre ella y darle doble click y el sistema les mostrará la siguiente pantalla, le damos que "**SI**" y la línea se nos mostrará en la opción de arriba para ser modificada o eliminada.</span>
 
 ![](https://ayuda.cronuserp.com/uploads/images/migrated/Screenshot_10.png)<span style="font-size: 12pt; font-family: arial, helvetica, sans-serif;"></span>

<span style="font-size: 12pt; font-family: arial, helvetica, sans-serif;">Listo una vez que terminemos nada más nos salimos de la pantalla y ya el producto quedó guardado con las configuraciones respectivas de su composición. </span>

<span style="font-size: 12pt; font-family: arial, helvetica, sans-serif;">Luego de terminar esta parte, puede ir a crear la producción de la siguiente [forma .](https://ayuda.cronuserp.com/books/wiki-cronus-erp/page/Ejecucin-de-la-produccin)</span>

# CRONUS-Movimientos-Cajas-Recibos-adelantados

<h1 id="toc0"><span style="font-size: 14pt; color: #ff0000;"><strong>&iquest;C&oacute;mo hacer un recibo por adelanto de dinero?</strong></span></h1> <p style="text-align: justify;"><span style="font-size: 12pt; font-family: arial, helvetica, sans-serif;">Desde el men&uacute; principal de Cronus presione el bot&oacute;n <strong>"Recibos"</strong> y de la pantalla siguiente el bot&oacute;n<strong> "Incluir"</strong>.</span></p> <p style="text-align: justify;"><span style="font-size: 12pt; font-family: arial, helvetica, sans-serif;"><img style="display: block; margin-left: auto; margin-right: auto;" src="/files/CRONUS-Movimientos-Cajas-Recibos-adelantados/imagen%2002.png" alt="imagen 02.png" width="943" height="458" /></span></p> <p style="text-align: justify;">&nbsp;</p> <p style="text-align: justify;"><span style="font-size: 12pt; font-family: arial, helvetica, sans-serif;">En la pantalla de detalle del recibo debe definir el cliente, la moneda (Local o D&oacute;lares) y el tipo de recibo, para este caso el que dice <strong>AD - Adelanto</strong>. Este tipo de recibo aplica para situaciones en las que el cliente da dinero a la empresa sin tener de por medio una factura de compra o un apartado.</span></p> <p style="text-align: justify;"><span style="font-size: 12pt; font-family: arial, helvetica, sans-serif;">Al definirle el cliente al recibo, el campo de fecha queda bloqueado y podr&aacute; ver el tipo de cambio del d&oacute;lar incluido para ese d&iacute;a. Una vez escogidos estos datos debe de presionar el bot&oacute;n <strong>"Definir forma de pago"</strong> para agregar el monto del adelanto.</span></p> <p style="text-align: justify;"><span style="font-size: 12pt; font-family: arial, helvetica, sans-serif;"><img style="display: block; margin-left: auto; margin-right: auto;" src="/files/CRONUS-Movimientos-Cajas-Recibos-adelantados/imagen%2003.png" alt="imagen 03.png" width="803" height="583" /></span></p> <p style="text-align: justify;">&nbsp;</p> <p style="text-align: justify;"><span style="font-size: 12pt; font-family: arial, helvetica, sans-serif;">Datos importantes de esta pantalla, el usuario puede digitar un n&uacute;mero de recibo f&iacute;&shy;sico y tiene la posibilidad de redactar un detalle describiendo datos valiosos.</span></p> <p style="text-align: justify;"><span style="font-size: 12pt; font-family: arial, helvetica, sans-serif;">Desde la pantalla de forma de pago, debe de indicarle al sistema de que manera el cliente le est&aacute; entregando el adelanto de dinero, las opciones son efectivo, tarjeta, cheque o transferencia, puede escoger una solo o una combinaci&oacute;n de ellas. Dependiendo de la forma de pago as&iacute;&shy; ser&aacute; la informaci&oacute;n que debe de llenar. Por ejemplo; si el cliente paga por medio de una transferencia bancaria, lo primero es definir si fue en una cuenta en d&oacute;lares o en moneda local, luego a cual cuenta corriente hizo el pago, el n&uacute;mero de transferencia , la fecha y por &uacute;ltimo el monto.</span></p> <p style="text-align: justify;"><span style="font-size: 12pt; font-family: arial, helvetica, sans-serif;"><img style="display: block; margin-left: auto; margin-right: auto;" src="/files/CRONUS-Movimientos-Cajas-Recibos-adelantados/imagen%2004.png" alt="imagen 04.png" width="722" height="559" /></span></p> <p style="text-align: justify;">&nbsp;</p> <p style="text-align: justify;"><span style="font-size: 12pt; font-family: arial, helvetica, sans-serif;">Al digitar el monto del pago el sistema le mostrar&aacute; en la parte de abajo de la pantalla ese mismo monto en d&oacute;lares y en colones (conversi&oacute;n seg&uacute;n el tipo de cambio ingresado en la fecha definida para el recibo).</span></p> <p style="text-align: justify;"><span style="font-size: 12pt; font-family: arial, helvetica, sans-serif;">Una vez registrada la forma de pago y confirmado por parte del usuario que la informaci&oacute;n ha sido ingresada correctamente, se debe de presionar el bot&oacute;n <strong>"Aceptar"</strong>, en este punto el sistema asignara un consecutivo interno para este recibo y le dar&aacute; la opci&oacute;n para imprimirlo.</span></p> <h1 id="toc0" style="text-align: justify;"><span style="font-size: 12pt; font-family: arial, helvetica, sans-serif; color: #000000;"><strong>&iquest;C&oacute;mo aplicar un recibo por adelanto de dinero?</strong></span></h1> <p style="text-align: justify;"><span style="font-size: 12pt; font-family: arial, helvetica, sans-serif;">Hay dos formas de aplicar un recibo de adelanto: 1. Al hacer la factura de contado y asociando el recibo de adelanto como forma de pago y 2. Utilizando el adelanto de dinero como pago a un documento de cr&eacute;dito ya incluido en el sistema (Facturas, notas de d&eacute;bito, Notas de cr&eacute;dito). En cualquiera de los dos casos el documento debe de tener el mismo n&uacute;mero de cliente del recibo, si por alguna raz&oacute;n el recibo qued&oacute; para el cliente 1 y la factura para el cliente 2, no se puede realizar la liga entre ambos documentos.</span></p> <p style="text-align: justify;">&nbsp;</p> <p style="text-align: justify;"><span style="font-size: 12pt; font-family: arial, helvetica, sans-serif;"><strong>1. Al hacer una factura de contado y asociarle el recibo de adelanto:</strong> al terminar de hacer una factura de contado, el sistema le muestra la pantalla de forma de pago, despliegue el&nbsp; combo de opciones de la columna&nbsp;<strong>"Forma de pago"</strong> y elija la que dice "<strong>Recibo</strong>" (para nuestro ejemplo ser&iacute;a "Recibo $").&nbsp;Al lado derecho se van habilitar todos los recibos en $ que este cliente tenga con saldo a favor, escoja el que desea ligar a esta factura.</span></p> <p style="text-align: justify;"><span style="font-size: 12pt; font-family: arial, helvetica, sans-serif;"><img style="display: block; margin-left: auto; margin-right: auto;" src="/files/CRONUS-Movimientos-Cajas-Recibos-adelantados/imagen%2006.2.png" alt="imagen 06.2.png" width="1215" height="368" /></span></p> <p style="text-align: justify;">&nbsp;</p> <p style="text-align: justify;"><span style="font-size: 12pt; font-family: arial, helvetica, sans-serif;">En el caso que el monto de la factura sea mayor al saldo del recibo, en la siguiente l&iacute;nea deber&aacute; de ingresar alguna otra forma de pago para cancelar la factura, si por el contrario el monto de la factura es menor al saldo a favor del cliente, del recibo se rebajar&iacute;a el monto de esta compra y quedar&iacute;a la diferencia para ser aplicada a una futura compra. Una vez completada la forma de pago, presione el bot&oacute;n "<strong>Aceptar</strong>" para completar el proceso.</span></p> <p style="text-align: justify;"><span style="font-size: 12pt; font-family: arial, helvetica, sans-serif;"><img style="display: block; margin-left: auto; margin-right: auto;" src="/files/CRONUS-Movimientos-Cajas-Recibos-adelantados/imagen%2008.png" alt="imagen 08.png" width="732" height="585" /></span></p> <p style="text-align: justify;">&nbsp;</p> <p style="text-align: justify;"><span style="font-size: 12pt; font-family: arial, helvetica, sans-serif;"><strong>2.&nbsp;Utilizando el adelanto de dinero como pago a un documento de cr&eacute;dito ya incluido en el sistema:</strong> Si el cliente tiene una cuenta de cr&eacute;dito, y tiene facturas con saldo es posible ligar los recibos de adelanto para cancelarlas o afectar su saldo actual. Desde la pantalla de facturas, busque el n&uacute;mero de factura en el filtro y haga click derecho sobre ella, luego escoja las opciones Aplicaciones de documentos ==&gt; Aplicar documentos incluidos a otros.</span></p> <p style="text-align: justify;"><span style="font-size: 12pt; font-family: arial, helvetica, sans-serif;"><img style="display: block; margin-left: auto; margin-right: auto;" src="/files/CRONUS-Movimientos-Cajas-Recibos-adelantados/imagen%2009.png" alt="imagen 09.png" width="799" height="546" /></span></p> <p style="text-align: justify;">&nbsp;</p> <p style="text-align: justify;"><span style="font-size: 12pt; font-family: arial, helvetica, sans-serif;">En la pantalla siguiente ver&aacute; los datos de la factura y los recibos disponibles con saldo, en la columna "<strong>Utilizar</strong>" haga doble click sobre la l&iacute;nea del recibo, esta se marcar&aacute; con una "<strong>X</strong>" y quedar&aacute; de color amarillo, en la columna de la derecha puede definir un monto inferior al recibo, por ejemplo,&nbsp; el recibo #11041 tiene un saldo de $5,000, pero solo vamos a aplicar $2.925 a la factura y dejar el restante para ser aplicado en otro documento.</span></p> <p style="text-align: justify;"><span style="font-size: 12pt; font-family: arial, helvetica, sans-serif;">En la parte inferior izquierda de la pantalla ver&aacute; el total del recibo aplicado y el saldo actual de la factura, cuando este seguro que los datos son correctos, presione el bot&oacute;n "<strong>Aceptar</strong>" para realizar el proceso.</span></p> <p style="text-align: justify;"><span style="font-size: 12pt; font-family: arial, helvetica, sans-serif;"><img style="display: block; margin-left: auto; margin-right: auto;" src="/files/CRONUS-Movimientos-Cajas-Recibos-adelantados/imagen%2010.png" alt="imagen 10.png" width="762" height="592" /></span></p> <p style="text-align: justify;">&nbsp;</p> <p style="text-align: justify;"><span style="font-size: 12pt; font-family: arial, helvetica, sans-serif;"><strong>Recibos de adelanto y cierre de caja</strong></span></p> <p style="text-align: justify;"><span style="font-size: 12pt; font-family: arial, helvetica, sans-serif;">El recibo por adelantos de dinero funcionan igual que cualquier otro tipo de recibo a la hora de verlo en el cierre de caja, la forma de distinguirlo es por su nombre "<strong>Adelanto</strong>", el usuario encargado de realizar el cierre de caja debe de registrar este pago el d&iacute;a que se hizo el recibo. Es indistinto si el recibo va a ser aplicado a una compra al d&iacute;a siguiente o dentro de un a&ntilde;o, este debe de entrar en el cierre de caja el d&iacute;a que se registr&oacute; en el sistema.</span></p> <p style="text-align: justify;"><img style="display: block; margin-left: auto; margin-right: auto;" src="/files/CRONUS-Movimientos-Cajas-Recibos-adelantados/imagen%2011.png" alt="imagen 11.png" width="820" height="625" /></p>

# CRONUS Movimientos Comisiones Comisiones Tipo I

<ul> <li style="text-align: justify;"><span style="font-size: 12pt; font-family: arial, helvetica, sans-serif;">Se calcula el porcentaje alcanzado desde el inicio del mes hasta la fecha de corte.</span> <ul> <li><span style="font-size: 12pt; font-family: arial, helvetica, sans-serif;">Porcentaje = Ventas totales / Meta</span></li> <li><span style="font-size: 12pt; font-family: arial, helvetica, sans-serif;">Inicio del mes.</span></li> <li><span style="font-size: 12pt; font-family: arial, helvetica, sans-serif;">Corte de la Comisi&oacute;n.</span></li> </ul> </li> <li style="text-align: justify;"><span style="font-size: 12pt; font-family: arial, helvetica, sans-serif;">El agente debe tener Metas definidas para ese mes.</span></li> <li style="text-align: justify;"><span style="font-size: 12pt; font-family: arial, helvetica, sans-serif;">Documentos Activos y sin NC aplicadas.</span></li> <li style="text-align: justify;"><span style="font-size: 12pt; font-family: arial, helvetica, sans-serif;">Solo con el agente principal.</span></li> <li style="text-align: justify;"><span style="font-size: 12pt; font-family: arial, helvetica, sans-serif;">El usuario que calcula debe tener acceso a las sucursales.</span></li> </ul>

# CRONUS Mantenimiento Inventario Productos Costos

<span style="font-size: 12pt; font-family: arial, helvetica, sans-serif;">**Derechos**</span>

- <span style="font-size: 12pt; font-family: arial, helvetica, sans-serif;">"MPROD\_ADM1" acceder a la lista de producto.</span>
- <span style="font-size: 12pt; font-family: arial, helvetica, sans-serif;">"MODPROD02" permite presionar "Aceptar" en la pantalla.</span>

<span style="font-size: 12pt; font-family: arial, helvetica, sans-serif;">CRONUS de forma automática puede alterar el Costo de Fábrica y por ende recalcular los precios de venta, para esto tome en cuenta lo siguiente:</span>

<span style="font-size: 12pt; font-family: arial, helvetica, sans-serif;">**¿Cuándo aplica?**</span>

- <span style="font-size: 12pt; font-family: arial, helvetica, sans-serif;">El producto debe tener porcentajes de utilidad asociados, si ha digitado un precio manual este NO se puede recalcular.</span>
- <span style="font-size: 12pt; font-family: arial, helvetica, sans-serif;">El indicador de "Manipular Costo Sistema" debe estar desmarcado, esto porque al marcarlo se le indica a CRONUS que ya el precio final NO depende del Costo de Fábrica.</span>
- <span style="font-size: 12pt; font-family: arial, helvetica, sans-serif;">Debe conocer cómo funciona el cálculo de precio.</span>

<span style="font-size: 12pt; font-family: arial, helvetica, sans-serif;">**Productos**</span>

<span style="font-size: 12pt; font-family: arial, helvetica, sans-serif;">En la Cejilla "2.Indicador", puede acceder a las dos alternativas que se marcan en el dibujo.</span>

[![costos 1.png](https://ayuda.cronuserp.com/uploads/images/gallery/2026-07/scaled-1680-/costos-1.png)](https://ayuda.cronuserp.com/uploads/images/gallery/2026-07/costos-1.png)

1. <span style="font-size: 12pt; font-family: arial, helvetica, sans-serif;">Marque la primera opción para que cuando se haga una compra el COSTO de FÁBRICA se modifique de forma automática.</span>
2. <span style="font-size: 12pt; font-family: arial, helvetica, sans-serif;">Marque la segunda opción para que cambie aún cuando el nuevo costo sea inferior al costo actual (en otras palabras el costo de compra al proveedor es más barato y se va a trasladar el beneficio al consumidor).</span>

<span style="font-size: 12pt; font-family: arial, helvetica, sans-serif;">Estos dos checks están desmarcados por defecto, si quisiera que CRONUS los sugiera al incluir todos los productos debe hacerlo en las Opciones Generales.</span>

[![costos2.png](https://ayuda.cronuserp.com/uploads/images/gallery/2026-07/scaled-1680-/costos2.png)](https://ayuda.cronuserp.com/uploads/images/gallery/2026-07/costos2.png)

<span style="font-size: 12pt; font-family: arial, helvetica, sans-serif;">Una vez que lo haga esto aplica para todos los productos que se incluyen a partir de este momento, más no cambia los productos previamente incluidos.</span>

---

# **<span style="font-size: 12pt; font-family: arial, helvetica, sans-serif;">CRONUS/Fórmulas de costeo:</span>**

<span style="font-size: 12pt; font-family: arial, helvetica, sans-serif;">**¿Qué es la Fórmula de costeo y como se registra en Cronus?** </span>

<span style="font-size: 12pt; font-family: arial, helvetica, sans-serif;">Muy bien, la fórmula de costeo es un % de descuento fijo negociado con un proveedor para los productos que le compra mi empresa. Ejemplo; un proveedor me entrega la lista de sus productos con los precios del mercado en general y a mi me aplica un 30% de descuento, este sería mi margen de utilidad a la hora de vender sus productos. Inclusive, podríamos tener negociados diferentes % de descuento dependiendo de las marcas o líneas de un producto.</span>

<span style="font-size: 12pt; font-family: arial, helvetica, sans-serif;">Para registrar estos % de descuentos fijos en Cronus debe de entrar a **Inventarios ==&gt; Costeo ==&gt; Fórmulas de Costeo:** </span>

[![costeo 1.png](https://ayuda.cronuserp.com/uploads/images/gallery/2026-07/scaled-1680-/costeo-1.png)](https://ayuda.cronuserp.com/uploads/images/gallery/2026-07/costeo-1.png)

<span style="font-size: 12pt; font-family: arial, helvetica, sans-serif;">En esta pantalla podrá incluir todas las fórmulas de costeo que tenga negociadas con sus proveedores, puede ingresar "N" cantidad de fórmulas al sistema y a cada producto le puede definir una diferente. Para esto solamente presione el botón **"agregar"**, defina un código (alfanumérico de 3 caracteres), una descripción que le permita identificar la fórmula y el factor de costeo. Ejemplo; si el descuento es del 30% en el sistema debe de ingresar 0.70, por último presione el botón **"Aceptar"** para guardar la información. </span>

[![COSTEO AGREGAR.png](https://ayuda.cronuserp.com/uploads/images/gallery/2026-07/scaled-1680-/costeo-agregar.png)](https://ayuda.cronuserp.com/uploads/images/gallery/2026-07/costeo-agregar.png)

<span style="font-size: 12pt; font-family: arial, helvetica, sans-serif;">**Notas:**</span>

<div class="editable content mb-3" id="bkmrk-el-sistema-le-permit">- <span style="font-size: 12pt; font-family: arial, helvetica, sans-serif;">El sistema le permite **eliminar** fórmulas siempre y cuando éstas **NO** estén asociadas a un producto.</span>
- <span style="font-size: 12pt; font-family: arial, helvetica, sans-serif;">El sistema le permite **modificar** datos de las fórmulas (descripción y factor de costeo), pero guarda una bitácora con el día, la hora, el rubro y la cantidad de productos que estaban relacionados en ese momento a esa fórmula.</span>
- <span style="font-size: 12pt; font-family: arial, helvetica, sans-serif;">Si modifica una fórmula de costeo debe de recalcular los precios de venta de sus productos.</span>

</div><span style="font-size: 12pt; font-family: arial, helvetica, sans-serif;">**¿Cuál es la función de esta fórmula de costeo en el sistema?**</span>

<span style="font-size: 12pt; font-family: arial, helvetica, sans-serif;">Por cada producto el sistema cuenta diferentes costos:</span>

<div class="editable content mb-3" id="bkmrk-costo-de-compra%3A%C2%A0%C3%9Alt">- <span style="font-size: 12pt; font-family: arial, helvetica, sans-serif;">**Costo de compra:** Último precio con el que se compró un producto.</span>
- <span style="font-size: 12pt; font-family: arial, helvetica, sans-serif;">**Costo promedio (C.P):** Sale de la suma de todos los costos de un producto entre la cantidad total en inventario.</span>
- <span style="font-size: 12pt; font-family: arial, helvetica, sans-serif;">**Costo de fábrica (C.F):** Son lo precios de lista dados por el proveedor al público en general</span>
- <span style="font-size: 12pt; font-family: arial, helvetica, sans-serif;">**Costo estándar (C.E):** Sale de multiplicar el costo de fábrica por la fórmula de costeo.</span>
- <span style="font-size: 12pt; font-family: arial, helvetica, sans-serif;">**Costo sistema (C.S):** Sale de multiplicar el costo estándar por el factor de costo.</span>

</div><span style="font-size: 12pt; font-family: arial, helvetica, sans-serif;">Ahora, en Cronus cada producto cuenta con 6 precios de venta, estos precios puede ser definidos manualmente por un encargado o calculados automáticamente indicando un % de utilidad. Estos % de utilidad se calculan según el **costo sistema** (definición anterior). </span>

<span style="font-size: 12pt; font-family: arial, helvetica, sans-serif;">Ejemplo: Quiero que mi producto tenga una ganancia del 20% de utilidad en el precio 1, el cálculo sería el siguiente:</span>

<div class="editable content mb-3" id="bkmrk-el-costo-sistema-es-">- <span style="font-size: 12pt; font-family: arial, helvetica, sans-serif;">El costo sistema es de 7,000</span>
- <span style="font-size: 12pt; font-family: arial, helvetica, sans-serif;">El cálculo sería: C.S 7,000 / 0.80 (20% utilidad)</span>
- <span style="font-size: 12pt; font-family: arial, helvetica, sans-serif;">El precio de venta es de 8,750 + IVA.</span>

</div><span style="font-size: 12pt; font-family: arial, helvetica, sans-serif;">  
</span>

<span style="font-family: arial, helvetica, sans-serif; font-size: 12pt;">**Manipular C.S**</span>

<span style="font-size: 12pt; font-family: arial, helvetica, sans-serif;">La forma en que el sistema trabaja con los costos es la siguiente: </span>

<span style="font-size: 12pt; font-family: arial, helvetica, sans-serif;">El **Costo de fábrica** (proveniente de la orden de compra) se multiplica por una fórmula que genera el **Costo estándar**. Este, a su vez, se multiplica por el **factor de costo**, lo que da como resultado el **Costo sistema**. A partir del costo sistema se calculan los precios de venta, basados en el porcentaje de utilidad.</span>

<span style="font-size: 12pt; font-family: arial, helvetica, sans-serif;">  
Ahora bien, si está activado el indicador **"Manipular C.S."**, se anula automáticamente esta formulación. Es decir, el costo sistema **no se actualizará** al cambiar el costo de fábrica.  
Si se requiere que el costo sistema se actualice automáticamente según el costo de fábrica (orden de compra), el indicador **"Manipular C.S."** debe estar **desactivado**.</span>

<span style="font-size: 12pt; font-family: arial, helvetica, sans-serif;">[![costo sistema.png](https://ayuda.cronuserp.com/uploads/images/gallery/2026-07/scaled-1680-/costo-sistema.png)](https://ayuda.cronuserp.com/uploads/images/gallery/2026-07/costo-sistema.png)</span>


<span style="font-size: 12pt; font-family: arial, helvetica, sans-serif;">**Cronus ERP puede asignar el precio final de forma automática, inclusive redondeado para evitar problemas de vueltos.**</span>

<span style="font-size: 12pt; font-family: arial, helvetica, sans-serif;">**Pasos importantes a tomar en cuenta para dicho proceso:** </span>

<div class="editable content mb-3" id="bkmrk-el-campo-%E2%80%9Ccosto-de-f"><div class="editable content mb-3" style="text-align: justify;">- <span style="font-size: 12pt; font-family: arial, helvetica, sans-serif;">El campo “Costo de fábrica” tiene que venir en cada producto</span>
- <span style="font-size: 12pt; font-family: arial, helvetica, sans-serif;">El precio final del producto debe estar calculado en base a un porcentaje de utilidad fijo y NO puede ser alterado por el usuario.</span>
- <span style="font-size: 12pt; font-family: arial, helvetica, sans-serif;">El redondeo final con impuesto incluido solo es a 0, 1 , 10, 25 , 50 y 100.</span>
- <span style="font-size: 12pt; font-family: arial, helvetica, sans-serif;">El Costo de Fábrica es distinto al Costo de última compra o Costo Promedio, estos costos no necesariamente se amarran al precio final.</span>
- <span style="font-size: 12pt; font-family: arial, helvetica, sans-serif;">El “Costo sistema” con que se calcula el precio final, depende de la fórmula y su factor, si la fórmula es por defecto, esta tiene un valor de 1, entonces el costo de multiplica por 1 siempre dejando el monto igual.</span>
- <span style="font-size: 12pt; font-family: arial, helvetica, sans-serif;">El Factor de Costo que se configura en opciones generales también puede afectar el costo final, este es 1 por defecto.</span>
- <span style="font-size: 12pt; font-family: arial, helvetica, sans-serif;">CRONUS erp puede configurarse de tal forma que cambie automáticamente el costo de fábrica al comprar a un proveedor, esto inclusive puede definirse si el costo es más bajo o más alto.</span>

</div></div><span style="font-size: 12pt; font-family: arial, helvetica, sans-serif;">**Costo de fábrica**</span>

<span style="font-size: 12pt; font-family: arial, helvetica, sans-serif;">El Costo de Fábrica para calcular los precios de venta es de 5,000, pero el Costo Promedio que maneja la empresa es de 2,831, todos los cálculos para la venta al cliente se hacen el costo de fábrica.</span>

<span style="font-size: 12pt; font-family: arial, helvetica, sans-serif;">El Costo Promedio siempre está en moneda local, y los otros Costos dependen de la moneda de Venta exclusivamente.</span>

<span style="font-size: 12pt; font-family: arial, helvetica, sans-serif;">**Manejo de utilidad**</span>

<span style="font-size: 12pt; font-family: arial, helvetica, sans-serif;">Los precios finales, ahora se calculan de forma automática, como podemos ver en la imagen, los precios en este caso del 1 al 5 tienen porcentajes de utilidad definidos, y el precio 6 está digitado “manualmente” por el usuario, esto quiere decir que los primeros 5 cambian inmediatamente al cambiar el costo de fábrica e inclusive aplican redondeo a 100 (como se muestra en el segundo cuadro ) </span>

<span style="font-size: 12pt; font-family: arial, helvetica, sans-serif;">Los porcentajes de utilidad aplican la fórmula de “mark up” de la siguiente manera:</span>

<span style="font-size: 12pt; font-family: arial, helvetica, sans-serif;">Precio sin impuesto =&gt; Costo / ((100 - Utilidad) /100)</span>

<span style="font-size: 12pt; font-family: arial, helvetica, sans-serif;">En este caso =&gt; 5000 / 0.90 =&gt; 5,555.55</span>

<span style="font-size: 12pt; font-family: arial, helvetica, sans-serif;">Luego se aplica el redondeo a 100 y se aplica el impuesto, con esto nos da un número “sencillo” con impuesto incluido.</span>

<span style="font-size: 12pt; font-family: arial, helvetica, sans-serif;">Este tipo de fórmula permite al vendedor y a la gerencia conocer de antemano el porcentaje máximo de descuento a aplicar sin hacer cálculos en el momento, un ejemplo basado en el modelo común sería el siguiente: 5000 \* 1.10 = 5500, dando un precio final de 5,500 al producto con una utilidad de un 10%, ahora, el problema se da al aplicar un descuento, usualmente las personas asumen que como tienen un 10% de utilidad, pueden aplicar un 10% de descuento, pero al aplicar un 10% de descuento al precio de 5,500, tenemos ahora que el producto se vende a 4950, dejando una pérdida de 50.</span>

<span style="font-size: 12pt; font-family: arial, helvetica, sans-serif;">**Con el método de trabajo de CRONUS erp esto no ocurre.**</span>

<div class="editable content mb-3" id="bkmrk--9"></div>

# CRONUS-Movimientos-Apartados

<span style="font-size: 12pt; font-family: arial, helvetica, sans-serif;">Presione el botón **"Apartar"** ubicado en la barra de botones de la pantalla principal de Cronus.</span>

 ![](https://ayuda.cronuserp.com/uploads/images/migrated/Screenshot_1.png)<span style="font-size: 12pt; font-family: arial, helvetica, sans-serif;"></span>

 ![](https://ayuda.cronuserp.com/uploads/images/migrated/Screenshot_2.png)<span style="font-size: 12pt; font-family: arial, helvetica, sans-serif;"></span>

<span style="font-size: 12pt; font-family: arial, helvetica, sans-serif;">Para crear un apartado nuevo presionamos el botón **"Incluir"** ubicado arriba a la izquierda de la pantalla. La fecha es sugerida de forma automática por el servidor, luego debemos de identificar al cliente al que deseamos crearle el apartado, si sabe el número de código lo puede digitar, si no lo sabe, puede presionar el botón con un símbolo de pregunta ubicado abajo del campo Número y buscar en la lista, para escogerlo haga doble click sobre el nombre del cliente. También debe escoger el proyecto si aplicará que se posiciona en la parte de abajo de la casilla del cliente **( PRY )** ; y por último el agente ubicado en la parte de abajo de la casilla del proyecto ( mismo proceso que con cliente ). . </span>

[![Screenshot_3.png](https://ayuda.cronuserp.com/uploads/images/gallery/2025-08/scaled-1680-/screenshot-3.png)](https://ayuda.cronuserp.com/uploads/images/gallery/2025-08/screenshot-3.png)<span style="font-size: 12pt; font-family: arial, helvetica, sans-serif;"></span>

 ![](https://ayuda.cronuserp.com/uploads/images/migrated/Screenshot_4.png)<span style="font-size: 12pt; font-family: arial, helvetica, sans-serif;"></span>

<span style="font-size: 12pt; font-family: arial, helvetica, sans-serif;">Importante también debemos seleccionar la moneda del documento ( el sistema por default pondrá la moneda definida en el cliente ) pero si el usuario tiene permiso podrá apartar en distinta moneda a la del cliente.</span>

 ![](https://ayuda.cronuserp.com/uploads/images/migrated/Screenshot_5.png)<span style="font-size: 12pt; font-family: arial, helvetica, sans-serif;"></span>

<span style="font-size: 12pt; font-family: arial, helvetica, sans-serif;">Al lado derecho de la pantalla en la parte superior hay un campo de **Observaciones** ,en el puede hacer anotaciones o recordatorios , estas observaciones saldrán impresas en el apartado.</span>

 ![](https://ayuda.cronuserp.com/uploads/images/migrated/Screenshot_6.png)<span style="font-size: 12pt; font-family: arial, helvetica, sans-serif;"></span>

<span style="font-size: 12pt; font-family: arial, helvetica, sans-serif;">Seguidamente seria el proceso de búsqueda de productos para apartar, funciona de la misma manera que la búsqueda de clientes, si usted sabe el código del producto lo puede digitar en el campo **"Producto"** o buscarlo digitando palabras claves en el campo que dice **"Búsqueda F4"**. Al hacerlo el sistema le mostrará todos los productos que contengan esas palabras en su descripción. Para escogerlo y poderlo apartar debe de hacer doble click sobre el. Después llenar los campos de cantidad, bodega y porcentaje de descuento (si aplica) luego presione el botón **"Incluir"**. Este procedimiento lo tiene que hacer con cada producto que desee apartar. Una vez cargados todos productos, verifique los precios, las cantidades y los descuentos aplicados, si tiene que modificar alguno, solo haga doble click sobre el y modifique la información.</span>

<span style="font-size: 12pt; font-family: arial, helvetica, sans-serif;">**Super importante recalcar para este proceso que la creación de un apartado SI amarra inventario.** </span>

 ![](https://ayuda.cronuserp.com/uploads/images/migrated/Screenshot_7.png)<span style="font-size: 12pt; font-family: arial, helvetica, sans-serif;"></span>

<span style="font-size: 12pt; font-family: arial, helvetica, sans-serif;">Para crear el apartado e imprimirlo presione el botón "Aceptar" ubicado en la parte inferior izquierda de la pantalla". </span>

<span style="font-size: 12pt; font-family: arial, helvetica, sans-serif;">Por último en esta pantalla por defecto aparecen todos los documentos registrados, y ahí se pueden filtrar por fechas, ver los de hoy, hace 1 día, 1 semana o 1 mes o con rango definido. </span>

 ![](https://ayuda.cronuserp.com/uploads/images/migrated/Screenshot_8.png)<span style="font-size: 12pt; font-family: arial, helvetica, sans-serif;"></span>

<span style="font-size: 12pt; font-family: arial, helvetica, sans-serif;">Wikis relacionados:</span>

- <span style="font-size: 12pt; color: #000080; font-family: arial, helvetica, sans-serif;">[Configuración de apartados](CRONUS-Movimientos-Apartados-Apartados-Configuracion)</span>
- <span style="color: #000080; font-size: 12pt; font-family: arial, helvetica, sans-serif;">[Apartado como Pre-Factura](CRONUS-Movimientos-Apartados-Apartados-Pre-Factura "Apartado como Pre-factura")</span>

# CRONUS-Movil-Movimientos-Alisto-NP-Entrega

<span style="font-size: 12pt; font-family: arial, helvetica, sans-serif;">Para esto debemos ingresar al APP =&gt; Alisto NP =&gt; Entrega: </span>

 ![](https://ayuda.cronuserp.com/uploads/images/migrated/Screenshot_1.png)<span style="font-size: 12pt; font-family: arial, helvetica, sans-serif;"></span>

 ![](https://ayuda.cronuserp.com/uploads/images/migrated/Screenshot_2.png)<span style="font-size: 12pt; font-family: arial, helvetica, sans-serif;"></span>

<span style="font-size: 12pt; font-family: arial, helvetica, sans-serif;">Una vez en esta pantalla, nos saldrán las guías pendientes asignadas a nuestro usuario para ser tomada o rechazada. Y para esto presionamos sobre la línea que deseamos validar y el APP nos mostrará el mensaje para seleccionar lo que deseamos realizar: </span>

[![Screenshot_3.png](https://ayuda.cronuserp.com/uploads/images/gallery/2025-08/scaled-1680-/screenshot-3.png)](https://ayuda.cronuserp.com/uploads/images/gallery/2025-08/screenshot-3.png)<span style="font-size: 12pt; font-family: arial, helvetica, sans-serif;"></span>

 ![](https://ayuda.cronuserp.com/uploads/images/migrated/Screenshot_4.png)<span style="font-size: 12pt; font-family: arial, helvetica, sans-serif;"></span>

<span style="font-size: 12pt; font-family: arial, helvetica, sans-serif;">Una vez que presionamos Tomar guía, el APP nos va a mostrar un mensaje de confirmación: </span>

 ![](https://ayuda.cronuserp.com/uploads/images/migrated/Screenshot_5.png)<span style="font-size: 12pt; font-family: arial, helvetica, sans-serif;"></span>

<span style="font-size: 12pt; font-family: arial, helvetica, sans-serif;">Para proseguir con el proceso debemos, presionar **"Aceptar"**. Una vez con esto pasaremos a la pantalla donde veremos el detalle de las líneas incluidas en la misma: </span>

 ![](https://ayuda.cronuserp.com/uploads/images/migrated/Screenshot_6.png)<span style="font-size: 12pt; font-family: arial, helvetica, sans-serif;"></span>

<span style="font-size: 12pt; font-family: arial, helvetica, sans-serif;">Para procesar alguno de los documentos por entregar, debemos presionar dos veces sobre la línea: </span>

 ![](https://ayuda.cronuserp.com/uploads/images/migrated/Screenshot_7.png)<span style="font-size: 12pt; font-family: arial, helvetica, sans-serif;"></span>

<span style="font-size: 12pt; font-family: arial, helvetica, sans-serif;">De esta manera tendremos las tres opciones como podemos notar en la pantalla anterior: </span>

- <span style="font-size: 12pt; font-family: arial, helvetica, sans-serif;">Marcar como entregada.</span>
- <span style="font-size: 12pt; font-family: arial, helvetica, sans-serif;">Marcar como NO entregada.</span>
- <span style="font-size: 12pt; font-family: arial, helvetica, sans-serif;">Visualizar detalle.</span>
 

# CRONUS-Movimientos-Apartados-Apartados-Pre-Factura

<span style="color: #ff0000; font-size: 14pt; font-family: arial, helvetica, sans-serif;">**<span style="vertical-align: inherit;"><span style="vertical-align: inherit;"><span style="vertical-align: inherit;"><span style="vertical-align: inherit;"><span style="vertical-align: inherit;"><span style="vertical-align: inherit;"><span style="vertical-align: inherit;"><span style="vertical-align: inherit;"><span style="vertical-align: inherit;"><span style="vertical-align: inherit;">Puntos importantes para tomar en cuenta para dicho proceso: </span></span></span></span></span></span></span></span></span></span>**</span>

- <span style="vertical-align: inherit; color: #000000; font-size: 12pt; font-family: arial, helvetica, sans-serif;"><span style="vertical-align: inherit;"><span style="vertical-align: inherit;"><span style="vertical-align: inherit;"><span style="vertical-align: inherit;"><span style="vertical-align: inherit;"><span style="vertical-align: inherit;"><span style="vertical-align: inherit;"><span style="vertical-align: inherit;"><span style="vertical-align: inherit;">Se debe solicitar al encargado de la seguridad de su empresa el permiso con el siguiente código "APARINC3" para poder realizar dicho proceso. </span></span></span></span></span></span></span></span></span></span>
- <span style="color: #000000; font-size: 12pt; font-family: arial, helvetica, sans-serif;"><span style="vertical-align: inherit;"><span style="vertical-align: inherit;"><span style="vertical-align: inherit;"><span style="vertical-align: inherit;"><span style="vertical-align: inherit;"><span style="vertical-align: inherit;"><span style="vertical-align: inherit;"><span style="vertical-align: inherit;"><span style="vertical-align: inherit;"><span style="vertical-align: inherit;">No se pueden anular pre-facturas, una vez que ya han sido facturadas. </span></span></span></span></span></span></span></span></span></span></span>
- <span style="color: #000000; font-size: 12pt; font-family: arial, helvetica, sans-serif;"><span style="vertical-align: inherit;"><span style="vertical-align: inherit;"><span style="vertical-align: inherit;"><span style="vertical-align: inherit;"><span style="vertical-align: inherit;"><span style="vertical-align: inherit;"><span style="vertical-align: inherit;"><span style="vertical-align: inherit;"><span style="vertical-align: inherit;"><span style="vertical-align: inherit;">Se pintarán en color naranja las pre-facturas y procesadas y en blanco quedarán las pendientes de facturar: </span></span></span></span></span></span></span></span></span></span></span>
 
 ![](https://ayuda.cronuserp.com/uploads/images/migrated/Screenshot_10.png)[![Screenshot_14.png](https://ayuda.cronuserp.com/uploads/images/gallery/2025-08/scaled-1680-/screenshot-14.png)](https://ayuda.cronuserp.com/uploads/images/gallery/2025-08/screenshot-14.png)<span style="color: #000000; font-size: 12pt; font-family: arial, helvetica, sans-serif;"></span>

<span style="font-size: 12pt; font-family: arial, helvetica, sans-serif;"><span style="vertical-align: inherit;"><span style="vertical-align: inherit;"><span style="vertical-align: inherit;"><span style="vertical-align: inherit;"><span style="vertical-align: inherit;"><span style="vertical-align: inherit;"><span style="vertical-align: inherit;"><span style="vertical-align: inherit;">Presione el botón </span></span></span></span></span></span></span></span>**<span style="vertical-align: inherit;"><span style="vertical-align: inherit;"><span style="vertical-align: inherit;"><span style="vertical-align: inherit;"><span style="vertical-align: inherit;"><span style="vertical-align: inherit;"><span style="vertical-align: inherit;"><span style="vertical-align: inherit;">"Apartar" </span></span></span></span></span></span></span></span>** <span style="vertical-align: inherit;"><span style="vertical-align: inherit;"><span style="vertical-align: inherit;"><span style="vertical-align: inherit;"><span style="vertical-align: inherit;"><span style="vertical-align: inherit;"><span style="vertical-align: inherit;"><span style="vertical-align: inherit;"> ubicado en la barra de botones de la pantalla principal de Cronus. </span></span></span></span></span></span></span></span></span>

<span style="vertical-align: inherit; font-size: 12pt; font-family: arial, helvetica, sans-serif;"><span style="vertical-align: inherit;"><span style="vertical-align: inherit;"><span style="vertical-align: inherit;"><span style="vertical-align: inherit;"><span style="vertical-align: inherit;"><span style="vertical-align: inherit;"><span style="vertical-align: inherit;"><span style="vertical-align: inherit;"><span style="vertical-align: inherit;">En Apartados, se muestra el ícono de Pre-Factura ingresa a dicha opción y presiona el ícono de "Incluir"; </span></span></span></span></span><span style="vertical-align: inherit;"><span style="vertical-align: inherit;"><span style="vertical-align: inherit;"><span style="vertical-align: inherit;"><span style="vertical-align: inherit;">para iniciar con la creación del mismo:</span></span></span></span></span></span></span></span></span></span>

![](https://ayuda.cronuserp.com/uploads/images/migrated/Screenshot_2.png)<span style="vertical-align: inherit; font-size: 12pt; font-family: arial, helvetica, sans-serif;"><span style="vertical-align: inherit;"></span></span>

<span style="vertical-align: inherit; font-size: 12pt; font-family: arial, helvetica, sans-serif;"><span style="vertical-align: inherit;"><span style="vertical-align: inherit;"><span style="vertical-align: inherit;"><span style="vertical-align: inherit;"><span style="vertical-align: inherit;"><span style="vertical-align: inherit;"><span style="vertical-align: inherit;"><span style="vertical-align: inherit;"><span style="vertical-align: inherit;">En dicha pantalla debe incluir los datos y presionar el ícono de "Aceptar" como habitualmente es realizado para incluir el documento:</span></span></span></span></span></span></span></span></span></span>

<span style="vertical-align: inherit; font-size: 12pt; font-family: arial, helvetica, sans-serif;">[![Screenshot_3.png](https://ayuda.cronuserp.com/uploads/images/gallery/2025-08/scaled-1680-/screenshot-3.png)](https://ayuda.cronuserp.com/uploads/images/gallery/2025-08/screenshot-3.png)<span style="vertical-align: inherit;"></span></span>

<span style="vertical-align: inherit; font-size: 12pt; font-family: arial, helvetica, sans-serif;"><span style="vertical-align: inherit;"><span style="vertical-align: inherit;"><span style="vertical-align: inherit;"><span style="vertical-align: inherit;"><span style="vertical-align: inherit;"><span style="vertical-align: inherit;"><span style="vertical-align: inherit;"><span style="vertical-align: inherit;"><span style="vertical-align: inherit;">Ahora bien, para convertir estos documentos en factura real se va a ingresar desde la misma pantalla de apartados al botón que dice "Crédito":</span></span></span></span></span></span></span></span></span></span>

![](https://ayuda.cronuserp.com/uploads/images/migrated/Screenshot_11.png)<span style="vertical-align: inherit; font-size: 12pt; font-family: arial, helvetica, sans-serif;"><span style="vertical-align: inherit;"></span></span>

<span style="vertical-align: inherit; font-size: 12pt; font-family: arial, helvetica, sans-serif;"><span style="vertical-align: inherit;"><span style="vertical-align: inherit;"><span style="vertical-align: inherit;"><span style="vertical-align: inherit;"><span style="vertical-align: inherit;"><span style="vertical-align: inherit;"><span style="vertical-align: inherit;"><span style="vertical-align: inherit;"><span style="vertical-align: inherit;">La siguiente pantalla contiene la fecha "hasta" para buscar las Pre-Facturas pendientes que se crearon para los distintos clientes. </span></span></span></span></span></span></span><span style="vertical-align: inherit;"><span style="vertical-align: inherit;"><span style="vertical-align: inherit;"><span style="vertical-align: inherit;"><span style="vertical-align: inherit;"><span style="vertical-align: inherit;"><span style="vertical-align: inherit;">Entonces se va a definir la fecha y presionar el ícono de "Consultar Pendientes":</span></span></span></span></span></span></span></span></span></span>

![](https://ayuda.cronuserp.com/uploads/images/migrated/Screenshot_5.png)<span style="vertical-align: inherit; font-size: 12pt; font-family: arial, helvetica, sans-serif;"><span style="vertical-align: inherit;"></span></span>

<span style="vertical-align: inherit; font-size: 12pt; font-family: arial, helvetica, sans-serif;"><span style="vertical-align: inherit;"><span style="vertical-align: inherit;"><span style="vertical-align: inherit;"><span style="vertical-align: inherit;"><span style="vertical-align: inherit;"><span style="vertical-align: inherit;"><span style="vertical-align: inherit;"><span style="vertical-align: inherit;"><span style="vertical-align: inherit;"><span style="vertical-align: inherit;"><span style="vertical-align: inherit;">Presionando dicha opción, se va a mostrar todos los clientes que tengan (según la fecha definida) una Pre-Factura creada: </span></span></span></span></span></span></span></span></span></span></span></span>

![](https://ayuda.cronuserp.com/uploads/images/migrated/Screenshot_6.png)<span style="vertical-align: inherit; font-size: 12pt; font-family: arial, helvetica, sans-serif;"><span style="vertical-align: inherit;"></span></span>

<span style="vertical-align: inherit; font-size: 12pt; font-family: arial, helvetica, sans-serif;"><span style="vertical-align: inherit;"><span style="vertical-align: inherit;"><span style="vertical-align: inherit;"><span style="vertical-align: inherit;"><span style="vertical-align: inherit;"><span style="vertical-align: inherit;"><span style="vertical-align: inherit;"><span style="vertical-align: inherit;"><span style="vertical-align: inherit;"><span style="vertical-align: inherit;"><span style="vertical-align: inherit;">Según la pantalla anterior puede marcar los clientes que desea crear la factura en firme, la cual se genera en base a todas las Pre-Facturas creadas, una vez que marque el cliente se a va a mostrar en la pantalla de abajo las pendientes para el mismo:</span></span></span></span></span></span></span></span></span></span></span></span>

![](https://ayuda.cronuserp.com/uploads/images/migrated/Screenshot_7.png)<span style="vertical-align: inherit; font-size: 12pt; font-family: arial, helvetica, sans-serif;"><span style="vertical-align: inherit;"></span></span>

<span style="vertical-align: inherit; font-size: 12pt; font-family: arial, helvetica, sans-serif;"><span style="vertical-align: inherit;"><span style="vertical-align: inherit;"><span style="vertical-align: inherit;"><span style="vertical-align: inherit;"><span style="vertical-align: inherit;"><span style="vertical-align: inherit;"><span style="vertical-align: inherit;"><span style="vertical-align: inherit;"><span style="vertical-align: inherit;"><span style="vertical-align: inherit;"><span style="vertical-align: inherit;">Estando seguros de la información anterior, solo debe presionar el ícono de "Aceptar" y confirmar la ventana emergente de confirmación:</span></span></span></span></span></span></span></span></span></span></span></span>

![](https://ayuda.cronuserp.com/uploads/images/migrated/Screenshot_8.png)<span style="vertical-align: inherit; font-size: 12pt; font-family: arial, helvetica, sans-serif;"><span style="vertical-align: inherit;"></span></span>

<span style="vertical-align: inherit; font-size: 12pt; font-family: arial, helvetica, sans-serif;"><span style="vertical-align: inherit;"><span style="vertical-align: inherit;"><span style="vertical-align: inherit;"><span style="vertical-align: inherit;"><span style="vertical-align: inherit;"><span style="vertical-align: inherit;"><span style="vertical-align: inherit;"><span style="vertical-align: inherit;"><span style="vertical-align: inherit;"><span style="vertical-align: inherit;"><span style="vertical-align: inherit;">Ya con los pasos anteriores completados, la factura de crédito para el cliente se hará visible en la pantalla de facturación directamente:</span></span></span></span></span></span></span></span></span></span></span></span>

![](https://ayuda.cronuserp.com/uploads/images/migrated/Screenshot_9.png)<span style="vertical-align: inherit; font-size: 12pt; font-family: arial, helvetica, sans-serif;"><span style="vertical-align: inherit;"></span></span>

# CRONUS-Reportes-Generador-de-reportes-Estadisticas-Sucursales-01-Sucursales-Resumen

<p style="text-align: justify;"><span style="font-size: 12pt; font-family: arial, helvetica, sans-serif;">Ruta: Generador de Reportes ==&gt; Estad&iacute;sticas ==&gt; Sucursales ==&gt; <strong>01. Sucursal - Resumen</strong></span></p> <p style="text-align: justify;"><span style="font-size: 12pt; font-family: arial, helvetica, sans-serif;"><img style="display: block; margin-left: auto; margin-right: auto;" src="/files/CRONUS-Reportes-Generador-de-reportes-Estadisticas-Sucursales-01-Sucursales-Resumen/2020-12-16%20Sucursal-Resumen.png" alt="2020-12-16 Sucursal-Resumen.png" width="321" height="561" /></span></p> <p style="text-align: justify;">&nbsp;</p> <p style="text-align: justify;"><span style="font-size: 12pt; font-family: arial, helvetica, sans-serif;">Este reporte muestra las ventas del d&iacute;a menos</span></p> <p style="text-align: justify;"><span style="font-size: 12pt; font-family: arial, helvetica, sans-serif;">Par&aacute;metros por los cuales se puede filtrar la informaci&oacute;n:</span></p> <ul> <li style="text-align: justify;"><span style="font-size: 12pt; font-family: arial, helvetica, sans-serif;">Rango de fecha</span></li> <li style="text-align: justify;"><span style="font-size: 12pt; font-family: arial, helvetica, sans-serif;">Sucursal</span></li> <li style="text-align: justify;"><span style="font-size: 12pt; font-family: arial, helvetica, sans-serif;">Clientes: agente, agente externo, cobrador, categor&iacute;a, ruta, zona y negocio</span></li> <li style="text-align: justify;"><span style="font-size: 12pt; font-family: arial, helvetica, sans-serif;">Producto: producto, proveedor, marca, grupo, familia y categor&iacute;a</span></li> </ul>

# CRONUS-Movimientos-Cajas-Cierre-de-cajas-Cambio-de-deposito

<span style="color: #ff0000;">**Notas importantes para el proceso:**</span>

- Permiso de la seguridad " PCIERRE\_MOD "
- <span style="color: #000000;">El cierre no debe estar conciliado </span>
- <span style="color: #000000;">El cierre no debe estar contabilizado </span>
 
Para esto ingresamos a la pantalla habitual de cierre de caja y una vez en esta elegimos el cierre que deseamos modificar:

 ![](https://ayuda.cronuserp.com/uploads/images/migrated/Screenshot_1.png)Una vez que presionemos modificar el sistema nos abrirá la pantalla del cierre de caja, una vez acá vamos a ingresar a la subpestaña " Depósitos y Transferencias " :

 ![](https://ayuda.cronuserp.com/uploads/images/migrated/Screenshot_2.png)En dicha pantalla nos vamos a ubicar en la Lista de Depósitos Incluidos :

 [![Screenshot_3.png](https://ayuda.cronuserp.com/uploads/images/gallery/2025-08/scaled-1680-/screenshot-3.png)](https://ayuda.cronuserp.com/uploads/images/gallery/2025-08/screenshot-3.png)Aquí se elige el que se desea modificar para esto nos posicionamos sobre el mismo y hacemos doble click. Con esto el sistema nos mostrará la pantalla para que pongamos las claves de acceso:

 ![](https://ayuda.cronuserp.com/uploads/images/migrated/Screenshot_4.png)Cuando se validan los accesos el sistema le muestra la pantalla para realizar el cambio al nuevo depósito. En la misma debemos ingresar el nuevo número y cuenta (si lo amerita ) y presionar Aceptar para guardar el cambio:

 ![](https://ayuda.cronuserp.com/uploads/images/migrated/Screenshot_5.png)Cuando el usuario presione Aceptar el sistema le muestra una pantalla de confirmación para dicho cambio, al cuál se debe presionar "si " o " no " y listo quedara el cambio realizado en el cierre de caja :

 ![](https://ayuda.cronuserp.com/uploads/images/migrated/Screenshot_6.png)

# CRONUS-Saldos

<ul> <li><span style="font-size: 12pt; font-family: arial, helvetica, sans-serif;"><strong>Utilitarios:</strong></span> <ul> <li><span style="font-size: 12pt; font-family: arial, helvetica, sans-serif;"><a href="CRONUS-Saldos-Utilitarios-Imprimir-etiqueta-de-inventario">Imprimir etiqueta de inventario</a></span></li> <li><span style="font-size: 12pt; font-family: arial, helvetica, sans-serif;"><a href="CRONUS-Saldos-Utilitarios-Imprimir-etiqueta-de-precio">Imprimir etiqueta de precio</a></span></li> </ul> </li> <li><span style="font-size: 12pt; font-family: arial, helvetica, sans-serif;"><strong>Ubicaci&oacute;n:</strong></span> <ul> <li><span style="font-size: 12pt; font-family: arial, helvetica, sans-serif;"><a href="CRONUS-Saldos-Ubicacion-Ubicaciones-WMS">Ubicaciones WMS</a></span></li> <li><span style="font-size: 12pt; font-family: arial, helvetica, sans-serif;"><a href="CRONUS-Saldos-Ubicacion-Etiquetas-de-Ubicaciones-WMS">Etiquetas de ubicaciones WMS</a></span></li> <li><span style="font-size: 12pt; font-family: arial, helvetica, sans-serif;"><a href="CRONUS-Saldos-Ubicacion-Exportar-productos-sin-ubicacion">Exportar productos sin ubicaci&oacute;n</a></span></li> <li><span style="font-size: 12pt; font-family: arial, helvetica, sans-serif;"><a href="CRONUS-Saldos-Ubicacion-Importar-ubicaciones">Importar ubicaciones</a></span></li> <li><span style="font-size: 12pt; font-family: arial, helvetica, sans-serif;"><a href="CRONUS-Saldos-Ubicacion">Ubicaciones en el proceso de Consulta de Saldos</a></span></li> </ul> </li> </ul> <p>&nbsp;</p> <p>&nbsp;</p>

# CRONUS-Movimientos-Facturacion-documentos-Facturacion-Tipos-de-NC

<p><strong>Tipos de NC</strong></p> <table style="border-collapse: collapse; width: 58.4553%; height: 245px;" border="1"> <tbody> <tr style="height: 26px;"> <td style="width: 52%; height: 26px;"><strong>Tipo</strong></td> <td style="width: 37.4915%; height: 26px; text-align: center;"><strong>Seguridad</strong></td> </tr> <tr style="height: 24px;"> <td style="width: 52%; height: 24px;">DE - Devoluci&oacute;n</td> <td style="width: 37.4915%; height: 24px; text-align: center;">DEVOLUCIONES3</td> </tr> <tr style="height: 24px;"> <td style="width: 52%; height: 24px;">DX - Diferencia de precios</td> <td style="width: 37.4915%; height: 24px; text-align: center;">PNCTIPODX1</td> </tr> <tr style="height: 24px;"> <td style="width: 52%; height: 24px;">EX - Exoneraci&oacute;n de impuesto</td> <td style="width: 37.4915%; height: 24px; text-align: center;">PNCTIPOEX1</td> </tr> <tr style="height: 24px;"> <td style="width: 52%; height: 24px;">RE - Retenci&oacute;n de renta</td> <td style="width: 37.4915%; height: 24px; text-align: center;">PNCTIPORE1</td> </tr> <tr style="height: 24px;"> <td style="width: 52%; height: 24px;">DP - Descuento especial</td> <td style="width: 37.4915%; height: 24px; text-align: center;">PNCTIPODP1</td> </tr> <tr style="height: 24px;"> <td style="width: 52%; height: 24px;">VA - Varios</td> <td style="width: 37.4915%; height: 24px; text-align: center;">PNCTIPOVA1</td> </tr> <tr style="height: 24px;"> <td style="width: 52%; height: 24px;">PP - Pronto Pago</td> <td style="width: 37.4915%; height: 24px; text-align: center;">PNCTIPOPP1</td> </tr> <tr style="height: 24px;"> <td style="width: 52%; height: 24px;">OT - Otros</td> <td style="width: 37.4915%; height: 24px; text-align: center;">PNCTIPOOT1</td> </tr> <tr style="height: 27px;"> <td style="width: 52%; height: 27px;">AJ - Ajustes</td> <td style="width: 37.4915%; height: 27px; text-align: center;">PNCTIPOAJ1</td> </tr> </tbody> </table> <p>&nbsp;</p>

# CRONUS-Saldos-Ubicación

<p style="text-align: justify;"><span style="font-size: 14pt;"><strong>Indicaciones iniciales</strong></span></p> <ul style="text-align: justify;"> <li style="text-align: justify;"><span style="font-size: 12pt; font-family: arial, helvetica, sans-serif;">Las Ubicaciones pueden ser incluidas una a una. Al ubicar un producto use la tecla F1 o use al bot&oacute;n ubicado a la derecha del c&oacute;digo elegido. Requiere el siguiente derecho para ingresar a la pantalla "MAVISOSINUBIC1".</span></li> <li style="text-align: justify;"><span style="font-size: 12pt; font-family: arial, helvetica, sans-serif;">La pantalla de Ubicaciones permite igualmente al usuario encargado reclasificar el producto en caso de localizar errores de configuraci&oacute;n. Pare esto se requiere el siguiente derecho "PPRODCCN1".</span></li> <li style="text-align: justify;"><span style="font-size: 12pt; font-family: arial, helvetica, sans-serif;">Para poder cambiar o incluir nuevas configuraciones de Ubicaciones requiere el acceso al siguiente derecho "MAVISOSINUBIC2".</span></li> <li style="text-align: justify;"><span style="font-size: 12pt; font-family: arial, helvetica, sans-serif;">Las Zonas ya est&aacute;n prestablecidas en CRONUS y no pueden ser alteradas por el usuario, las disponibles son las siguientes:</span> <ul> <li><span style="font-size: 12pt; font-family: arial, helvetica, sans-serif;">01 - Picking</span></li> <li><span style="font-size: 12pt; font-family: arial, helvetica, sans-serif;">02 - General</span></li> <li><span style="font-size: 12pt; font-family: arial, helvetica, sans-serif;">06 - Secundaria</span></li> <li><span style="font-size: 12pt; font-family: arial, helvetica, sans-serif;">09 - Exhibici&oacute;n</span></li> <li><span style="font-size: 12pt; font-family: arial, helvetica, sans-serif;">15 - Despacho</span></li> <li><span style="font-size: 12pt; font-family: arial, helvetica, sans-serif;">99 - Sin definir</span></li> </ul> </li> <li style="text-align: justify;"><span style="font-size: 12pt; font-family: arial, helvetica, sans-serif;">Es posible imprimir ubicaciones QR para las etiquetas desde esta misma pantalla, pero ellas deben estar preconfiguradas.</span></li> <li style="text-align: justify;"><span style="font-size: 12pt; font-family: arial, helvetica, sans-serif;">Las Ubicaciones de cada art&iacute;culo pueden cambiar mas adelante, mas estas son usadas por defecto.</span></li> <li style="text-align: justify;"><span style="font-size: 12pt; font-family: arial, helvetica, sans-serif;">Cada Bodega (Desde la cejilla de Bodegas en la pantalla de Sucursales) puede tener una Ubicaci&oacute;n por defecto usada cuando no se encuentra una ubicaci&oacute;n espec&iacute;fica para un producto.</span></li> <li style="text-align: justify;"><span style="font-size: 12pt; font-family: arial, helvetica, sans-serif;">Cada Bodega tiene un indicador de Ubicaciones WMS, este tiene el siguiente funcionamiento:</span> <ul> <li><span style="font-size: 12pt; font-family: arial, helvetica, sans-serif;">Al incluir productos en las Tomas F&iacute;sicas usa todas las ubicaciones disponibles.</span></li> <li><span style="font-size: 12pt; font-family: arial, helvetica, sans-serif;">Solo aplica al marcar el check "Toma F&iacute;sica con WMS".</span></li> </ul> </li> <li style="text-align: justify;"><span style="font-size: 12pt; font-family: arial, helvetica, sans-serif;">Las Solicitudes de Movimiento de Inventario imprimen la primera ubicaci&oacute;n por defecto localizada.</span></li> </ul> <hr /> <p style="text-align: justify;"><span style="font-size: 14pt; font-family: arial, helvetica, sans-serif;"><strong>Importar Ubicaciones de forma Masiva</strong></span></p> <ul style="text-align: justify;"> <li><span style="font-size: 12pt; font-family: arial, helvetica, sans-serif;">Desde la pantalla principal de Consulta de Saldos.</span> <ul> <li><span style="font-size: 12pt; font-family: arial, helvetica, sans-serif;">Use el Submen&uacute; Ubicaci&oacute;n.</span></li> <li><span style="font-size: 12pt; font-family: arial, helvetica, sans-serif;">Importar Ubicaciones ("requiere acceso a&nbsp;MAVISOSINUBIC2").</span> <ul> <li><span style="font-size: 12pt; font-family: arial, helvetica, sans-serif;">Requiere C&oacute;digo de Compa&ntilde;&iacute;a y Sucursal.</span></li> <li><span style="font-size: 12pt; font-family: arial, helvetica, sans-serif;">Detalle de la Ubicaci&oacute;n.</span></li> <li><span style="font-size: 12pt; font-family: arial, helvetica, sans-serif;">Use CRONUS para ver los campos indispensables.</span></li> </ul> </li> <li><span style="font-size: 12pt; font-family: arial, helvetica, sans-serif;">Exportar productos sin Ubicaci&oacute;n : entre todos los art&iacute;culos que no tengan al menos 1 ubicaci&oacute;n de WMS preestablecida.</span></li> </ul> </li> </ul> <p style="text-align: justify;">&nbsp;</p>

# CRONUS-Mantenimiento-Clientes-Clientes-Analisis de Credito

<span style="color: #ff0000; font-size: 14pt; font-family: arial, helvetica, sans-serif;">**Notas importantes:** </span>

- <span style="color: #000000; font-size: 12pt; font-family: arial, helvetica, sans-serif;">En esta pantalla se ordenan los clientes en forma descendente, del saldo más alto al más bajo. </span>
- <span style="color: #000000; font-size: 12pt; font-family: arial, helvetica, sans-serif;">Siempre mostrará saldos en dólares y en moneda local. </span>
- <span style="color: #000000; font-size: 12pt; font-family: arial, helvetica, sans-serif;">Las líneas en color verde corresponde a montos en dólares. </span>
- <span style="color: #000000; font-size: 12pt; font-family: arial, helvetica, sans-serif;">Las líneas en blanco corresponden a montos en moneda local. </span>
 
<span style="color: #000000; font-size: 12pt; font-family: arial, helvetica, sans-serif;">Desde esta pantalla el usuario podrá realizar varios procesos y revisiones mediante un click derecho sobre la pantalla de clientes ( parte de arriba ) , los cuales se detallan a continuación: </span>

- <span style="color: #000000; font-size: 12pt; font-family: arial, helvetica, sans-serif;">**Filtrar cliente:** Con esta opción se puede realizar una búsqueda sencilla de un cliente especifico ( sobre la linea que posicionados con el puntero ). Entonces una vez que presionamos dicho ícono el sistema mostrará la ventana emergente de confirmación: </span>
 
 ![](https://ayuda.cronuserp.com/uploads/images/migrated/Screenshot_1.png)![](https://ayuda.cronuserp.com/uploads/images/migrated/Screenshot_2.png)<span style="font-size: 12pt; font-family: arial, helvetica, sans-serif;"><span style="color: #000000;"></span><span style="color: #000000;"> </span><span style="color: #000000;"></span></span>

<span style="color: #000000; font-size: 12pt; font-family: arial, helvetica, sans-serif;">Una vez confirmada la ventana anterior, se nos va a mostrar en ambas pantallas únicamente los datos referentes a la búsqueda seleccionada: </span>

[![Screenshot_3.png](https://ayuda.cronuserp.com/uploads/images/gallery/2025-08/scaled-1680-/screenshot-3.png)](https://ayuda.cronuserp.com/uploads/images/gallery/2025-08/screenshot-3.png)<span style="color: #000000; font-size: 12pt; font-family: arial, helvetica, sans-serif;"></span>

- <span style="font-size: 12pt; font-family: arial, helvetica, sans-serif;">**<span style="color: #000000;">Limpiar filtros: </span>**<span style="color: #000000;">Es un método igual al que presionemos el botón de Refrescar; lo que quiere decir que nos va a cargar nuevamente todos los datos iniciales. </span></span>
 
 ![](https://ayuda.cronuserp.com/uploads/images/migrated/Screenshot_4.png)<span style="color: #000000; font-size: 12pt; font-family: arial, helvetica, sans-serif;"></span>

- <span style="font-size: 12pt; font-family: arial, helvetica, sans-serif;"><span style="color: #000000;">**Anotación:** Es la pantalla donde el usuario puede crear notas para ser guardas en el histórico del cliente y de esta manera queda un registro y trazabilidad de lo que ha pasado entre el cliente y el encargado de crédito y cobro.</span><span style="color: #000000;"> </span></span>
 
 ![](https://ayuda.cronuserp.com/uploads/images/migrated/Screenshot_8.png)<span style="color: #000000; font-size: 12pt; font-family: arial, helvetica, sans-serif;"></span>

- <span style="font-size: 12pt; font-family: arial, helvetica, sans-serif;">**<span style="color: #000000;">Ver Histórico: </span>**<span style="color: #000000;">Con esta opción se habilita una pantalla para ver el historial de todas las anotaciones que se le hayan creado al cliente elegido. </span></span>
 
 ![](https://ayuda.cronuserp.com/uploads/images/migrated/Screenshot_11.png)<span style="font-size: 12pt; font-family: arial, helvetica, sans-serif;"><span style="color: #000000;"></span></span>

<span style="font-size: 12pt; font-family: arial, helvetica, sans-serif;"><span style="color: #000000;">Una vez en esta pantalla el usuario tiene varias opciones de filtros para la misma, incluso exportar el histórico o verlo en el CRM. ( Sitio previamente solicitado al equipo de CRFUSION para la creación del mismo ) . </span></span>

- <span style="font-size: 12pt; font-family: arial, helvetica, sans-serif;">**<span style="color: #000000;">Reportes: </span>**<span style="color: #000000;">En esta opción el usuario puede definir si desea generar los reportes mostrados a continuación, ya sea para un cliente especifico o para todos los mostradas en pantalla principal. </span></span>
 
![](https://ayuda.cronuserp.com/uploads/images/migrated/Screenshot_12.png)<span style="font-size: 14pt;"><span style="color: #000000;"><span style="font-size: 12pt;"></span></span></span>

# CRONUS-Sistema

- [<span style="font-size: 12pt; font-family: arial, helvetica, sans-serif;">Opciones de Pinpad</span>](https://ayuda.cronuserp.com/books/wiki-cronus-erp/page/cronus-sistema-opciones-pinpad-configuracion)
- <span style="font-size: 12pt; font-family: arial, helvetica, sans-serif;">Bitácora Pinpad</span>

---

- <span style="font-size: 12pt; font-family: arial, helvetica, sans-serif;">[<span style="color: #000080;">Cambio de compañía</span>](https://ayuda.cronuserp.com/CRONUS-Sistema-Cambio-de-compania)</span>
- <span style="font-size: 12pt; font-family: arial, helvetica, sans-serif;">[<span style="color: #000080;">Cambio de clave</span>](https://ayuda.cronuserp.com/CRONUS-Sistema-Cambio-de-Clave)</span>
- <span style="font-size: 12pt; font-family: arial, helvetica, sans-serif;">[<span style="color: #000080;">Procesar seguridad </span>(leer cambios aplicados al usuario actual)](https://ayuda.cronuserp.com/CRONUS-SISTEMA-PROCESAR-SEGURIDAD)</span>

# CRONUS-Toma Fisica

<span style="color: #ff0000; font-size: 14pt;">**Notas importantes a tomar en cuenta para el proceso:** </span>

- <span style="font-size: 12pt; font-family: arial, helvetica, sans-serif;">La toma física no se puede anular, una vez aplicada. </span>
- <span style="font-size: 12pt; font-family: arial, helvetica, sans-serif;">Nos saldrán visibles las bodegas a las que el usuario tenga derecho. </span>
- <span style="font-size: 12pt; font-family: arial, helvetica, sans-serif;">Una vez aplicada los saldos de inventarios serán actualizados, según el conteo digitado. </span>

<span style="font-size: 12pt; font-family: arial, helvetica, sans-serif;">Ingresamos a Cronus =&gt; Toma Física =&gt;</span>

<span style="font-size: 12pt; font-family: arial, helvetica, sans-serif;">[![TF.png](https://ayuda.cronuserp.com/uploads/images/gallery/2026-03/scaled-1680-/tf.png)](https://ayuda.cronuserp.com/uploads/images/gallery/2026-03/tf.png)</span>

<span style="font-size: 12pt; font-family: arial, helvetica, sans-serif;">Presionamos el botón de "**Incluir**" y se llena los datos que el sistema solicita, luego se debe de presionar el botón "**Guardar**" =&gt; </span>

<span style="font-size: 12pt; font-family: arial, helvetica, sans-serif;">[![TF 1.png](https://ayuda.cronuserp.com/uploads/images/gallery/2026-03/scaled-1680-/tf-1.png)](https://ayuda.cronuserp.com/uploads/images/gallery/2026-03/tf-1.png)</span>

<span style="font-size: 12pt; font-family: arial, helvetica, sans-serif;"> </span>

<span style="font-size: 12pt; font-family: arial, helvetica, sans-serif;">En este punto tenemos tres opciones para realizar la toma física. Solamente una de las tres puede ser elegida para realizar el proceso. </span>

- <span style="font-size: 12pt; font-family: arial, helvetica, sans-serif;">Solo para los productos en la lista ( un proceso completamente manual, donde el usuario debe ingresar los productos uno a uno o mediante un XLS ) </span>
- <span style="font-size: 12pt; font-family: arial, helvetica, sans-serif;">Lista de todos los productos dentro del siguiente rango de fechas ( donde debemos digitar una fecha desde y hasta para tomar en cuenta en nuestra toma física y bajo estos rangos serán cargados la lista de productos)</span>
- <span style="font-size: 12pt; font-family: arial, helvetica, sans-serif;">Lista de todos los productos con la siguiente clasificación ( en esta opción podemos definir ciertos parámetros para la toma física, cómo por ejemplo familia, proveedor, categoría, etc ) cabe recalcar que solamente serán tomados los productos que entren en los parámetros elegidos.</span>

<span style="font-size: 12pt; font-family: arial, helvetica, sans-serif;">Ahora bien. Una vez que ya tiene en la pantalla de "**Lista de productos**" todos los productos según el filtro elegido debe de presionar el botón "**Impresiones**" ==&gt;</span>

<span style="font-size: 12pt; font-family: arial, helvetica, sans-serif;">[![TF3.png](https://ayuda.cronuserp.com/uploads/images/gallery/2026-03/scaled-1680-/tf3.png)](https://ayuda.cronuserp.com/uploads/images/gallery/2026-03/tf3.png)</span>

<span style="font-size: 12pt; font-family: arial, helvetica, sans-serif;">Posteriormente,seleccionar Reportes Generales: </span>

<span style="font-size: 12pt; font-family: arial, helvetica, sans-serif;">[![TF4.png](https://ayuda.cronuserp.com/uploads/images/gallery/2026-03/scaled-1680-/tf4.png)](https://ayuda.cronuserp.com/uploads/images/gallery/2026-03/tf4.png)</span>

<span style="font-size: 12pt; font-family: arial, helvetica, sans-serif;">En la siguiente pantalla debe de filtrar y definir el formato, llamado " Productos por aplicar/aplicados. Ya que dicho reporte debe ser impreso previo a la aplicación de la toma física ==&gt;</span>

<span style="font-size: 12pt; font-family: arial, helvetica, sans-serif;">[![TF5.png](https://ayuda.cronuserp.com/uploads/images/gallery/2026-03/scaled-1680-/tf5.png)](https://ayuda.cronuserp.com/uploads/images/gallery/2026-03/tf5.png)</span>

<span style="font-size: 12pt; font-family: arial, helvetica, sans-serif;">Una vez que ya tengan la lista de productos cargada, el reporte que pueden usar en caso de requerir pasarlo al encargado del conteo físico, sería el llamado " Datos para conteo" ( agrupado por Bodega ) : </span>

<span style="font-size: 12pt; font-family: arial, helvetica, sans-serif;">[![TF6.png](https://ayuda.cronuserp.com/uploads/images/gallery/2026-03/scaled-1680-/tf6.png)](https://ayuda.cronuserp.com/uploads/images/gallery/2026-03/tf6.png)</span>

<span style="font-size: 12pt; font-family: arial, helvetica, sans-serif;">Ahora bien y cómo uno de los últimos pasos para la TF ,sería inicial el conteo en CRONUS para dicha toma física y para esto contamos con dos opciones el conteo/digitación manual o por medio de XLS, explicamos cada una a continuación: </span>

- <span style="font-size: 12pt; font-family: arial, helvetica, sans-serif;">**Conteo/digitación manual:** Para esto ingresamos a la pantalla de listado de productos, y ahí debemos presionar doble click sobre la línea que deseamos iniciar el conteo.Una vez que presionamos doble click sobre la línea el sistema nos abrirá la pantalla para iniciar el conteo: </span>

<span style="font-size: 12pt; font-family: arial, helvetica, sans-serif;">[![TF7.png](https://ayuda.cronuserp.com/uploads/images/gallery/2026-03/scaled-1680-/tf7.png)](https://ayuda.cronuserp.com/uploads/images/gallery/2026-03/tf7.png)</span><span style="font-size: 12pt; font-family: arial, helvetica, sans-serif;">Importante, en este punto debemos marcar el indicador de "**Guardar los datos al pasarse**", para que se nos vayan guardando los datos digitados y de esta manera una vez que digitamos la cantidad de conteo, únicamente le damos "**Guardar**" para pasarnos al siguiente detalle y así sucesivamente con cada línea. </span>

- <span style="font-size: 12pt; font-family: arial, helvetica, sans-serif;">**Importar XLS:** Pueden también hacer la carga de la TF por medio de un XLS, siempre y cuando sean respetadas las columnas que el sistema solicita para dicha función. Si se desea usar la función de importar, nos dirigimos al menú de Importar y Exportar: </span>

<span style="font-size: 12pt; font-family: arial, helvetica, sans-serif;">[![importar XLS TF.png](https://ayuda.cronuserp.com/uploads/images/gallery/2026-06/scaled-1680-/importar-xls-tf.png)](https://ayuda.cronuserp.com/uploads/images/gallery/2026-06/importar-xls-tf.png)</span>

<span style="font-size: 12pt; font-family: arial, helvetica, sans-serif;">Una vez acá, el sistema nos va a mostrar la pantalla con las columnas que debe de llevar el XLS a importar: </span>

[![columnas XLS TF.png](https://ayuda.cronuserp.com/uploads/images/gallery/2026-06/scaled-1680-/columnas-xls-tf.png)](https://ayuda.cronuserp.com/uploads/images/gallery/2026-06/columnas-xls-tf.png)

<span style="font-size: 12pt; font-family: arial, helvetica, sans-serif;">Tomar en cuenta, que si se usa el proceso de IMPORTAR XLS,se debe de tomar en cuenta el mensaje indicado en la pantalla anterior que se nos indica "Los productos deben coincidir con los parámetros definidos inicialmente,de otra forma fallará la importación; esto quiere decir que se debe respetar los productos incluidos en la lista del XLS según los parámetros definidos en el encabezado de la TF, por ejemplo con estos datos: </span>

<span style="font-size: 12pt; font-family: arial, helvetica, sans-serif;">[![encabezado TF.png](https://ayuda.cronuserp.com/uploads/images/gallery/2026-06/scaled-1680-/encabezado-tf.png)](https://ayuda.cronuserp.com/uploads/images/gallery/2026-06/encabezado-tf.png)</span>

<span style="font-size: 12pt; font-family: arial, helvetica, sans-serif;">Cuando ya hemos completado el proceso de conteo en CRONUS, sería definir la fecha de aplicación y presionar "**Aplicar** " para que la toma física quede cargada y de esta manera los saldos actualizados: </span>

[![TF8.png](https://ayuda.cronuserp.com/uploads/images/gallery/2026-03/scaled-1680-/tf8.png)](https://ayuda.cronuserp.com/uploads/images/gallery/2026-03/tf8.png)

<span style="font-size: 12pt; font-family: arial, helvetica, sans-serif;">Una vez que se presione el botón de "aplicar", el sistema emerge una serie de mensajes de confirmación que debemos aceptar para que nuestra toma física quede aplicada correctamente, los saldos recalculados y el inventario actualizado. </span>

<span style="font-size: 12pt; font-family: arial, helvetica, sans-serif;">El primero será que si deseamos recalcular los saldos: </span>

[![TF9.png](https://ayuda.cronuserp.com/uploads/images/gallery/2026-03/scaled-1680-/tf9.png)](https://ayuda.cronuserp.com/uploads/images/gallery/2026-03/tf9.png)

<span style="font-size: 12pt; font-family: arial, helvetica, sans-serif;">[![TF10.png](https://ayuda.cronuserp.com/uploads/images/gallery/2026-03/scaled-1680-/tf10.png)](https://ayuda.cronuserp.com/uploads/images/gallery/2026-03/tf10.png)</span>

<span style="font-size: 12pt; font-family: arial, helvetica, sans-serif;">El siguiente, que solamente se hará dicho proceso para los productos que fueron incluidos y contados en la lista: </span>

<span style="font-size: 12pt; font-family: arial, helvetica, sans-serif;">[![TF11.png](https://ayuda.cronuserp.com/uploads/images/gallery/2026-03/scaled-1680-/tf11.png)](https://ayuda.cronuserp.com/uploads/images/gallery/2026-03/tf11.png)</span>

<span style="font-size: 12pt; font-family: arial, helvetica, sans-serif;">Una vez confirmado el mensaje anterior, la toma física será aplicada: </span>

<span style="font-size: 12pt; font-family: arial, helvetica, sans-serif;">[![TF12.png](https://ayuda.cronuserp.com/uploads/images/gallery/2026-03/scaled-1680-/tf12.png)](https://ayuda.cronuserp.com/uploads/images/gallery/2026-03/tf12.png)</span>

<span style="font-size: 12pt; font-family: arial, helvetica, sans-serif;">Y ya la podremos visualizar en la pantalla principal de toma física: </span>

[![TF13.png](https://ayuda.cronuserp.com/uploads/images/gallery/2026-03/scaled-1680-/tf13.png)](https://ayuda.cronuserp.com/uploads/images/gallery/2026-03/tf13.png)

<span style="font-size: 12pt; font-family: arial, helvetica, sans-serif;">Wikis relacionados:</span>

- <span style="color: #000080; font-size: 12pt; font-family: arial, helvetica, sans-serif;">[Toma Física con etiquetas](https://ayuda.cronuserp.com/CRONUS-Movimiento-Inventario-Toma-Fisica-Tiquetes-de-conteo)</span>
- <span style="color: #000080; font-size: 12pt; font-family: arial, helvetica, sans-serif;">[Toma Física con conteo secundario](https://ayuda.cronuserp.com/CRONUS-Movimiento-Inventario-Toma-Fisica-Conteo-Secundario)</span>

# CRONUS-Movimientos-Proformas-Pre-Proformas

<p style="text-align: justify;"><span style="font-size: 12pt; font-family: arial, helvetica, sans-serif;">Para tomar la pre-forma en CRONUS, debemos ingresar a la pantalla de PROFORMA = &gt; INCLUIR :&nbsp;</span></p> <p style="text-align: justify;"><span style="font-size: 12pt; font-family: arial, helvetica, sans-serif;"><img style="display: block; margin-left: auto; margin-right: auto;" src="/files/CRONUS-Movimientos-Proformas-Pre-Proformas/CRONUS%201.png" alt="CRONUS 1.png" width="811" height="210" /></span></p> <p style="text-align: justify;">&nbsp;</p> <p style="text-align: justify;"><span style="font-size: 12pt; font-family: arial, helvetica, sans-serif;">Cuando ingresamos a la pantalla de Incluir nos mostrar&aacute; esta nueva opci&oacute;n " APP PRE-PROFORMA " donde debemos presionar con un click :&nbsp;</span></p> <p style="text-align: justify;"><span style="font-size: 12pt; font-family: arial, helvetica, sans-serif;"><img style="display: block; margin-left: auto; margin-right: auto;" src="/files/CRONUS-Movimientos-Proformas-Pre-Proformas/cronus%202.png" alt="cronus 2.png" width="807" height="587" /></span></p> <p style="text-align: justify;">&nbsp;</p> <p style="text-align: justify;"><span style="font-size: 12pt; font-family: arial, helvetica, sans-serif;">En esa pantalla elegimos la pre-proforma que deseamos utilizar mediante un doble click sobre la misma o en el &iacute;cono de "Aceptar" ubicado en la parte de arriba :&nbsp;</span></p> <p style="text-align: justify;"><span style="font-size: 12pt; font-family: arial, helvetica, sans-serif;"><img style="display: block; margin-left: auto; margin-right: auto;" src="/files/CRONUS-Movimientos-Proformas-Pre-Proformas/cronus%203.png" alt="cronus 3.png" width="770" height="508" /></span></p> <p style="text-align: justify;">&nbsp;</p> <p style="text-align: justify;"><span style="font-size: 12pt; font-family: arial, helvetica, sans-serif;">Una vez elegida la que vamos a utilizar el sistema nos va a indicar que debemos ingresar el cliente para proseguir :&nbsp;</span></p> <p style="text-align: justify;"><span style="font-size: 12pt; font-family: arial, helvetica, sans-serif;"><img style="display: block; margin-left: auto; margin-right: auto;" src="/files/CRONUS-Movimientos-Proformas-Pre-Proformas/cronus%204.png" alt="cronus 4.png" width="414" height="150" /></span></p> <p style="text-align: justify;">&nbsp;</p> <p style="text-align: justify;"><span style="font-size: 12pt; font-family: arial, helvetica, sans-serif;">Y esta opci&oacute;n nos llevar&aacute; a la pantalla de clientes ( habitual de uso en CRONUS ) para buscar el cliente que deseamos asignarle a la proforma por crear:&nbsp;</span></p> <p style="text-align: justify;"><span style="font-size: 12pt; font-family: arial, helvetica, sans-serif;"><img style="display: block; margin-left: auto; margin-right: auto;" src="/files/CRONUS-Movimientos-Proformas-Pre-Proformas/cronus%205.png" alt="cronus 5.png" width="737" height="625" /></span></p> <p style="text-align: justify;">&nbsp;</p> <p style="text-align: justify;"><span style="font-size: 12pt; font-family: arial, helvetica, sans-serif;">Cuando asignemos el cliente se nos va a cargar la pantalla rutinaria de proformas para avanzar con la misma:&nbsp;</span></p> <p style="text-align: justify;"><span style="font-size: 12pt; font-family: arial, helvetica, sans-serif;"><img style="display: block; margin-left: auto; margin-right: auto;" src="/files/CRONUS-Movimientos-Proformas-Pre-Proformas/cronus%206.png" alt="cronus 6.png" /></span></p> <p style="text-align: justify;">&nbsp;</p> <p style="text-align: justify;"><span style="font-size: 12pt; font-family: arial, helvetica, sans-serif;">&Uacute;nicamente debemos presionar el bot&oacute;n de "Aceptar" que nos muestra la ventana emergente al elegir el cliente y de esa manera podemos ya sea completar nuestra proforma mediante el &iacute;cono de ACEPTAR inmediatamente cargada la pre-proforma o bien seguir cargando productos, cambiando datos, definiendo descuentos, etc. Una vez completa nuestra proforma presionamos "Aceptar" para confirmar la inclusi&oacute;n de est&aacute;:&nbsp;</span></p> <p style="text-align: justify;"><span style="font-size: 12pt; font-family: arial, helvetica, sans-serif;"><img style="display: block; margin-left: auto; margin-right: auto;" src="/files/CRONUS-Movimientos-Proformas-Pre-Proformas/cronus%207.png" alt="cronus 7.png" width="409" height="143" /></span></p> <p style="text-align: justify;">&nbsp;</p> <p style="text-align: justify;">&nbsp;</p> <p style="text-align: justify;">&nbsp;</p> <p style="text-align: justify;">&nbsp;</p> <p style="text-align: justify;">&nbsp;</p> <p style="text-align: justify;">&nbsp;</p>

# CRONUS-Sistema-Opciones-generales-Indicador-forma-pago-tarjeta-credito

<p><span style="font-weight: 400;">En el caso de que se necesite amarrar un precio de venta superior a la forma de pago &ldquo;Tarjeta de cr&eacute;dito&rdquo;, es posible en CRONUS configurar la alternativa siempre y cuando se cumplan las siguientes condiciones:</span></p> <ul> <li style="font-weight: 400;"><span style="font-weight: 400;">Una vez definida la forma de pago, ya NO se pueden alterar si se han incluido l&iacute;neas en la proforma o nota de pedido.</span></li> <li style="font-weight: 400;"><span style="font-weight: 400;">Debe existir un &uacute;nico precio asociado a tarjeta de cr&eacute;dito, este NO depende del cliente y no depende del producto.</span></li> <li style="font-weight: 400;"><span style="font-weight: 400;">Los descuentos por cliente, por usuario o por producto son aplicados sin ninguna restricci&oacute;n a esta forma de trabajo.</span></li> <li style="font-weight: 400;"><span style="font-weight: 400;">SI el producto tiene precio de venta configurable, entonces CRONUS no evitar&aacute; que el usuario digite un precio inferior.</span></li> </ul> <p><span style="font-weight: 400;"><img style="display: block; margin-left: auto; margin-right: auto;" src="/files/CRONUS-Sistema-Opciones-generales-Indicador-forma-pago-tarjeta-credito/pr%201.png" alt="pr 1.png" width="626" height="311" /></span></p> <p><span style="font-weight: 400;">Primero que todo se debe configurar el precio asociado, una vez configurado CRONUS ahora sugerir&aacute; este precio cada vez que se elija la forma de pago:</span></p> <p><span style="font-weight: 400;"><img style="display: block; margin-left: auto; margin-right: auto;" src="/files/CRONUS-Sistema-Opciones-generales-Indicador-forma-pago-tarjeta-credito/pr%202.png" alt="pr 2.png" width="451" height="512" /></span></p> <p><span style="font-weight: 400;">Si se desea, se puede dejar en blanco, esto hace que CRONUS ignore el precio y permita al usuario elegir el que desee sin ning&uacute;n bloqueo.</span></p> <p><span style="font-weight: 400;">Una vez configurado, CRONUS sugiere siempre el precio basado en el pago configurado seg&uacute;n la imagen que se detalla a continuaci&oacute;n:</span></p> <p><span style="font-weight: 400;"><img style="display: block; margin-left: auto; margin-right: auto;" src="/files/CRONUS-Sistema-Opciones-generales-Indicador-forma-pago-tarjeta-credito/pr%203.png" alt="pr 3.png" width="624" height="235" /></span></p> <p><span style="font-weight: 400;">Cabe destacar que el usuario NO puede cambiar la forma de pago a mitad del camino, osea, no puede alterar y decir que es &ldquo;Efectivo&rdquo; luego de haber incluido el primer producto, esto para asegurarnos de que no definan un precio distinto al configurado.</span></p> <p><span style="font-weight: 400;">Al copiar una proforma a otra proforma o pedido, la forma de pago tambi&eacute;n se copia y por ende tampoco podr&iacute;a ser alterada:</span></p> <p><span style="font-weight: 400;"><img style="display: block; margin-left: auto; margin-right: auto;" src="/files/CRONUS-Sistema-Opciones-generales-Indicador-forma-pago-tarjeta-credito/pr%204.png" alt="pr 4.png" width="582" height="325" /></span></p> <p><span style="font-weight: 400;">Si la proforma o pedido tiene productos incluidos y cualquier forma de pago excepto Tarjeta, puede cambiarse su forma de pago, por ejemplo : Si es &ldquo;efectivo&rdquo; puedo cambiar a recibo, cheque, nota de cr&eacute;dito, pero si est&aacute; en tarjeta de cr&eacute;dito, NO es posible hacer el cambio.</span></p> <p><span style="font-weight: 400;">Cuando se facture esta Nota de pedido, CRONUS fallar&aacute; si el cajero/facturador elije tarjeta de cr&eacute;dito como forma de pago:</span></p> <p><span style="font-weight: 400;"><img style="display: block; margin-left: auto; margin-right: auto;" src="/files/CRONUS-Sistema-Opciones-generales-Indicador-forma-pago-tarjeta-credito/pr%205.png" alt="pr 5.png" width="628" height="460" /></span></p> <p><span style="font-weight: 400;">Para deshabilitar esta funci&oacute;n simplemente deja en blanco <img src="/files/CRONUS-Sistema-Opciones-generales-Indicador-forma-pago-tarjeta-credito/pr%206.png" alt="pr 6.png" width="283" height="54" /></span><span style="font-weight: 400;">con esto ya los procesos evitan este bloqueo.</span></p> <p>&nbsp;</p>

# CRONUS-Movimiento-Inventario-Toma-Fisica-Conteo-Secundario

<span style="font-size: 14pt; font-family: arial, helvetica, sans-serif;">**Permisos de seguridad asociados al proceso:** </span>

- <span style="font-size: 12pt; font-family: arial, helvetica, sans-serif;">Agregar segundo conteo ( PTOMA\_FISICACV3 ) </span>
- <span style="font-size: 12pt; font-family: arial, helvetica, sans-serif;">Cierra conteo 1 para iniciar conteo 2 ( PTOMA\_FISICACN2 ) </span>
- <span style="font-size: 12pt; font-family: arial, helvetica, sans-serif;">Valoración de Segundo Conteo ( PTOMA:FISICACV2 ) </span>
 
<span style="font-size: 12pt; font-family: arial, helvetica, sans-serif;">A continuación se explicará el proceso para el segundo conteo en la toma física de CRONUS. </span>

<span style="font-size: 12pt; font-family: arial, helvetica, sans-serif;">Lo primero seria crear la toma física con el proceso habitual, una vez realizada la misma el usuario debe finalizar el conteo 1, esto para poder iniciar el conteo 2. </span>

<span style="font-size: 12pt; font-family: arial, helvetica, sans-serif;">Para esto ingresamos a Utilitarios =&gt; Finalizar Conteo 1 : </span>

 ![](https://ayuda.cronuserp.com/uploads/images/migrated/Screenshot_1.png)<span style="font-size: 12pt; font-family: arial, helvetica, sans-serif;"></span>

<span style="font-size: 12pt; font-family: arial, helvetica, sans-serif;">Una vez marcada dicha opción, el sistema emerge la siguiente ventana, para la confirmación:</span>

 ![](https://ayuda.cronuserp.com/uploads/images/migrated/Screenshot_2.png)<span style="font-size: 12pt; font-family: arial, helvetica, sans-serif;"></span>

<span style="font-size: 12pt; font-family: arial, helvetica, sans-serif;">Y una última ventana, para la ejecución del proceso: </span>

[![Screenshot_3.png](https://ayuda.cronuserp.com/uploads/images/gallery/2025-08/scaled-1680-/screenshot-3.png)](https://ayuda.cronuserp.com/uploads/images/gallery/2025-08/screenshot-3.png)<span style="font-size: 12pt; font-family: arial, helvetica, sans-serif;"></span>

<span style="font-size: 12pt; font-family: arial, helvetica, sans-serif;">Ahora bien para iniciar con el conteo 2, debemos definir que productos necesitamos pasar a conteo secundario. Para esto ingresamos al Menú Utilitarios =&gt; Valoración Conteo 2: </span>

 ![](https://ayuda.cronuserp.com/uploads/images/migrated/Screenshot_4.png)<span style="font-size: 12pt; font-family: arial, helvetica, sans-serif;"></span>

<span style="font-size: 12pt; font-family: arial, helvetica, sans-serif;">Una vez en esta pantalla, marcamos los productos que deseamos pasar a conteo 2 ( arrastrando el cursor sobre las líneas que deseamos marcar ) , y presionamos click derecho =&gt; Enviar productos a conteo 2: </span>

 ![](https://ayuda.cronuserp.com/uploads/images/migrated/Screenshot_5.png)<span style="font-size: 12pt; font-family: arial, helvetica, sans-serif;"></span>

<span style="font-size: 12pt; font-family: arial, helvetica, sans-serif;">Para validar los productos que pasamos, debemos regresar a la pantalla principal de Toma Física y presionar "refrescar", con esto la primer columna se pintará en un color naranja lo cuál nos indicará que dichos productos están para CONTEO 2 : </span>

 ![](https://ayuda.cronuserp.com/uploads/images/migrated/Screenshot_6.png)<span style="font-size: 12pt; font-family: arial, helvetica, sans-serif;"></span>

<span style="font-size: 12pt; font-family: arial, helvetica, sans-serif;">Una vez con los productos elegidos para conteo 2, deben realizar el proceso habitual de conteo para dichos productos. </span>

<span style="font-size: 12pt; font-family: arial, helvetica, sans-serif;">Por último, tenemos la opción de imprimir un reporte para los datos del Conteo 2. Para esto ingresamos a la opción de Reportes, ubicado en la pantalla principal de la toma y ahí elegimos Datos para Conteo 2:</span>

 ![](https://ayuda.cronuserp.com/uploads/images/migrated/Screenshot_10.png)<span style="font-size: 12pt; font-family: arial, helvetica, sans-serif;"></span>

 ![](https://ayuda.cronuserp.com/uploads/images/migrated/Screenshot_11.png)<span style="font-size: 12pt; font-family: arial, helvetica, sans-serif;"></span>

<span style="font-size: 12pt; font-family: arial, helvetica, sans-serif;">Para finalizar el proceso por completo de toma física, ya una vez digitado el segundo conteo de los productos, el proceso para la aplicación de la toma física es el mismo que habitualmente se realiza.</span>

<span style="font-size: 12pt; font-family: arial, helvetica, sans-serif;">**Otras funciones del proceso:** </span>

- <span style="font-size: 12pt; font-family: arial, helvetica, sans-serif;">Tenemos la opción de bloquear los productos que deseamos que no reciban más modificaciones; para esto presionamos click derecho y ahí nos mostrarán las opciones vigentes para el caso: </span>
    
     ![](https://ayuda.cronuserp.com/uploads/images/migrated/Screenshot_7.png)<span style="font-size: 12pt; font-family: arial, helvetica, sans-serif;"></span>
 
- <span style="font-size: 12pt; font-family: arial, helvetica, sans-serif;">Podemos ver bitácora de cambios del producto, para esto debemos ingresar igualmente a la pantalla de valoración conteo 2 ( explicada anteriormente ) y una vez en esta pantalla marcamos la línea que deseamos ver, click derecho=&gt; ver bitácora de cambios: </span>
 
 ![](https://ayuda.cronuserp.com/uploads/images/migrated/Screenshot_8.png)<span style="font-size: 12pt; font-family: arial, helvetica, sans-serif;"></span>

<span style="font-size: 12pt; font-family: arial, helvetica, sans-serif;">Ahí nos emerge todos los cambios que ha sufrido dicho producto: </span>

 ![](https://ayuda.cronuserp.com/uploads/images/migrated/Screenshot_9.png)<span style="font-size: 12pt; font-family: arial, helvetica, sans-serif;"></span>

# CRONUS-Movimientos-Facturación/Documentos

<p style="text-align: justify;"><span style="font-family: arial, helvetica, sans-serif; font-size: 12pt;">Presione el bot&oacute;n <strong>"Factura"</strong> ubicado en la barra de botones de la pantalla principal de Cronus. </span><br /><br /></p> <div style="text-align: justify;"><span style="font-size: 12pt; font-family: arial, helvetica, sans-serif;"><img style="display: block; margin-left: auto; margin-right: auto;" title="02 Facturar 01.png" src="/files/atts/02%20Facturar%2001.png" alt="02 Facturar 01.png" /></span></div> <p style="text-align: justify;"><br /><br /></p> <div style="text-align: justify;"><span style="font-size: 12pt; font-family: arial, helvetica, sans-serif;"><img style="display: block; margin-left: auto; margin-right: auto;" title="01 Pantalla Principal 01.1.png" src="/files/atts/01%20Pantalla%20Principal%2001.1.png" alt="01 Pantalla Principal 01.1.png" /></span><br /><span style="font-size: 12pt; font-family: arial, helvetica, sans-serif;"><span style="background-color: #ffffff;">En esta nueva pantalla por defecto aparecen todos los documentos registrados, se pueden filtrar por fechas, ver los de hoy, hace 1 d&iacute;a, 1 semana o 1 mes.Para crear una factura nueva presionamos el bot&oacute;n </span> <strong>?facturar?</strong> <span style="background-color: #ffffff;"> ubicado arriba a la izquierda de la pantalla. Lo primero que debemos de hacer es identificar el tipo de documento si es factura de cr&eacute;dito o de contado. La fecha es sugerida de forma autom&aacute;tica por el servidor, luego debemos de identificar al cliente al que deseamos facturarle, si sabe el n&uacute;mero de c&oacute;digo lo puede digitar, si no lo sabe, puede presionar el bot&oacute;n con un s&iacute;mbolo de pregunta ubicado abajo del campo N&uacute;mero</span> <strong>?<a class="wiki_link" href="EOS-CXC-Mantenimientos-Clientes">?</a>?</strong> <span style="background-color: #ffffff;"> y buscar en la lista, para escogerlo haga doble click sobre el nombre del agente. Si tiene dudas de como crear un cliente puede reviser el manual &iquest;C&oacute;mo crear clientes?.</span> </span><br /><br /><span style="font-size: 12pt; font-family: arial, helvetica, sans-serif;"><span style="background-color: #ffffff;">Al lado derecho de la pantalla en la parte superior hay un campo de </span> <strong>Observaciones</strong> <span style="background-color: #ffffff;">,en el puede hacer anotaciones o recordatorios para usted como usuario, estas observaciones NO saldr&aacute;n impresas en la factura. Tomar en cuenta que una vez hecha la factura estos datos no puede ser modificados, si est&aacute;n mal debemos de anular el documento con una nota de cr&eacute;dito.</span></span></div> <div style="text-align: justify;"><span style="font-size: 12pt; font-family: arial, helvetica, sans-serif;"><img style="height: 483px; width: 640px; display: block; margin-left: auto; margin-right: auto;" title="02 Facturar 05.png" src="/files/atts/02%20Facturar%2005.png" alt="02 Facturar 05.png" /></span></div> <p style="text-align: justify;"><span style="font-size: 12pt; font-family: arial, helvetica, sans-serif;"><span style="display: block; text-align: center;"><br /></span>El proceso de b&uacute;squeda de productos para facturar, funciona de la misma manera que la b&uacute;squeda de clientes, si usted sabe el c&oacute;digo del producto lo puede digitar en el campo <strong>"Producto"</strong> o buscarlo digitando palabras claves en el campo que dice <strong>"Busqueda F4"</strong>. Al hacerlo el sistema le mostrar&aacute; todos los productos que contengan esas palabras en su descripci&oacute;n. Para escogerlo y poderlo facturar debe de hacer doble click sobre &eacute;l. Despu&eacute;s llenar los campos de cantidad, bodega y porcentaje de descuento (si aplica) luego presione el bot&oacute;n <strong>"Incluir"</strong>. Este procedimiento lo tiene que hacer con cada producto que desee facturar. Una vez cargados todos productos, verifique los precios, las cantidades y los descuentos aplicados, si tiene que modificar alguno, solo haga doble click sobre el y modifique la informaci&oacute;n. </span><br /><br /><span style="font-family: arial, helvetica, sans-serif; font-size: 12pt;">Para crear la factura e imprimirla presione el bot&oacute;n "Aceptar" ubicado en la parte inferior izquierda de la pantalla". Es importante recalcar que una vez presionado este bot&oacute;n la factura se vuelve intocable, no se puede ni modificar ni anular. </span><br /><br /><br /><span style="font-size: 12pt; font-family: arial, helvetica, sans-serif;"><span style="display: block; text-align: center;"><br /></span> <span style="display: block; text-align: center;"><br /></span> <span style="display: block; text-align: center;"><br /></span> <span style="display: block; text-align: center;"><br /></span> <span style="display: block; text-align: center;"><br /></span> <span style="display: block; text-align: center;"><br /></span> <span style="display: block; text-align: center;"><br /></span> <span style="display: block; text-align: center;"><br /></span> </span><span style="display: block; text-align: center;"><br /></span></p>

# CRONUS-Util

<ul> <li><span style="font-size: 12pt; color: #000080;"><a style="color: #000080;" href="https://ayuda.cronuserp.com/books/wiki-cronus-erp/page/CRONUS-Util-Revisar-inventario-con-problemas">Revisar inventario con problemas&nbsp;</a></span></li> <li><span style="font-size: 12pt; color: #000080;"><a style="color: #000080;" href="https://ayuda.cronuserp.com/books/wiki-cronus-erp/page/web-inventario-inventario-repara-inventario-con-problemas">Repara inventario con problemas&nbsp;</a></span></li> </ul> <hr /> <ul> <li><span style="font-size: 12pt; color: #000080;"><a style="color: #000080;" href="https://ayuda.cronuserp.com/books/wiki-cronus-erp/page/CRONUS-Util-Estadisticas-de-CRONUS">Estad&iacute;sticas de Cronus (CRFUSION)</a></span></li> </ul> <p>&nbsp;</p>

# CRONUS-Movimiento-Inventario-Toma-Fisica-Tiquetes-de-conteo

<span style="font-weight: 400; font-size: 12pt; font-family: arial, helvetica, sans-serif;">Esta forma de trabajar las Tomas Físicas nos permite realizar el conteo de una manera más ágil y por lo tanto disminuir el tiempo que tardamos en realizar dicho proceso desde Cronus. </span>

<span style="font-weight: 400; font-size: 12pt; font-family: arial, helvetica, sans-serif;">Este se basa en imprimir “tiquetes de conteo” por cada producto en la toma física para posteriormente pegar estas etiquetas en nuestra bodega.</span>

<span style="font-weight: 400; font-size: 12pt; font-family: arial, helvetica, sans-serif;">A continuación, en la pantalla del detalle de la toma física aparecerá un botón para imprimir los “tiquetes de conteo ( etiquetas ) ”:</span>

 ![](https://ayuda.cronuserp.com/uploads/images/migrated/2.png)[![tiq.png](https://ayuda.cronuserp.com/uploads/images/gallery/2025-08/scaled-1680-/tiq.png)](https://ayuda.cronuserp.com/uploads/images/gallery/2025-08/tiq.png)[](https://ayuda.cronuserp.com/uploads/images/gallery/2025-08/tiq.png)<span style="font-weight: 400; font-size: 12pt; font-family: arial, helvetica, sans-serif;"></span>

<span style="font-weight: 400; font-size: 12pt; font-family: arial, helvetica, sans-serif;">Desde la pantalla de impresión de tiquete podemos seleccionar qué etiquetas queremos imprimir, ya sea imprimir un rango determinado de etiquetas ( por medio del número de etiqueta ) o imprimir las etiquetas de todos los productos de la toma física, adicionalmente podemos definir cuántas copias por etiqueta queremos imprimir:</span>

<span style="font-weight: 400; font-size: 12pt; font-family: arial, helvetica, sans-serif;"></span>

<span style="font-weight: 400; font-size: 12pt; font-family: arial, helvetica, sans-serif;">Se pueden imprimir tres etiquetas por cada página y cuentan con tres columnas. La primer columna es el encabezado de la etiqueta, la segunda y tercera son columnas de conteo. Ejemplo de etiqueta:</span>

 ![](https://ayuda.cronuserp.com/uploads/images/migrated/Screenshot_5.png)<span style="font-weight: 400; font-size: 12pt; font-family: arial, helvetica, sans-serif;"></span>

<span style="font-weight: 400; font-size: 12pt; font-family: arial, helvetica, sans-serif;">Después de imprimir las etiquetas y pegarlas donde corresponden el personal encargado de contar debe:</span>

1. <span style="font-weight: 400; font-size: 12pt; font-family: arial, helvetica, sans-serif;">Cortar una columna de conteo.</span>
2. <span style="font-weight: 400; font-size: 12pt; font-family: arial, helvetica, sans-serif;">Contar cuánto producto hay en el lugar donde se pego la etiqueta</span>
3. <span style="font-weight: 400; font-size: 12pt; font-family: arial, helvetica, sans-serif;">Escribir la cantidad contada en la etiqueta y firmar la etiqueta.</span>
4. <span style="font-weight: 400; font-size: 12pt; font-family: arial, helvetica, sans-serif;">Llevar la etiqueta al encargado de registrar la información en Cronus.</span>
 
<span style="font-weight: 400; font-size: 12pt; font-family: arial, helvetica, sans-serif;"> </span>

<span style="font-weight: 400; font-size: 12pt; font-family: arial, helvetica, sans-serif;">Si el personal encargado de contar tiene el App de Cronus ( Cronus Móvil ) y el derecho necesario ( PTOMA\_FISICA\_CONTAPP ), puede utilizar la opción de “Conteo TF” para cargar la información directamente a la toma física.</span>

<span style="font-weight: 400; font-size: 12pt; font-family: arial, helvetica, sans-serif;">Ver el manual de usuario [App Cronus Móvil ](https://ayuda.cronuserp.com/books/wiki-cronus-erp/page/Tomas-fisicas-Cronus-Movil)para más información.</span>

<span style="font-size: 12pt; font-family: arial, helvetica, sans-serif;"><span style="font-weight: 400;">Cuando el personal encargado de registrar la información en Cronus tiene las etiquetas debe dirigirse a la siguiente pantalla, la cual se despliega al darle doble click a un producto de la toma física. </span><span style="font-weight: 400;">En ella solo debe digitar el número de tiquete y la cantidad contada:</span></span>

 ![](https://ayuda.cronuserp.com/uploads/images/migrated/Screenshot_6.png)<span style="font-weight: 400; font-size: 12pt; font-family: arial, helvetica, sans-serif;"></span>

<span style="font-size: 12pt; font-family: arial, helvetica, sans-serif;"><span style="font-weight: 400;">Por último tenemos la posibilidad de ver la bitácora de quien ha cargado cantidades a un producto de la toma física, ya sea desde el App o desde Cronus.</span><span style="font-weight: 400;">Está bitácora la encontramos en el click derecho de la lista de productos:</span></span>

 ![](https://ayuda.cronuserp.com/uploads/images/migrated/Screenshot_7.png)<span style="font-weight: 400; font-size: 12pt; font-family: arial, helvetica, sans-serif;"></span>

<span style="font-weight: 400; font-size: 12pt; font-family: arial, helvetica, sans-serif;">Desde esta pantalla podemos eliminar un registro de la bitácora y recalcular el saldo de dicho producto basándonos en la bitácora:</span>

 ![](https://ayuda.cronuserp.com/uploads/images/migrated/Screenshot_8.png)<span style="font-weight: 400;"></span>

# CRONUS Puntos

<p style="text-align: justify;"><span style="font-size: 12pt; font-family: arial, helvetica, sans-serif;"><strong>Seguridad</strong></span></p> <ol style="text-align: justify;"> <li><span style="font-size: 12pt; font-family: arial, helvetica, sans-serif;">Importar y Exportar requiere "MPRODUCTOS_IPUN".</span></li> <li><span style="font-size: 12pt; font-family: arial, helvetica, sans-serif;">Crear NC de puntos Disponibles requiere "PNCTPUNTOS1".</span></li> </ol> <p style="text-align: justify;"><span style="font-size: 12pt; font-family: arial, helvetica, sans-serif;"><strong>Funcionalidad</strong></span></p> <ul> <li style="text-align: justify;"><span style="font-size: 12pt; font-family: arial, helvetica, sans-serif;">Todos los clientes tienen por defecto el indicador de Puntos activo (lo puede configurar en la cejilla de indicadores con el check llamado "Al cliente le aplica el c&aacute;lculo de puntos"</span></li> <li style="text-align: justify;"><span style="font-size: 12pt; font-family: arial, helvetica, sans-serif;">A todos los productos se les debe configurar un porcentaje de puntos asignado.</span> <ul> <li><span style="font-size: 12pt; font-family: arial, helvetica, sans-serif;">Cejilla 2. Indicadores, en la sub-cejilla "Adicionales".</span></li> <li><span style="font-size: 12pt; font-family: arial, helvetica, sans-serif;">El porcentaje est&aacute; bloqueado a ser de 0 a 5 % m&aacute;ximo.</span></li> <li><span style="font-size: 12pt; font-family: arial, helvetica, sans-serif;">Puede importar/exportar un archivo de Excel de puntos desde la pantalla principal.</span></li> </ul> </li> <li style="text-align: justify;"><span style="font-size: 12pt; font-family: arial, helvetica, sans-serif;">El sistema permite crear NC a favor del cliente usando el men&uacute; utilitarios de las siguientes pantallas:</span> <ul> <li><span style="font-size: 12pt; font-family: arial, helvetica, sans-serif;">Proformas de Notas de Pedido.</span></li> <li><span style="font-size: 12pt; font-family: arial, helvetica, sans-serif;">Notas de Pedido.</span></li> <li><span style="font-size: 12pt; font-family: arial, helvetica, sans-serif;">Apartados.</span></li> <li><span style="font-size: 12pt; font-family: arial, helvetica, sans-serif;">Proformas.</span></li> <li><span style="font-size: 12pt; font-family: arial, helvetica, sans-serif;">Facturaci&oacute;n.</span></li> </ul> </li> <li style="text-align: justify;"><span style="font-size: 12pt; font-family: arial, helvetica, sans-serif;">La NC es de tipo Varios y usa una cuenta contable espec&iacute;fica que se debe digitar en las Opciones Generales Contables.</span></li> <li style="text-align: justify;"><span style="font-size: 12pt; font-family: arial, helvetica, sans-serif;">La NC se puede aplicar como cualquier otro documento.</span></li> </ul>

# CRONUS-Mantenimiento-Clientes-Descuentos-por-producto

<p><span style="font-weight: 400; font-size: 12pt; font-family: arial, helvetica, sans-serif;">Si se desea definir un descuento fijo por cliente por producto, se puede hacer desde las siguiente pantalla:</span></p> <p><span style="font-weight: 400; font-size: 12pt; font-family: arial, helvetica, sans-serif;"><img style="display: block; margin-left: auto; margin-right: auto;" src="/files/CRONUS-Mantenimiento-Clientes-Clientes-Descuentos-por-producto-por-cliente/cli%201.png" alt="cli 1.png" width="624" height="144" /></span></p> <p>&nbsp;</p> <p><span style="font-weight: 400; font-size: 12pt; font-family: arial, helvetica, sans-serif;">Este descuento sobrepasa el descuento por cliente por usuario y por producto (separados).</span></p> <p><span style="font-weight: 400; font-size: 12pt; font-family: arial, helvetica, sans-serif;">&nbsp;</span></p> <p><span style="font-weight: 400; font-size: 12pt; font-family: arial, helvetica, sans-serif;">Defina el producto y digite los porcentajes:</span></p> <p><span style="font-weight: 400; font-size: 12pt; font-family: arial, helvetica, sans-serif;"><img style="display: block; margin-left: auto; margin-right: auto;" src="/files/CRONUS-Mantenimiento-Clientes-Clientes-Descuentos-por-producto-por-cliente/cli%202.png" alt="cli 2.png" width="624" height="339" /></span></p> <p>&nbsp;</p> <p><span style="font-weight: 400; font-size: 12pt; font-family: arial, helvetica, sans-serif;">Ahora, cuando se va a facturar al elegir el cliente, el producto y el precio el sistema sugiere el porcentaje de forma previa, el usuario por supuesto puede cambiarlo:</span></p> <p><span style="font-weight: 400; font-size: 12pt; font-family: arial, helvetica, sans-serif;"><img style="display: block; margin-left: auto; margin-right: auto;" src="/files/CRONUS-Mantenimiento-Clientes-Clientes-Descuentos-por-producto-por-cliente/cli%203.png" alt="cli 3.png" width="622" height="424" /></span></p> <p>&nbsp;</p> <p>&nbsp;</p>

# CRONUS-Movimientos-Facturacion-documentos-Devoluciones-Castigos

<p><span style="font-size: 12pt; font-family: arial, helvetica, sans-serif;"><strong>Cronus 6.2.111 o superior</strong></span></p> <p><span style="font-size: 12pt; font-family: arial, helvetica, sans-serif;"><strong>Motivo</strong></span></p> <p><span style="font-size: 12pt; font-family: arial, helvetica, sans-serif;">Por claridad en el manejo de precios e impuestos se aplica un cambio a Cronus que a partir de la versi&oacute;n indicada (o previo a actualizaci&oacute;n directa de la BD) se van a ejecutar los siguientes cambios:</span></p> <ul> <li><span style="font-size: 12pt; font-family: arial, helvetica, sans-serif;">Se incluye una ND por el cobro del Castigo, este documento es adicional.</span> <ul> <li><span style="font-size: 12pt; font-family: arial, helvetica, sans-serif;">La cuenta contable se define en Opciones Contables en el men&uacute; principal de Cronus.</span></li> <li><span style="font-size: 12pt; font-family: arial, helvetica, sans-serif;">El centro de costo que se usa es el de la sucursal que crea la Solicitud o Devoluci&oacute;n.</span></li> <li><span style="font-size: 12pt; font-family: arial, helvetica, sans-serif;">Si la cuenta contable no es de Ingresos/Gastos el centro de costo queda en 00-00-00 (sin centro de costo).</span></li> </ul> </li> <li><span style="font-size: 12pt; font-family: arial, helvetica, sans-serif;">La NC se incluye siempre por el monto total.</span> <ul> <li><span style="font-size: 12pt; font-family: arial, helvetica, sans-serif;">Afecta el impuesto por el mismo monto unitario que la venta.</span></li> <li><span style="font-size: 12pt; font-family: arial, helvetica, sans-serif;">El precio es el mismo.</span></li> <li><span style="font-size: 12pt; font-family: arial, helvetica, sans-serif;">En los reportes de Ventas el Precio de Venta y Devoluci&oacute;n son equivalentes.</span></li> </ul> </li> <li><span style="font-size: 12pt; font-family: arial, helvetica, sans-serif;">La NC puede quedar con saldo.</span></li> <li><span style="font-size: 12pt; font-family: arial, helvetica, sans-serif;">La ND siempre va a quedar con saldo.</span> <ul> <li><span style="font-size: 12pt; font-family: arial, helvetica, sans-serif;">La ND aparece en los mismos reportes de Estado de Cuenta y Antig&uuml;edad de Saldos.</span></li> <li><span style="font-size: 12pt; font-family: arial, helvetica, sans-serif;">El plazo = 0 d&iacute;as, expira el mismo d&iacute;a de la inclusi&oacute;n.</span></li> <li><span style="font-size: 12pt; font-family: arial, helvetica, sans-serif;">La ND no es tributaria.</span></li> </ul> </li> </ul> <p><span style="font-size: 12pt; font-family: arial, helvetica, sans-serif;"><strong>&iquest;Como aplicarla?</strong></span></p> <ul> <li><span style="font-size: 12pt; font-family: arial, helvetica, sans-serif;">Aplica a las Devoluciones directas o Solicitudes de Devoluci&oacute;n.</span></li> <li><span style="font-size: 12pt; font-family: arial, helvetica, sans-serif;">El castigo se define exactamente de la misma forma que ha funcionado desde el inicio.</span></li> <li><span style="font-size: 12pt; font-family: arial, helvetica, sans-serif;">Los montos en pantalla separan el TOTAL sin Castigo y el Castigo separado.</span></li> <li><span style="font-size: 12pt; font-family: arial, helvetica, sans-serif;">El total de la NC incluye los 2 montos.</span></li> <li><span style="font-size: 12pt; font-family: arial, helvetica, sans-serif;">La ND va a por el total del castigo sin el Impuesto.</span></li> </ul> <p>&nbsp;</p>

# CRONUS-Otros-Importador-de-datos-al-sistema

<span style="font-size: 12pt; font-family: arial, helvetica, sans-serif;">Desde esta pantalla tendremos la opción de importar datos al sistema, esto se realiza cuando por ejemplo el cliente arranca con el sistema para realizar la carga masiva de todos los datos para el uso del mismo. </span>

<span style="font-size: 12pt; font-family: arial, helvetica, sans-serif;">Para esto ingresamos a OTROS =&gt; IMPORTADOR DE DATOS AL SISTEMA: </span>

 ![](https://ayuda.cronuserp.com/uploads/images/migrated/Screenshot_1.png)[![eeeee.png](https://ayuda.cronuserp.com/uploads/images/gallery/2025-08/scaled-1680-/eeeee.png)](https://ayuda.cronuserp.com/uploads/images/gallery/2025-08/eeeee.png)[](https://ayuda.cronuserp.com/uploads/images/gallery/2025-08/eeeee.png)<span style="font-size: 12pt; font-family: arial, helvetica, sans-serif;"></span>

<span style="font-size: 12pt; font-family: arial, helvetica, sans-serif;">Para contar con las planillas requeridas,basta con seleccionar el dato que deseamos importar y posterior el ícono de EXPORTADOR para obtener el XLS de ejemplo y la plantilla cómo tal que debemos completar e importar con los datos reales al sistema. </span>

<span style="font-size: 12pt; font-family: arial, helvetica, sans-serif;"></span>

<span style="font-size: 12pt; font-family: arial, helvetica, sans-serif;">Una vez acá solamente debemos elegir que archivo vamos a importar y presionar aceptar para posteriormente buscar el mismo en la carpeta del equipo donde lo tenemos previamente guardado y completado con la información requerida: </span>

 ![](https://ayuda.cronuserp.com/uploads/images/migrated/Screenshot_2.png)<span style="font-size: 12pt; font-family: arial, helvetica, sans-serif;"></span>

**<span style="font-size: 12pt; font-family: arial, helvetica, sans-serif;">Importante, validar el indicador mostrado en la pantalla anterior " Permite reemplazar Productos" ya que si esto está marcado y tenemos productos con datos iguales en sistema los mismos serán reemplazados por los nuevos. En caso de no desear realizar esto el check deberá ser desmarcado previo a la importación de datos. </span>**

# CRONUS Erp WMS

<span style="font-family: arial, helvetica, sans-serif; font-size: 12pt;">**Configuración de WMS**</span>

<span style="font-family: arial, helvetica, sans-serif; font-size: 12pt;">El uso del WMS implica a los distintos módulos de acceso a CRONUS Erp, esto incluye la versión de Windows (Cliente-Servidor), el sitio WEB y el APP para dispositivos móviles (Android y IOS)</span>

<span style="font-family: arial, helvetica, sans-serif; font-size: 12pt;">![](https://i.pinimg.com/originals/71/42/62/714262829697e9749a4aa86b3c1f5538.png)Para bajar el APP busque CRONUS Erp Móvil en el Google Play Store. </span>

- <span style="font-size: 12pt; font-family: arial, helvetica, sans-serif;">[Ubicaciones](https://ayuda.cronuserp.com/books/wiki-cronus-erp/page/CRONUS-Saldos-Ubicacion)</span>
- <span style="font-size: 12pt; font-family: arial, helvetica, sans-serif;">[Sucursales y Bodegas](https://ayuda.cronuserp.com/books/wiki-cronus-erp/page/CRONUS-WB-CXC-Mantenimiento-Sucursales-Bodegas-y-Derechos)</span>
- <span style="font-size: 12pt; font-family: arial, helvetica, sans-serif;">[Transacciones de Inventario](https://ayuda.cronuserp.com/books/wiki-cronus-erp/page/CRONUS-WEB-Inventario-Inventario-Tipo-de-Transaccion)</span>
- <span style="font-size: 12pt; font-family: arial, helvetica, sans-serif;">[Cronus Móvil WMS](CRONUS-Movil-Movimientos-WMS)</span>
- <span style="font-size: 12pt; font-family: arial, helvetica, sans-serif;">[WMS Traslados](https://ayuda.cronuserp.com/books/wiki-cronus-erp/page/CRONUS-Movil-WMS-Traslados)</span>
- <span style="font-size: 12pt; font-family: arial, helvetica, sans-serif;">[Función-WMS](https://ayuda.cronuserp.com/books/wiki-cronus-erp/page/CRONUS-Movil-WMS-Explicacion)</span>
- <span style="font-size: 12pt; font-family: arial, helvetica, sans-serif;">[WMS Solicitudes](https://ayuda.cronuserp.com/books/wiki-cronus-erp/page/CRONUS-Movil-Solicitudes-WMS)</span>
 
---

<span style="font-family: arial, helvetica, sans-serif; font-size: 12pt;">Diferencias CRONUS Erp vs CRONUS Erp WMS</span>

- <span style="font-family: arial, helvetica, sans-serif; font-size: 12pt;">[Descripción de Diferencias](CRONUS-WMS-Diferencias)</span>

# CRONUS-Movimiento-Notas-de-pedido-Entrada-y-salida-de-reservaciones

<p style="text-align: justify;"><span style="font-weight: 400; font-size: 12pt; font-family: arial, helvetica, sans-serif;">El proceso de reserva de materiales funciona para ubicar el producto en una bodega especial que no puede ser alterada en el uso cotidiano, el material se mueve de su bodega normal en tractos o en su totalidad, para usar este nuevo proceso se requiere lo siguiente:</span></p> <p style="text-align: justify;"><span style="font-weight: 400; font-size: 12pt; font-family: arial, helvetica, sans-serif;"><img style="display: block; margin-left: auto; margin-right: auto;" src="/files/CRONUS-Movimiento-Notas-de-pedido-Entrada-y-salida-de-reservaciones/rer%201.png" alt="rer 1.png" width="631" height="432" /></span></p> <p style="text-align: justify;"><span style="font-weight: 400; font-size: 12pt; font-family: arial, helvetica, sans-serif;"><img style="display: block; margin-left: auto; margin-right: auto;" src="/files/CRONUS-Movimiento-Notas-de-pedido-Entrada-y-salida-de-reservaciones/rer%202.png" alt="rer 2.png" width="644" height="210" /></span></p> <p style="text-align: justify;"><span style="font-weight: 400; font-size: 12pt; font-family: arial, helvetica, sans-serif;"><img style="display: block; margin-left: auto; margin-right: auto;" src="/files/CRONUS-Movimiento-Notas-de-pedido-Entrada-y-salida-de-reservaciones/rer%203.png" alt="rer 3.png" width="642" height="399" /></span></p> <p style="text-align: justify;"><span style="font-weight: 400; font-size: 12pt; font-family: arial, helvetica, sans-serif;"><img style="display: block; margin-left: auto; margin-right: auto;" src="/files/CRONUS-Movimiento-Notas-de-pedido-Entrada-y-salida-de-reservaciones/rer%204.png" alt="rer 4.png" width="651" height="208" /></span></p> <p style="text-align: justify;"><span style="font-weight: 400; font-size: 12pt; font-family: arial, helvetica, sans-serif;"><img style="display: block; margin-left: auto; margin-right: auto;" src="/files/CRONUS-Movimiento-Notas-de-pedido-Entrada-y-salida-de-reservaciones/rer%205.png" alt="rer 5.png" width="646" height="322" /></span></p> <p style="text-align: justify;">&nbsp;</p> <p style="text-align: justify;"><span style="font-weight: 400; font-size: 12pt; font-family: arial, helvetica, sans-serif;">Una vez llevada a cabo la configuraci&oacute;n de estas opciones ahora podemos iniciar el proceso de reserva.</span></p> <p style="text-align: justify;"><span style="font-weight: 400; font-size: 12pt; font-family: arial, helvetica, sans-serif;">A tomar en cuenta:</span></p> <ul style="text-align: justify;"> <li><span style="font-weight: 400; font-size: 12pt; font-family: arial, helvetica, sans-serif;">Solo aplica a notas de pedido.</span></li> <li style="font-weight: 400;"><span style="font-weight: 400; font-size: 12pt; font-family: arial, helvetica, sans-serif;">Solo se puede reservar cuando una nota de pedido ha sido incluida ( no en el proceso de inclusi&oacute;n ).</span></li> <li style="font-weight: 400;"><span style="font-size: 12pt; font-family: arial, helvetica, sans-serif;"><strong>Una NP tiene tres condiciones para su reserva:</strong></span></li> <ul> <li style="font-weight: 400;"><span style="font-weight: 400; font-size: 12pt; font-family: arial, helvetica, sans-serif;">Si la NP cuenta con saldo en todos los productos se debe Reservar S&oacute;lo con Saldo ( Sin Hacer Pendientes ).</span></li> <li style="font-weight: 400;"><span style="font-weight: 400; font-size: 12pt; font-family: arial, helvetica, sans-serif;">Si la NP no cuenta con saldo en todos los productos se debe Reservar Sin Saldos ( Esta NP t&eacute;cnicamente es una NP Pendiente ) y por &uacute;ltimo.</span></li> <li style="font-weight: 400;"><span style="font-weight: 400; font-size: 12pt; font-family: arial, helvetica, sans-serif;">Si la NP cuenta con saldos parciales en unidades y l&iacute;neas, se debe Reservar Todo ( Esto permitir&aacute; que se logre facturar todo el pedido y por tanto no existir&aacute;n NP Pendientes por aparte ).</span></li> </ul> <li style="font-weight: 400;"><span style="font-size: 12pt; font-family: arial, helvetica, sans-serif;"><strong>La NP puede ser marcada como &ldquo;Reserva completa&rdquo; o &ldquo;Reserva Parcial&rdquo;:</strong></span></li> <ul> <li style="font-weight: 400;"><span style="font-weight: 400; font-size: 12pt; font-family: arial, helvetica, sans-serif;">Reserva completa: A la NP no se le pueden hacer &ldquo;pendientes sobre pedido&rdquo;. La NP debe ser reservada en su totalidad para ser facturada.</span></li> <li style="font-weight: 400;"><span style="font-weight: 400; font-size: 12pt; font-family: arial, helvetica, sans-serif;">Reserva parcial: A la NP si se le pueden hacer &ldquo;pendientes sobre pedido&rdquo;. La NP debe ser reservada en su totalidad para ser facturada.</span></li> </ul> </ul> <p style="text-align: justify;"><span style="font-weight: 400; font-size: 12pt; font-family: arial, helvetica, sans-serif;"><img style="display: block; margin-left: auto; margin-right: auto;" src="/files/CRONUS-Movimiento-Notas-de-pedido-Entrada-y-salida-de-reservaciones/rer%206.png" alt="rer 6.png" width="461" height="191" /></span></p> <p style="text-align: justify;">&nbsp;</p> <ul style="text-align: justify;"> <li style="font-weight: 400;"><span style="font-weight: 400; font-size: 12pt; font-family: arial, helvetica, sans-serif;">La anulaci&oacute;n de m&uacute;ltiples pedidos NO aplica a NP con reserva marcada o con productos reservados.</span></li> <li style="font-weight: 400;"><span style="font-weight: 400; font-size: 12pt; font-family: arial, helvetica, sans-serif;">La impresi&oacute;n de NP ahora muestra el texto que indica si est&aacute; reservada o no.</span></li> </ul> <p style="text-align: justify;"><span style="font-weight: 400; font-size: 12pt; font-family: arial, helvetica, sans-serif;"><strong>&iquest;C&oacute;mo reservar?</strong></span></p> <ol style="text-align: justify;"> <li><span style="font-size: 12pt; font-family: arial, helvetica, sans-serif;"><span style="font-weight: 400;">Abrir una NP activa y presionar el bot&oacute;n &ldquo;Reserva&rdquo;<img src="/files/CRONUS-Movimiento-Notas-de-pedido-Entrada-y-salida-de-reservaciones/rer%207.png" alt="rer 7.png" width="161" height="67" /></span><span style="font-weight: 400;">, este proceso marca la NP como &ldquo;Reserva&rdquo; y la bloquea de forma inmediata, ya NO se le puede incluir nuevos productos, modificar productos actuales o eliminar l&iacute;neas.</span></span></li> <li style="font-weight: 400;"><span style="font-weight: 400; font-size: 12pt; font-family: arial, helvetica, sans-serif;">Inmediatamente se intentar&aacute; generar una reserva de todos los materiales disponibles en inventario, pueden quedar pendientes para una reserva en el futuro.</span></li> <li style="font-weight: 400;"><span style="font-weight: 400; font-size: 12pt; font-family: arial, helvetica, sans-serif;">Si el usuario desea reservar productos adicionales cuando sepa que han ingresado a inventario, pueden hacerlo presionando el bot&oacute;n de &ldquo;Reserva&rdquo; con el icono que tiene el&nbsp;&ldquo;Check&rdquo; de color verde.&nbsp;<img src="/files/CRONUS-Movimiento-Notas-de-pedido-Entrada-y-salida-de-reservaciones/rer%208.png" alt="rer 8.png" width="110" height="67" /></span></li> <li style="font-weight: 400;"><span style="font-weight: 400; font-size: 12pt; font-family: arial, helvetica, sans-serif;">El bot&oacute;n de &ldquo;reserva&rdquo; queda bloqueado por 3 minutos luego de aplicar cada movimiento de productos, esto con el fin de esperar a que el inventario sea abastecido previo a una nueva petitoria.</span></li> <li style="font-weight: 400;"><span style="font-size: 12pt; font-family: arial, helvetica, sans-serif;"><span style="font-weight: 400;">Al final de la lista de notas de pedido se pueden localizar nuevos campos que indican el&nbsp;estado de esta;&nbsp;</span><span style="font-weight: 400;">primero la cantidad de l&iacute;neas, la sumatoria de productos y la sumatoria de productos ya reservados. Al final aparece un indicador que describe si la reserva es completa (&ldquo;S&rdquo;) o parcial (&ldquo;N&rdquo;), si&nbsp; estuviese en blanco entonces no hay reservas aplicadas.</span></span></li> </ol> <p style="text-align: justify;"><span style="font-weight: 400; font-size: 12pt; font-family: arial, helvetica, sans-serif;"><img style="display: block; margin-left: auto; margin-right: auto;" src="/files/CRONUS-Movimiento-Notas-de-pedido-Entrada-y-salida-de-reservaciones/rer%209.png" alt="rer 9.png" width="405" height="193" /></span></p> <p style="text-align: justify;">&nbsp;</p> <p style="text-align: justify;"><span style="font-weight: 400; font-size: 12pt; font-family: arial, helvetica, sans-serif;">&nbsp; &nbsp; 6. En cada NP ahora se pueden ver las cantidades reservadas por cada l&iacute;nea, adicionalmente se puede presionar el bot&oacute;n que se&ntilde;ala la flecha pintada de rojo para ver todos los movimientos de inventario, su origen y fecha.</span></p> <p style="text-align: justify;"><span style="font-weight: 400; font-size: 12pt; font-family: arial, helvetica, sans-serif;"><img style="display: block; margin-left: auto; margin-right: auto;" src="/files/CRONUS-Movimiento-Notas-de-pedido-Entrada-y-salida-de-reservaciones/rer%2010.png" alt="rer 10.png" width="577" height="263" /></span></p> <p style="text-align: justify;">&nbsp;</p> <p style="text-align: justify;"><span style="font-size: 12pt; font-family: arial, helvetica, sans-serif;"><strong>Leyenda de colores</strong></span></p> <ul style="text-align: justify;"> <li style="font-weight: 400;"><span style="font-weight: 400; font-size: 12pt; font-family: arial, helvetica, sans-serif;">Este color identifica a los pedidos o l&iacute;neas de pedido que tienen pendientes<img src="/files/CRONUS-Movimiento-Notas-de-pedido-Entrada-y-salida-de-reservaciones/rer%2011.png" alt="rer 11.png" width="135" height="14" /></span></li> <li style="font-weight: 400;"><span style="font-weight: 400; font-size: 12pt; font-family: arial, helvetica, sans-serif;">Este color identifica a los pedidos o l&iacute;neas de pedido que ya NO tienen pendientes<img src="/files/CRONUS-Movimiento-Notas-de-pedido-Entrada-y-salida-de-reservaciones/rer%2012.png" alt="rer 12.png" width="149" height="17" /></span></li> </ul> <p style="text-align: justify;"><span style="font-size: 12pt; font-family: arial, helvetica, sans-serif;"><strong>Facturaci&oacute;n</strong></span></p> <ul> <li style="text-align: justify;"><span style="font-weight: 400; font-size: 12pt; font-family: arial, helvetica, sans-serif;">Al facturar una NP de reserva, TODO el inventario tuvo que haber sido asignado a la bodega indicada.</span></li> <li style="font-weight: 400; text-align: justify;"><span style="font-weight: 400; font-size: 12pt; font-family: arial, helvetica, sans-serif;">NO se puede facturar una NP si no tiene todo reservado.</span></li> <li style="font-weight: 400; text-align: justify;"><span style="font-weight: 400; font-size: 12pt; font-family: arial, helvetica, sans-serif;">Si desea quitarle productos a una NP de reserva debe hacerlo mediante la NP pendiente.</span></li> </ul>

# CRONUS-Reportes-Etiquetas-de-Precios

<span style="font-size: 12pt; font-family: arial, helvetica, sans-serif;">Las etiquetas base se utilizan para imprimir el rótulo del producto, con datos como estos:</span>

- <span style="font-size: 12pt; font-family: arial, helvetica, sans-serif;">Código 2.</span>
- <span style="font-size: 12pt; font-family: arial, helvetica, sans-serif;">Precios.</span>
- <span style="font-size: 12pt; font-family: arial, helvetica, sans-serif;">QR o Barras.</span>
- <span style="font-size: 12pt; font-family: arial, helvetica, sans-serif;">Descripción.</span>
- <span style="font-size: 12pt; font-family: arial, helvetica, sans-serif;">Unidad de medida.</span>

<span style="font-size: 12pt; font-family: arial, helvetica, sans-serif;">**Configuración**</span>

<span style="font-size: 12pt; font-family: arial, helvetica, sans-serif;">La configuración del formato es por cada sucursal, cada una puede tener un formato preestablecido y funcional que depende de la impresora y etiquetas de su compañía, consulte al equipo de CRONUSERP </span><span style="font-size: 12pt; font-family: arial, helvetica, sans-serif;">cual es el formato mejor adaptado para sus necesidades antes de adquirir el hardware necesario.</span>

<span style="font-size: 12pt; font-family: arial, helvetica, sans-serif;">Elija un formato en el mantenimiento a Sucursal según se indica a continuación.</span>

<span style="font-size: 12pt; font-family: arial, helvetica, sans-serif;">**Opcional (solo activo para formato QR y con acceso a los módulos WEB)**</span>

<span style="font-size: 12pt; font-family: arial, helvetica, sans-serif;">En las Opciones Generales de Cronus, vaya a la cejilla que dice "URL" y ahí configure :</span>

1. <span style="font-size: 12pt; font-family: arial, helvetica, sans-serif;">Link a la Ficha Técnica.</span>
2. <span style="font-size: 12pt; font-family: arial, helvetica, sans-serif;">Usuario para tomar el saldo a mostrar en el link.</span>
3. <span style="font-size: 12pt; font-family: arial, helvetica, sans-serif;">Precio para mostrar en el link.</span>

<span style="font-size: 12pt; font-family: arial, helvetica, sans-serif;">**Impresión**</span>

1. <span style="font-size: 12pt; font-family: arial, helvetica, sans-serif;">Submenú Reportes / Imprimir etiquetas base.</span>

# CRONUS WMS Diferencias

<p style="text-align: justify;"><span style="font-size: 12pt; font-family: arial, helvetica, sans-serif;"><strong>CRONUS y WMS</strong> por su naturaleza no est&aacute;n sincronizados, esto porque el saldo en CRONUS se genera primero y el WMS lo recibe de forma posterior para su acomodo, por ejemplo:</span></p> <ul style="text-align: justify;"> <li><span style="font-size: 12pt; font-family: arial, helvetica, sans-serif;">Se venden 10 Unidades y se rebajan en CRONUS, estas 10 unidades deben desglosarse a nivel de WMS</span></li> <li><span style="font-size: 12pt; font-family: arial, helvetica, sans-serif;">Se compran 10 Unidades y se aumentan en CRONUS, estas 10 unidades deben desglosarse a nivel de WMS</span></li> </ul> <p style="text-align: justify;"><span style="font-size: 12pt; font-family: arial, helvetica, sans-serif;">Los procesos del WMS est&aacute;n en constante mejora para que esta sincronizaci&oacute;n sea en l&iacute;nea, de tal forma que si se ejecutan desde el APP el cambio en CRONUS se hace al mismo tiempo que el cambio a WMS, por ejemplo:</span></p> <ul style="text-align: justify;"> <li><span style="font-size: 12pt; font-family: arial, helvetica, sans-serif;">Al alistar la NP y Facturar, CRONUS y WMS ejecutan al mismo tiempo el cambio de saldos</span></li> <li><span style="font-size: 12pt; font-family: arial, helvetica, sans-serif;">WMS ejecuta funciones que CRONUS no tiene:</span> <ul> <li><span style="font-size: 12pt; font-family: arial, helvetica, sans-serif;">Mueve productos de ubicaciones de WMS</span></li> <li><span style="font-size: 12pt; font-family: arial, helvetica, sans-serif;">Permite alisto y traslado de Ubicaciones sin que Cronus medie.</span></li> </ul> </li> </ul> <p style="text-align: justify;"><span style="font-size: 12pt; font-family: arial, helvetica, sans-serif;">No obstante hay algunas funciones de ajustes en CRONUS que no est&aacute;n directamente asociadas a un movimiento de WMS y por ende tienen que distribuirse de forma posterior, para eso se usa el proceso de inventario por distribuir.</span></p> <p style="text-align: justify;"><span style="font-size: 12pt; font-family: arial, helvetica, sans-serif;"><strong>Diferencias</strong></span></p> <ul style="text-align: justify;"> <li><span style="font-size: 12pt; font-family: arial, helvetica, sans-serif;">Movimientos por Distribuir</span> <ul> <li><span style="font-size: 12pt; font-family: arial, helvetica, sans-serif;">Transacciones que se generan en CRONUS</span></li> <li><span style="font-size: 12pt; font-family: arial, helvetica, sans-serif;">No tienen procesos de Alisto en el APP</span></li> <li><span style="font-size: 12pt; font-family: arial, helvetica, sans-serif;">Requiere de creaci&oacute;n de Solicitudes WMS</span></li> </ul> </li> <li><span style="font-size: 12pt; font-family: arial, helvetica, sans-serif;">Solicitudes en WMS</span> <ul> <li><span style="font-size: 12pt; font-family: arial, helvetica, sans-serif;">Que no han sido creadas en CRONUS</span></li> <li><span style="font-size: 12pt; font-family: arial, helvetica, sans-serif;">Con estado Pendiente</span></li> </ul> </li> <li><span style="font-size: 12pt; font-family: arial, helvetica, sans-serif;">Saldos de Bodegas transitorias</span> <ul> <li><span style="font-size: 12pt; font-family: arial, helvetica, sans-serif;">Al reservar en CRONUS los movimientos pasan de la bodega normal a la bodega de reservas</span></li> <li><span style="font-size: 12pt; font-family: arial, helvetica, sans-serif;">En el WMS este movimiento no se da, y los movimientos quedan en la bodega norma WMS (y se alistan desde ah&iacute;)</span></li> </ul> </li> </ul> <p style="text-align: justify;"><span style="font-size: 12pt; font-family: arial, helvetica, sans-serif;"><strong>Procedimientos almacenados requeridos</strong></span></p> <ul style="text-align: justify;"> <li><span style="font-size: 12pt; font-family: arial, helvetica, sans-serif;">Movimientos por Distribuir</span> <ul> <li><span style="font-size: 12pt; font-family: arial, helvetica, sans-serif;"><strong>exec [dbo].[USP_CRONUS_WMS_repara_saldos]</strong> (Revisa que el encabezado coincida con el detalle de WMS, la diferencia importante es que siempre ajusta los movimientos para que den igual al saldo)</span> <ul> <li><span style="font-size: 12pt; font-family: arial, helvetica, sans-serif;">@COD_CIA ='001'</span></li> <li><span style="font-size: 12pt; font-family: arial, helvetica, sans-serif;">,@COD_PROD = ''</span></li> <li><span style="font-size: 12pt; font-family: arial, helvetica, sans-serif;">,@COD_USUARIO ='CRFUSION'</span></li> <li><span style="font-size: 12pt; font-family: arial, helvetica, sans-serif;">,@IND_REPARA_NEGATIVOS ='S'</span></li> <li><span style="font-size: 12pt; font-family: arial, helvetica, sans-serif;">,@IND_PRUEBAS ='S'</span></li> <li><span style="font-size: 12pt; font-family: arial, helvetica, sans-serif;">,@COD_BODEGA = ''</span></li> <li><span style="font-size: 12pt; font-family: arial, helvetica, sans-serif;">,@ESTANTE = -1</span></li> </ul> </li> <li><span style="font-size: 12pt; font-family: arial, helvetica, sans-serif;"><strong>exec [dbo].[USP_CRONUS_WMS_saldos_compara]</strong> (Revisa temporales y puede reparar el saldo)</span> <ul> <li><span style="font-size: 12pt; font-family: arial, helvetica, sans-serif;">@COD_CIA ='001'</span></li> <li><span style="font-size: 12pt; font-family: arial, helvetica, sans-serif;">,@COD_PROD = ''</span></li> <li><span style="font-size: 12pt; font-family: arial, helvetica, sans-serif;">,@COD_BODEGA = ''</span></li> <li><span style="font-size: 12pt; font-family: arial, helvetica, sans-serif;">,@IND_TOMAR_NP_EN_ALISTO ='N'</span></li> <li><span style="font-size: 12pt; font-family: arial, helvetica, sans-serif;">,@IND_ACTUALIZAR = 'N'</span></li> <li><span style="font-size: 12pt; font-family: arial, helvetica, sans-serif;">,@IND_MOSTRAR_DISTRIBUIR ='N'</span></li> <li><span style="font-size: 12pt; font-family: arial, helvetica, sans-serif;">,@IND_MOSTRAR_WMS ='N'</span></li> <li><span style="font-size: 12pt; font-family: arial, helvetica, sans-serif;">,@IND_SOLO_NORMALES = 'S'</span></li> </ul> </li> </ul> </li> </ul> <p style="text-align: justify;">&nbsp;</p> <p style="text-align: justify;">&nbsp;</p>

# CRONUS-Movimientos-Cajas-Cierre-tarjetas-de-crédito-Retenciones-e-Impuestos

<span style="font-weight: 400;">Para mejorar la administración de cierres de caja y conciliaciones bancarias, Cronus puede ser configurado con valores parametrizables que permitan codificar estos resultados y facilitar la asociación contable.</span><span style="font-weight: 400;">Es indispensable comprender esta configuración contable y de procesos para iniciar las operaciones correctamente.</span>

**Carriers (Emisores de tarjetas):**

<span style="font-weight: 400;">Primeramente los carriers deben ser configurados, estos contienen los porcentajes negociados con los diferentes emisores de tarjetas en el país. Los porcentajes asociados dependen enteramente de la negociación con ellos y están divididos en % de tarjeta, % de Retención y % de Renta, cualquiera de ellos puede quedar en cero (o todos).</span>

<span style="font-weight: 400;">***Mantenimientos\\Facturación\\Carriers:***</span>

<span style="font-weight: 400;">***![tarjet 1.png](/files/CRONUS-Movimientos-Cajas-Cierre-tarjetas-de-crdito-Retenciones-e-Impuestos/tarjet%201.png)***</span>

<span style="font-weight: 400;">Estos porcentajes son claves en la aplicación de los datos y una vez se hayan digitado y usados en cierres de caja los cambios hechos no son retroactivos, por ende solo aplican a los cierres posteriores al cambio.</span>

<span style="font-weight: 400;">No es el mismo caso que los recibos, un recibo de dinero por ejemplo por $100 pagados con $100 de tarjeta tienen calculado estos porcentajes, pero solo son aplicados al marcar el documento en un cierre de cajas, entonces, mientras que el recibo no haya pasado por este proceso los datos pueden variarse.</span>

**Tarjetas de crédito**

<span style="font-weight: 400;">Luego de definir los Carriers, podemos asociarles todas las posibles tarjetas de crédito que emitan y que nuestra empresa acepte. Es importante conocer que pueden incluir solo 1 tarjeta por Carrier por facilidad de digitación y opciones al usuario, pero de la misma forma pueden definir N cantidad.</span>

***Mantenimientos\\Facturación\\Tarjetas de crédito***

<span style="font-weight: 400;">Al incluir las tarjetas, recuerde asociar el Carrier correcto para evitar problemas potenciales con las tasas porcentuales calculadas:</span>

<span style="font-weight: 400;">![tarjet 2.png](/files/CRONUS-Movimientos-Cajas-Cierre-tarjetas-de-crdito-Retenciones-e-Impuestos/tarjet%202.png)</span>

<span style="font-weight: 400;">Ahora, también tienen la opción de ligar la cuenta corriente a la tarjeta de crédito. Esto ayudaría para que a la hora de hacer el cierre de caja, cuando se marcan los recibos que tienen en forma de pago tarjeta, estos queden de una vez ligados a las cuentas bancarias de cada emisario de la tarjeta: </span>

 ![](https://ayuda.cronuserp.com/uploads/images/migrated/Screenshot_1.png)[![6666.png](https://ayuda.cronuserp.com/uploads/images/gallery/2025-08/scaled-1680-/6666.png)](https://ayuda.cronuserp.com/uploads/images/gallery/2025-08/6666.png)[](https://ayuda.cronuserp.com/uploads/images/gallery/2025-08/6666.png)<span style="font-weight: 400;"></span>

<span style="background-color: #ffffff; color: #ff0000;">**Puntos importantes a tomar en cuenta en este proceso:** </span>

- <span style="font-weight: 400;">En el Cierre de Cajas ahora se presentan los depósitos asociados a tarjetas de forma automática.</span>
- Se pueden alterar los datos con el proceso de cambiar número de depósitos. ( Con el permiso respectivo )
- Reporte va a presentar todos los datos incluyendo todas las tarjetas.
- Pueden existir tarjetas con Cuenta y otras que NO la tengan
 
**Manejo contable de recibos y cierres**

<span style="font-weight: 400;">El manejo contable del cierre con tarjetas es el siguiente: </span>

<span style="font-weight: 400;">El asiento de los recibos se visualizan de la siguiente manera :</span>

- <span style="font-weight: 400;">Crédito a Cuentas por Cobrar (Rebaja el dinero que debe el cliente)</span>
- <span style="font-weight: 400;">Débito a Dinero por depositar (Aumenta el dinero que falta de cerrar)</span>
 
<span style="font-weight: 400;">El asiento de los depósitos bancarios van de la siguiente manera :</span>

- <span style="font-weight: 400;">Crédito a Dinero por depositar (El dinero ya no está pendiente de cierre)</span>
- <span style="font-weight: 400;">Débito a Cuenta Bancaria (Rebaja el dinero que debe el cliente)</span>
 
**Proceso de cierre y Recibos de dinero**

<span style="font-weight: 400;">Todos los recibos con forma de pago Tarjeta de crédito - ya sea parcial o total - son calculados en el Cierre de Caja, Cronus rebaja la totalidad del monto de tarjeta de crédito y solo envía a depósito bancario la diferencia, por ejemplo:</span>

<span style="font-weight: 400;">Recibo de 10,000, menos el 7.6% de tarjeta, el depósito bancario o voucher debe ir por 9,240 y este monto exacto se va a depositar al módulo de cuentas corrientes, esto ocasiona que la conciliación bancaria sea transparente porque los montos van a ser idénticos.</span>

<span style="font-weight: 400;">Ahora, debido al asiento que se explicó en el punto previo, se puede identificar una diferencia contable, el recibo de dinero es por 10,000 y el depósito por 9,240 ocasionando que la cuenta contable de dinero por depositar no de cero, aunado a que no hay registro contable de las retenciones y renta.</span>

<span style="font-weight: 400;">![tarjet 3.png](/files/CRONUS-Movimientos-Cajas-Cierre-tarjetas-de-crdito-Retenciones-e-Impuestos/tarjet%203.png)</span>

<span style="font-weight: 400;">La impresión de un cierre de caja va a identificar claramente el monto de los depósitos y justificar la diferencia a las tarjetas con su porcentaje total asociado:</span>

<span style="font-weight: 400;">![tarjet 4.png](/files/CRONUS-Movimientos-Cajas-Cierre-tarjetas-de-crdito-Retenciones-e-Impuestos/tarjet%204.png)</span>

**Asiento de cierre de cajas**

<span style="font-weight: 400;">Para cuadrar la cuenta de “Dineros por depositar” el paso a seguir es ejecutar el asiento de cierres de caja </span>

***Movimientos\\Asiento contable:***

***<span style="font-weight: 400;">El asiento contable pendiente de este movimiento se ve a continuación:</span>***

***<span style="font-weight: 400;">![tarjet 6.png](/files/CRONUS-Movimientos-Cajas-Cierre-tarjetas-de-crdito-Retenciones-e-Impuestos/tarjet%206.png)</span>***

# CRONUS-Reportes-Generador-de-reportes-Derechos-especiales

### <span style="font-size: 12pt; font-family: arial, helvetica, sans-serif;"><span style="color: #000080;">**<span style="background-color: #ffffff;">Funciones especiales:</span>**</span><span style="background-color: #ffffff; color: #222222; display: block;"> </span></span>

- <span style="font-size: 12pt; font-family: arial, helvetica, sans-serif;">Si no desean ver costos, deben quitar acceso a : "DERCOSTO"</span>
 
<span style="font-size: 12pt; font-family: arial, helvetica, sans-serif;">El generador de reportes de CRONUS tiene múltiples opciones, separadas por nodos y/o ramas en una vista de árbol. No todos los reportes tienen un derecho único asignado y muchos convergen asociados a un solo derecho de seguridad, abajo de la imagen se presenta una idea general de estos derechos y los resultados que se pueden obtener.</span>

<div id="bkmrk-"><span style="font-size: 12pt; font-family: arial, helvetica, sans-serif;"></span></div>### <span style="background-color: #ffffff; color: #222222; font-family: arial, helvetica, sans-serif; font-size: 12pt;">Nodo 1. Entre comillas aparecen los derechos que se deben tener para desplegar estos nodos.</span>

- <span style="color: #222222; font-family: arial, helvetica, sans-serif; font-size: 12pt;">"MCLIENTES1\_ADM" <span class="il">Reportes</span> asociados a clientes</span>
- <span style="color: #222222; font-family: arial, helvetica, sans-serif; font-size: 12pt;">"RCR\_DOCUMENTOS" <span class="il">Reportes</span> de facturas, Nc, Etc</span>
- <span style="color: #222222; font-family: arial, helvetica, sans-serif; font-size: 12pt;">"RCR\_INVENTARIOS" Inventarios, Movimientos</span>
- <span style="color: #222222; font-family: arial, helvetica, sans-serif; font-size: 12pt;">"RCR\_ESTADISTICA" Estadísticas, ventas por Producto, Factura, Familia, etc</span>
- <span style="color: #222222; font-family: arial, helvetica, sans-serif; font-size: 12pt;">"RCR\_ESTAGECP" "Estadísticas\\Agente\\Costo promedio"</span>
- <span style="color: #222222; font-family: arial, helvetica, sans-serif; font-size: 12pt;">"RCR\_ESTAGECS" "Estadísticas\\Agente\\Costo sistema"</span>
 
### <span style="font-size: 12pt; font-family: arial, helvetica, sans-serif;"><span style="background-color: #ffffff; color: #222222;">Nodo 2. </span><span style="background-color: #ffffff; color: #222222;">Algunos de estos procesos está anidados, osea, unos dependen de otros, por ejemplo para ver comisiones se ocupa ver Estadísticas, entonces Estadísticas es el valor de Nodo1 y Comisiones un Proceso de Nodo2.</span></span>

<span style="background-color: #ffffff; color: #222222; display: block; font-family: arial, helvetica, sans-serif; font-size: 12pt;"><span style="background-color: #ffffff; color: #222222; display: block;"> </span></span>

- <span style="font-size: 12pt; font-family: arial, helvetica, sans-serif;">"RCONSULTA2\_INV" Balance de inventario</span>
- <span style="font-size: 12pt; font-family: arial, helvetica, sans-serif;">"EINVENC1" Movimientos de inventario a XLS</span>
- <span style="font-size: 12pt; font-family: arial, helvetica, sans-serif;">"PTOMA\_FISICA" <span class="il">Reportes</span> de Tomas físicas</span>
- <span style="font-size: 12pt; font-family: arial, helvetica, sans-serif;">"RSOLITRASL1" Solicitudes de movimientos de inventario</span>
- <span style="font-size: 12pt; font-family: arial, helvetica, sans-serif;">"PPUNTOSREO1" Puntos de reorden</span>
- <span style="font-size: 12pt; font-family: arial, helvetica, sans-serif;">"RTRAMITE1" Trámite de documentos</span>
- <span style="font-size: 12pt; font-family: arial, helvetica, sans-serif;">"REMOVPRD01" Producción general</span>
- <span style="font-size: 12pt; font-family: arial, helvetica, sans-serif;">"REMOVPRD02" Producción por período</span>
- <span style="font-size: 12pt; font-family: arial, helvetica, sans-serif;">"RCOMISIONES" Comisiones</span>
    - <span style="font-size: 12pt; font-family: arial, helvetica, sans-serif;">"RCOMISIONESC" Comisiones</span>
    - <span style="font-size: 12pt; font-family: arial, helvetica, sans-serif;">"RCOMISIONESF" Comisiones</span>
- <span style="font-size: 12pt; font-family: arial, helvetica, sans-serif;">"BODEGUERO1" Facturas por entregar, pendientes, a XLS, etc.</span>
- <span style="font-size: 12pt; font-family: arial, helvetica, sans-serif;">"RINVEXINCS" Productos ventas-compras e inventario (costos y exportador)</span>
- <span style="font-size: 12pt; font-family: arial, helvetica, sans-serif;">"PFACTORIMP01" Factoreo definición de parámetro para <span class="il">reporte</span></span>
- <span style="font-size: 12pt; font-family: arial, helvetica, sans-serif;">"PCNFGREP01" Editar GRUPOS para filtros</span>
- <span style="font-size: 12pt; font-family: arial, helvetica, sans-serif;">"RCR\_DWHESTAD01" Datawarehouse</span>
- <span style="color: #222222; font-family: arial, helvetica, sans-serif; font-size: 12pt;">"RCR\_INVBCNT01" Reportes de Balance Contable</span>
 
<span style="background-color: #ffffff; color: #222222; display: block; font-family: arial,sans-serif; font-size: 12.8px;">  


</span>

# CRONUS erp puente WMS Adaia - Procesos de Recepción y Expedición

<p><strong>Codificaci&oacute;n de la ORDEN del WMS&nbsp;</strong></p> <ul> <li>C&oacute;digo de Sucursal Abreviado (3 Char) (Casilla en Sucursales en Cronus Erp &uacute;nica por compa&ntilde;&iacute;a)</li> <li>Tipo (2 char) <ul> <li>SO - Solicitud de Inventario</li> <li>IM - Importaci&oacute;n</li> <li>IV - Movimiento de Inventario</li> <li>FA - Factura</li> <li>DV - Devoluci&oacute;n de CXC</li> <li>OR - Orden de compra</li> </ul> </li> <li>Consecutivo interno (8 char) <ul> <li>Solicitudes de Inventario son por compa&ntilde;&iacute;a</li> <li>Facturas son por Sucursal</li> </ul> </li> </ul> <p><strong>API con WMS</strong>&nbsp;confirma una Recepci&oacute;n o Expedici&oacute;n al lado de <strong>CRONUS Erp</strong>&nbsp;ocurren distintos procesos los cuales son:</p> <ul> <li>Confirmaci&oacute;n de recepci&oacute;n <ul> <li><strong>Importaci&oacute;n</strong>: al momento de confirmar una recepci&oacute;n de importaci&oacute;n <strong>CRONUS Erp</strong> realiza los siguientes procesos: <ul> <li>Se leen las cantidades enviadas por el WMS y se ingresan en el campo cantidad le&iacute;da tanto en la O.C como en la Importaci&oacute;n.</li> <li>Se ingresa el documento basado en la importaci&oacute;n enviada.</li> <li>Se ejecutan los movimientos de inventario.</li> <li>Se ingresa el monto del documento en la distribuci&oacute;n de pagos.</li> </ul> </li> <li><strong>Orden de compra</strong>: al momento de confirmar una recepci&oacute;n de una orden de compra <strong>CRONUS Erp</strong> realiza los siguientes procesos: <ul> <li>Se valida que la cantidad enviada por el WMS no sea mayor a la cantidad pendiente por procesar, en caso de que exista alguna cantidad mayor no podr&aacute; seguir con el proceso.</li> <li>Se actualizan los campos de cantidad le&iacute;da.</li> <li>Se registra la factura basado en el n&uacute;mero de documento enviado por el WMS.</li> <li>Se ingresa el monto del documento en la distribuci&oacute;n de pagos.</li> </ul> </li> <li><strong>Solicitud de inventario</strong>:&nbsp;al momento de confirmar una recepci&oacute;n de una solicitud de inventario&nbsp;<strong>CRONUS Erp</strong> realiza los siguientes procesos: <ul> <li><strong>Traslado Externo (sucursal origen y destino son diferentes)</strong> <ul> <li>Se aplica la solicitud.</li> <li>En caso de existir diferencias en las cantidades: <ul> <li>Se realiza una solicitud de inventario por las cantidades faltantes.</li> <li>Se aprueba la nueva solicitud.</li> <li>Se marca como procesada en el WMS la nueva solicitud.</li> </ul> </li> </ul> </li> <li><strong>Traslado Interno (Misma Sucursal, distintas bodegas)</strong> <ul> <li>En caso de existir diferencias en las cantidades: <ul> <li>Se desaprueba la solicitud.</li> <li>Se ajusta el inventario seg&uacute;n las cantidades enviadas por el WMS.</li> <li>Se aprueba la solicitud.</li> <li>Se marca la solicitud como procesada por el WMS.</li> <li>Se aplica la solicitud.</li> </ul> </li> <li>En caso de que todas las cantidades concuerden: <ul> <li>Se marca la solicitud como procesada por el WMS.</li> <li>Se aplica la solicitud.</li> </ul> </li> </ul> </li> <li><strong>Solicitud 1 solo Movimiento (no hay bodega transitoria)</strong> <ul> <li>En caso de existir diferencias en las cantidades: <ul> <li>Se desaprueba la solicitud.</li> <li>Se ajusta las l&iacute;neas seg&uacute;n las cantidades enviadas por el WMS.</li> <li>Se aprueba la solicitud.</li> <li>Se marca la solicitud como procesada por el WMS.</li> <li>Se aplica la solicitud.</li> </ul> </li> <li>En caso de que todas las cantidades concuerden: <ul> <li>Se marca la solicitud como procesada por el WMS.</li> <li>Se aplica la solicitud.</li> </ul> </li> </ul> </li> </ul> </li> <li><strong>Solicitud devoluci&oacute;n</strong>:&nbsp;&nbsp;al momento de confirmar una recepci&oacute;n de una solicitud de devoluci&oacute;n&nbsp;<strong>CRONUS Erp</strong> realiza los siguientes procesos: <ul> <li>En caso de existir diferencias en las cantidades: <ul> <li>Se desaprueba la solicitud.</li> <li>Se ajusta las l&iacute;neas seg&uacute;n las cantidades enviadas por el WMS.</li> <li>Se aprueba la solicitud.</li> </ul> </li> <li>Se marca la solicitud como procesada por el WMS.</li> <li>Si la solicitud requiere Nodos en el XML: <ul> <li>Se obtienen los usuarios configurados para el aviso WMS001.</li> <li>Se env&iacute;a un correo a los usuarios configurados informando &laquo;Se ha aprobado la solicitud de devoluci&oacute;n [n&uacute;mero de solicitud] desde el WMS, pero esta contiene NODOS OTROS, es necesario aplicar desde CRONUS&raquo;.</li> <li>En caso de no obtener usuarios configurados para el aviso, se retorna el mensaje de confirmaci&oacute;n &laquo;&iexcl;La solicitud se proces&oacute; pero es necesaria la aplicaci&oacute;n desde CRONUS!&raquo;.</li> </ul> </li> <li>Si la solicitud NO requiere Nodos en el XML: <ul> <li>Se procesa la solicitud como una devoluci&oacute;n multifactura.</li> <li>Se calcula la comisi&oacute;n negativa.</li> <li>Se aplica la devoluci&oacute;n.</li> </ul> </li> </ul> </li> </ul> </li> <li>Confirmaci&oacute;n de expedici&oacute;n <ul> <li><strong>Facturas</strong>:&nbsp;al momento de confirmar una expedici&oacute;n de facturas&nbsp;<strong>CRONUS Erp</strong> realiza los siguientes procesos: <ul> <li>Se valida el n&uacute;mero de documento enviado.</li> <li>Se marcan las l&iacute;neas y cantidades procesadas seg&uacute;n la informaci&oacute;n enviada por el WMS.</li> <li>En caso de existir alguna diferencia: <ul> <li>Se genera una solicitud de nota de cr&eacute;dito.</li> <li>La misma deber&aacute; ser aprobada y aplicada manualmente, esto con el fin de su respectiva revisi&oacute;n.</li> </ul> </li> </ul> </li> <li><strong>Solicitud de inventario</strong>:&nbsp;al momento de confirmar una expedici&oacute;n de una solicitud de inventario&nbsp;<strong>CRONUS Erp</strong> realiza los siguientes procesos: <ul> <li><strong>Traslado Externo (sucursal origen)</strong> <ul> <li>En caso de existir diferencias en las cantidades: <ul> <li>Se desaprueba la solicitud.</li> <li>Se ajusta el inventario seg&uacute;n las cantidades enviadas por el WMS.</li> <li>Se aprueba la solicitud.</li> <li>Se marca la solicitud como procesada por el WMS.</li> </ul> </li> <li>En caso de que todas las cantidades concuerden: <ul> <li>Se marca la solicitud como procesada por el WMS.</li> </ul> </li> </ul> </li> </ul> </li> </ul> </li> </ul> <p>Validaciones a tomar en cuenta para la sincronizaci&oacute;n de expediciones y recepciones:</p> <ul> <li><strong>Importaciones</strong>: las importaciones se sincronizar&aacute;n solamente si cumple con los siguientes requisitos: <ul> <li>La importaci&oacute;n est&eacute; en etapa 3.</li> <li>La importaci&oacute;n contenga el DUA.</li> <li>La importaci&oacute;n en su detalle debe poseer cantidad pendiente.</li> </ul> </li> <li><strong>Ordenes de compra (OC)</strong>: las OC se sincronizar&aacute;n solamente si cumple con los siguientes requisitos: <ul> <li>La OC posee un estado distinto a Nula.</li> <li>La OC cuenta con una aprobaci&oacute;n de usuario.</li> <li>La OC no est&aacute; relacionada a ninguna importaci&oacute;n.</li> </ul> </li> <li><strong>Facturas</strong>: las facturas una vez realizadas se sincronizar&aacute;n.</li> <li><strong>Solicitudes de inventario</strong>: las solicitudes de inventario se sincronizar&aacute;n solamente si cumple con los siguientes requisitos: <ul> <li>La solicitud posee un estado distinto a Nula.</li> <li>En caso de expedici&oacute;n la solicitud no se ha procesado a nivel de WMS.</li> <li>En caso de recepci&oacute;n la solicitud se ha procesado a nivel de WMS.</li> </ul> </li> <li><strong>Solicitudes de devoluci&oacute;n</strong>: las solicitudes de devoluciones se sincronizar&aacute;n solamente si cumple con los siguiente requisitos: <ul> <li>La solicitud posee un estado distinto a Nula.</li> <li>El tipo de solicitud es Devoluci&oacute;n (DE).</li> <li>No se ha procesado a nivel de WMS.</li> </ul> </li> </ul>

# CRONUS-Movimientos-Notas-de-pedido-Rastreo-de-pedidos

<p style="text-align: justify;"><span style="font-weight: 400; font-size: 12pt; font-family: arial, helvetica, sans-serif;">El rastreo s&oacute;lo se habilita para la facturaci&oacute;n con &ldquo;Notas de pedido&rdquo; configurable en opciones generales:</span></p> <p style="text-align: justify;"><span style="font-weight: 400; font-size: 12pt; font-family: arial, helvetica, sans-serif;"><img style="display: block; margin-left: auto; margin-right: auto;" src="/files/CRONUS-Movimientos-Notas-de-pedido-Rastreo-de-pedidos/n%201.png" alt="n 1.png" width="284" height="49" /></span></p> <p style="text-align: justify;">&nbsp;</p> <p style="text-align: justify;"><span style="font-weight: 400; font-size: 12pt; font-family: arial, helvetica, sans-serif;">El ingreso al manejo global de Notas de Pedido se puede hacer mediante el bot&oacute;n que se presenta en el men&uacute; principal de CRONUS:</span></p> <p style="text-align: justify;"><span style="font-weight: 400; font-size: 12pt; font-family: arial, helvetica, sans-serif;"><img style="display: block; margin-left: auto; margin-right: auto;" src="/files/CRONUS-Movimientos-Notas-de-pedido-Rastreo-de-pedidos/n%202.png" alt="n 2.png" width="418" height="118" /></span></p> <p style="text-align: justify;">&nbsp;</p> <p style="text-align: justify;"><span style="font-weight: 400; font-size: 12pt; font-family: arial, helvetica, sans-serif;">Los estados asociados al rastreo son los siguientes :</span></p> <ol style="text-align: justify;"> <li style="font-weight: 400;"><span style="font-weight: 400; font-size: 12pt; font-family: arial, helvetica, sans-serif;">1 - Pedido incluido</span></li> <li style="font-weight: 400;"><span style="font-weight: 400; font-size: 12pt; font-family: arial, helvetica, sans-serif;">5 - Confirmar el pedido</span></li> <li style="font-weight: 400;"><span style="font-weight: 400; font-size: 12pt; font-family: arial, helvetica, sans-serif;">10 - Proceso de alisto</span></li> <li style="font-weight: 400;"><span style="font-weight: 400; font-size: 12pt; font-family: arial, helvetica, sans-serif;">15 - Revisi&oacute;n para ruteo</span></li> <li style="font-weight: 400;"><span style="font-weight: 400; font-size: 12pt; font-family: arial, helvetica, sans-serif;">20 - Facturado</span></li> <li style="font-weight: 400;"><span style="font-weight: 400; font-size: 12pt; font-family: arial, helvetica, sans-serif;">25 - En Ruta</span></li> <li style="font-weight: 400;"><span style="font-weight: 400; font-size: 12pt; font-family: arial, helvetica, sans-serif;">30 - Entregado</span></li> <li style="font-weight: 400;"><span style="font-weight: 400; font-size: 12pt; font-family: arial, helvetica, sans-serif;">35 - No entregado</span></li> </ol> <p style="text-align: justify;"><span style="font-weight: 400; font-size: 12pt; font-family: arial, helvetica, sans-serif;"><img style="display: block; margin-left: auto; margin-right: auto;" src="/files/CRONUS-Movimientos-Notas-de-pedido-Rastreo-de-pedidos/n%203.png" alt="n 3.png" width="637" height="296" /></span></p> <p style="text-align: justify;">&nbsp;</p> <p style="text-align: justify;"><span style="font-weight: 400; font-size: 12pt; font-family: arial, helvetica, sans-serif;">En pantalla se muestran las NP con las siguientes caracter&iacute;sticas:</span></p> <ul style="text-align: justify;"> <li style="font-weight: 400;"><span style="font-weight: 400; font-size: 12pt; font-family: arial, helvetica, sans-serif;">Si la sucursal est&aacute; configurada solo para manejar reservas, solo las NP reservadas se muestran.</span></li> <li style="font-weight: 400;"><span style="font-weight: 400; font-size: 12pt; font-family: arial, helvetica, sans-serif;">Las nulas no se presentan.</span></li> <li style="font-weight: 400;"><span style="font-weight: 400; font-size: 12pt; font-family: arial, helvetica, sans-serif;">Basado en la configuraci&oacute;n del combo que aparece arriba a la derecha, si se marca la opci&oacute;n 1, &ldquo;Solo NP sin entrega&rdquo; aqu&iacute; se quitan los rastreos c&oacute;digo 30 y 35.</span></li> <li style="font-weight: 400;"><span style="font-weight: 400; font-size: 12pt; font-family: arial, helvetica, sans-serif;">Solo se presenta el &uacute;ltimo estado asociado al pedido y el bodeguero asociado a ese estado, m&uacute;ltiples bodegueros pudieron tener roles dentro de la cronolog&iacute;a.</span></li> <li style="font-weight: 400;"><span style="font-weight: 400; font-size: 12pt; font-family: arial, helvetica, sans-serif;">Para acceder a esta pantalla se ocupa el siguiente derecho &ldquo;MNOTASPC1&rdquo;.</span></li> </ul> <p style="text-align: justify;"><span style="font-weight: 400; font-size: 12pt; font-family: arial, helvetica, sans-serif;">&nbsp;</span></p> <p style="text-align: justify;"><span style="font-weight: 400; font-size: 12pt; font-family: arial, helvetica, sans-serif;">Si se desea visualizar la informaci&oacute;n de la bit&aacute;cora de cambio y estado, se busca la NP en lista y luego se presiona el bot&oacute;n &ldquo;Modifica&rdquo;.<img src="/files/CRONUS-Movimientos-Notas-de-pedido-Rastreo-de-pedidos/n%204.png" alt="n 4.png" width="56" height="56" /></span></p> <p style="text-align: justify;"><span style="font-weight: 400; font-size: 12pt; font-family: arial, helvetica, sans-serif;"><img style="display: block; margin-left: auto; margin-right: auto;" src="/files/CRONUS-Movimientos-Notas-de-pedido-Rastreo-de-pedidos/n%205.png" alt="n 5.png" width="540" height="305" /></span></p> <p style="text-align: justify;">&nbsp;</p> <p style="text-align: justify;"><span style="font-size: 12pt; font-family: arial, helvetica, sans-serif;"><span style="font-weight: 400;">En esta pantalla el usuario puede auditar el tiempo transcurrido. Si se requiere cambiar el rastreo el derecho necesario es el siguiente &ldquo;MNOTASPC1&rdquo;.</span><span style="font-weight: 400;">Para alterar el dato, solamente elija un nuevo estado y asigne un bodeguero de la lista ( siempre y cuando el bodeguero est&eacute; activo y el estado sea v&aacute;lido).</span></span></p> <p style="text-align: justify;"><span style="font-weight: 400; font-size: 12pt; font-family: arial, helvetica, sans-serif;"><img style="display: block; margin-left: auto; margin-right: auto;" src="/files/CRONUS-Movimientos-Notas-de-pedido-Rastreo-de-pedidos/n%206.png" alt="n 6.png" width="194" height="163" /></span></p> <p style="text-align: justify;">&nbsp;</p> <p style="text-align: justify;"><span style="font-weight: 400; font-size: 12pt; font-family: arial, helvetica, sans-serif;">Las reglas para el cambio de estado y asignaci&oacute;n de bodeguero son las siguientes:</span></p> <ul style="text-align: justify;"> <li style="font-weight: 400;"><span style="font-weight: 400; font-size: 12pt; font-family: arial, helvetica, sans-serif;">No se le puede cambiar el estado a una NP nula.</span></li> <li style="font-weight: 400;"><span style="font-weight: 400; font-size: 12pt; font-family: arial, helvetica, sans-serif;">La NP tiene que iniciar por el estado 1.</span></li> <li style="font-weight: 400;"><span style="font-weight: 400; font-size: 12pt; font-family: arial, helvetica, sans-serif;">Las opciones 10 y 15 est&aacute;n obligadas a incluir un bodeguero.</span></li> <li style="font-weight: 400;"><span style="font-weight: 400; font-size: 12pt; font-family: arial, helvetica, sans-serif;">Ning&uacute;n estado puede ser inferior al &uacute;ltimo asignado.</span></li> <li style="font-weight: 400;"><span style="font-weight: 400; font-size: 12pt; font-family: arial, helvetica, sans-serif;">El bodeguero debe estar activo.</span></li> <li style="font-weight: 400;"><span style="font-weight: 400; font-size: 12pt; font-family: arial, helvetica, sans-serif;">No se puede marcar un estado 25, 30 y 35 si no ha pasado por el estado 20 (facturado).</span></li> <li style="font-weight: 400;"><span style="font-weight: 400; font-size: 12pt; font-family: arial, helvetica, sans-serif;">Cualquier estado puede ser reemplazado por el mismo y esto actualiza fecha, hora y usuario.</span></li> <li style="font-weight: 400;"><span style="font-weight: 400; font-size: 12pt; font-family: arial, helvetica, sans-serif;">El estado 1 y 20 son los &uacute;nicos que no pueden ser reemplazados porque ser&aacute;n controlados por CRONUS.</span></li> </ul> <p style="text-align: justify;"><span style="font-weight: 400; font-size: 12pt; font-family: arial, helvetica, sans-serif;">&nbsp;</span></p> <p style="text-align: justify;"><span style="font-weight: 400; font-size: 12pt; font-family: arial, helvetica, sans-serif;">Otra forma de acceder al Rastreo de pedidos son las siguiente:</span></p> <p style="text-align: justify;"><span style="font-weight: 400; font-size: 12pt; font-family: arial, helvetica, sans-serif;"><img style="display: block; margin-left: auto; margin-right: auto;" src="/files/CRONUS-Movimientos-Notas-de-pedido-Rastreo-de-pedidos/n%207.png" alt="n 7.png" width="609" height="271" /></span></p> <p style="text-align: justify;">&nbsp;</p>

# CRONUS-Reportes-Generador-de-reportes-por-grupo

<span style="font-weight: 400;">Para organizar el acceso a los reportes en los distintos departamentos, el administrador de CRONUS en su empresa puede crear distintos grupos con reportes asociados al rol de los empleados en la empresa:</span>

<span style="font-weight: 400;"></span>

<span style="font-weight: 400;">Para acceder como administrador y poder crear las listas de grupos necesita el siguiente derecho “PCNFGREP01”.</span>

<span style="font-weight: 400;">En el combo de grupo aparecen todos los roles incluidos dentro del sistema de seguridad en su versión WEB o cliente servidor.</span>

<span style="font-weight: 400;">Con la barra de funciones </span><span style="font-weight: 400;">se pueden incluir nuevos tipos, eliminar tipos y cambiar sus nombres (en ese orden)</span>

<span style="font-weight: 400;">Podemos ver como en el ejemplo se incluyó un nuevo tipo “Final de mes para administradores” con el motivo de que se agrupen todos los reportes que los empleados que cumplan ese rol deban generan de forma mensual.</span>

<span style="font-weight: 400;">Luego de esto simplemente podemos buscar los reportes de la lista principal y buscar el reporte que deseamos agregar a este tipo dentro Grupo “ADMIN” y con el click derecho presionamos sobre la opción “Agregar”:</span>

<span style="font-weight: 400;">Una vez que agregamos se presenta una pantalla de confirmación:</span>

<span style="font-weight: 400;">Y luego una opción de adicionar comentarios que nos permita definir una descripción asociada a este (puede quedar en blanco):</span>

<span style="font-weight: 400;">![repo 4.png](/files/CRONUS-Reportes-Generador-de-reportes-por-grupo/repo%204.png)</span>

<span style="font-weight: 400;">Una vez que esto quede configurado, cualquier usuario asociado al grupo “ADMIN” (en este caso) puede ver la lista de reportes asociada a su grupo SIN derechos a agregar, modificar o eliminar los ya existentes:</span>

# CRONUS-Mantenimiento-Clientes-Clientes-Cobro-fijo

<span style="font-size: 14pt; color: #ff0000; font-family: arial, helvetica, sans-serif;">**Notas importantes a tomar en cuenta para dicho proceso:**</span>

1. <span style="font-size: 12pt; color: #000000; font-family: arial, helvetica, sans-serif;">El usuario puede eliminar y/o modificar el dato de producto fijo incluido. </span>
2. <span style="font-size: 12pt; color: #000000; font-family: arial, helvetica, sans-serif;">La moneda es la de la factura, es decir, no hay conversiones.</span>
3. <span style="font-size: 12pt; color: #000000; font-family: arial, helvetica, sans-serif;">Se incluirá el producto fijo posterior a la inclusión manual del primer producto en el documento. </span>
4. <span style="font-size: 12pt; color: #000000; font-family: arial, helvetica, sans-serif;">La inclusión del producto fijo no se inactiva automáticamente, se dejará de incluir en los documentos únicamente si lo eliminan desde la pantalla del cliente directamente. </span>
5. <span style="font-size: 12pt; color: #000000; font-family: arial, helvetica, sans-serif;">El precio del producto incluido NO podrá ser modificado de ninguna manera en los documentos. </span>
 
<span style="font-size: 12pt; font-family: arial, helvetica, sans-serif;">En el menú principal de CRONUS ingresamos a Clientes, escogemos mediante un doble click al cuál deseamos agregarle el cobro fijo ( esto aplicaría en apartados, proformas y facturas ) , una vez en dicha pantalla vamos a la pestaña de Prod.Fijo:</span>

 ![](https://ayuda.cronuserp.com/uploads/images/migrated/Screenshot_1.png)<span style="font-size: 12pt; font-family: arial, helvetica, sans-serif;"></span>

<span style="font-size: 12pt; font-family: arial, helvetica, sans-serif;">En esta pestaña el sistema nos va a mostrar la siguiente pantalla donde debemos ingresar el producto deseado para el cobro seguido del precio fijo y presionamos "Aceptar" para guardar el cambio: </span>

[![Screenshot_3.png](https://ayuda.cronuserp.com/uploads/images/gallery/2025-08/scaled-1680-/screenshot-3.png)](https://ayuda.cronuserp.com/uploads/images/gallery/2025-08/screenshot-3.png)<span style="font-size: 12pt; font-family: arial, helvetica, sans-serif;"></span>

<span style="font-size: 12pt; font-family: arial, helvetica, sans-serif;">Cuando agregamos el producto, lo muestra en el campo de abajo: </span>

 ![](https://ayuda.cronuserp.com/uploads/images/migrated/Screenshot_4.png)<span style="font-size: 12pt; font-family: arial, helvetica, sans-serif;"></span>

<span style="font-size: 12pt; font-family: arial, helvetica, sans-serif;">Una vez incluidos los productos deseados, únicamente debemos presionar el ícono de "ACEPTAR2 de la pantalla principal para guardar todos los cambios realizados: </span>

 ![](https://ayuda.cronuserp.com/uploads/images/migrated/Screenshot_5.png)<span style="font-size: 12pt; font-family: arial, helvetica, sans-serif;"></span>

<span style="font-size: 12pt; font-family: arial, helvetica, sans-serif;">Podemos eliminar y/o modificar la línea incluida, para esto debemos de posicionarnos en ella y marcamos según corresponda los íconos mostrados para dicho proceso y una vez que elegimos que acción deseamos realizar presionamos "SI" en la pantalla mostrada: </span>

 ![](https://ayuda.cronuserp.com/uploads/images/migrated/Screenshot_7.png)<span style="font-size: 12pt; font-family: arial, helvetica, sans-serif;"></span>

<span style="font-size: 12pt; font-family: arial, helvetica, sans-serif;">Y esto nos llevará la línea al campo inicial de inclusión para modificar los datos y presionamos nuevamente "Agregar" : </span>

 ![](https://ayuda.cronuserp.com/uploads/images/migrated/Screenshot_8.png)<span style="font-size: 12pt; font-family: arial, helvetica, sans-serif;"></span>

<span style="font-size: 12pt; font-family: arial, helvetica, sans-serif;">Ahora en el momento que a un cliente le aparten, proformen o facturen en el sistema; se incluirá por defecto el producto fijo definido según los pasos anteriores: </span>

 ![](https://ayuda.cronuserp.com/uploads/images/migrated/Screenshot_6.png)<span style="font-size: 12pt; font-family: arial, helvetica, sans-serif;"></span>

# CRONUS-Saldos-Ubicacion-Exportar-productos-sin-ubicacion

<span style="font-size: 12pt; font-family: arial, helvetica, sans-serif;">En esta opción podremos exportar la lista de los productos de la base de datos que no cuenten con ubicación definida. Para esto ingresamos a consulta de saldos =&gt; Ubicación =&gt; Exportar productos sin ubicación: </span>

 ![](https://ayuda.cronuserp.com/uploads/images/migrated/Screenshot_1.png)<span style="font-size: 12pt; font-family: arial, helvetica, sans-serif;"></span>

<span style="font-size: 12pt; font-family: arial, helvetica, sans-serif;">Una vez acá el sistema le emerge el mensaje para elegir el formato y poder descargar el archivo: </span>

 ![](https://ayuda.cronuserp.com/uploads/images/migrated/Screenshot_2.png)<span style="font-size: 12pt; font-family: arial, helvetica, sans-serif;"></span>

<span style="font-size: 12pt; font-family: arial, helvetica, sans-serif;">Por último debemos elegir donde guardar el archivo en la computadora: </span>

[![Screenshot_3.png](https://ayuda.cronuserp.com/uploads/images/gallery/2025-08/scaled-1680-/screenshot-3.png)](https://ayuda.cronuserp.com/uploads/images/gallery/2025-08/screenshot-3.png)<span style="font-size: 12pt; font-family: arial, helvetica, sans-serif;"></span>

# CRONUS-Movimientos-Proformas

<span style="font-size: 12pt; font-family: arial, helvetica, sans-serif;">Presione el botón **"Proforma"** ubicado en la barra de botones de la pantalla principal de Cronus.</span>

 ![](https://ayuda.cronuserp.com/uploads/images/migrated/Screenshot_1.png)<span style="font-size: 12pt; font-family: arial, helvetica, sans-serif;"></span>

 ![](https://ayuda.cronuserp.com/uploads/images/migrated/Screenshot_6.png)<span style="font-size: 12pt; font-family: arial, helvetica, sans-serif;"></span>

<span style="font-size: 12pt; font-family: arial, helvetica, sans-serif;">Para crear una proforma nueva presionamos el botón **"Incluir"** ubicado arriba a la izquierda de la pantalla. Lo primero que debemos de hacer es identificar el tipo de documento si es proforma de crédito o de contado. La fecha es sugerida de forma automática por el servidor, luego debemos de identificar al cliente al que deseamos proformarle, si sabe el número de código lo puede digitar, si no lo sabe, puede presionar el botón con un símbolo de pregunta ubicado abajo del campo "Número" y buscar en la lista, para escogerlo haga doble click sobre el nombre del cliente. También debe escoger el proyecto, si aplicará que se posiciona en la parte de abajo de la casilla del cliente **( PRY )** ; y por último el agente ubicado en la parte de abajo de la casilla del proyecto ( mismo proceso que con cliente ) . </span>

 ![](https://ayuda.cronuserp.com/uploads/images/migrated/Screenshot_9.png)<span style="font-size: 12pt; font-family: arial, helvetica, sans-serif;"></span>

 ![](https://ayuda.cronuserp.com/uploads/images/migrated/Screenshot_10.png)<span style="font-size: 12pt; font-family: arial, helvetica, sans-serif;"></span>

<span style="font-size: 12pt; font-family: arial, helvetica, sans-serif;">Importante, también debemos seleccionar la moneda del documento, ( el sistema por default pondrá la moneda definida en el cliente ) pero si el usuario tiene permiso podrá proformar en distinta moneda a la del cliente.</span>

[![Screenshot_15.png](https://ayuda.cronuserp.com/uploads/images/gallery/2025-08/scaled-1680-/screenshot-15.png)](https://ayuda.cronuserp.com/uploads/images/gallery/2025-08/screenshot-15.png)<span style="font-size: 12pt; font-family: arial, helvetica, sans-serif;"></span>

<span style="font-size: 12pt; font-family: arial, helvetica, sans-serif;">Al lado derecho de la pantalla en la parte superior hay un campo de **"Observaciones"**, en el puede hacer anotaciones o recordatorios , estas observaciones saldrán impresas en la proforma.</span>

 ![](https://ayuda.cronuserp.com/uploads/images/migrated/Screenshot_11.png)<span style="font-size: 12pt; font-family: arial, helvetica, sans-serif;"></span>

<span style="font-size: 12pt; font-family: arial, helvetica, sans-serif;">Seguidamente seria el proceso de búsqueda de productos para proformar, funciona de la misma manera que la búsqueda de clientes, si usted sabe el código del producto lo puede digitar en el campo **"Producto"** o buscarlo digitando palabras claves en el campo que dice **"Búsqueda F4"**. Al hacerlo el sistema le mostrará todos los productos que contengan esas palabras en su descripción. Para escogerlo y poderlo proformar debe de hacer doble click sobre el. Después llenar los campos de cantidad, bodega y porcentaje de descuento (si aplica) luego presione el botón **"Incluir"**. Este procedimiento lo tiene que hacer con cada producto que desee proformar. Una vez cargados todos productos, verifique los precios, las cantidades y los descuentos aplicados, si tiene que modificar alguno, solo haga doble click sobre el y modifique la información.</span>

<span style="font-size: 12pt; font-family: arial, helvetica, sans-serif;">**Super importante recalcar para este proceso que la creación de una proforma NO amarra inventario.** </span>

 ![](https://ayuda.cronuserp.com/uploads/images/migrated/Screenshot_13.png)<span style="font-size: 12pt; font-family: arial, helvetica, sans-serif;"></span>

<span style="font-size: 12pt; font-family: arial, helvetica, sans-serif;">Para crear la proforma e imprimirla presione el botón "Aceptar" ubicado en la parte inferior izquierda de la pantalla". </span>

<span style="font-size: 12pt; font-family: arial, helvetica, sans-serif;">Por último en esta pantalla por defecto aparecen todos los documentos registrados, y ahí se pueden filtrar por fechas, ver los de hoy, hace 1 día, 1 semana o 1 mes o con rango definido. </span>

[![Screenshot_14.png](https://ayuda.cronuserp.com/uploads/images/gallery/2025-08/scaled-1680-/screenshot-14.png)](https://ayuda.cronuserp.com/uploads/images/gallery/2025-08/screenshot-14.png)<span style="font-size: 12pt; font-family: arial, helvetica, sans-serif;"></span>

<span style="font-size: 12pt; font-family: arial, helvetica, sans-serif;">Wikis relacionados:</span>

- <span style="color: #000080; font-size: 12pt; font-family: arial, helvetica, sans-serif;">[Cambiar estado de Alisto](CRONUS-Movimientos-Proformas-Cambiar-estado-de-alisto)</span>
- <span style="font-family: arial, helvetica, sans-serif; font-size: 12pt; color: #000080;">[Configuración de productos](CRONUS-Movimientos-Proformas-Alisto-Configuracion-de-productos)</span>
- <span style="font-family: arial, helvetica, sans-serif; font-size: 12pt; color: #000080;">[Enviar a facturar proformas](CRONUS-Movimientos-Proformas-Enviar-a-facturar)</span>
- <span style="font-family: arial, helvetica, sans-serif; font-size: 12pt; color: #000080;">[Back Order en proformas](CRONUS-Movimientos-Proformas-Back-order)</span>
- <span style="font-family: arial, helvetica, sans-serif; font-size: 12pt; color: #000080;">[Pre-proformas en CRONUS](CRONUS-Movimientos-Proformas-Pre-Proformas) </span>
- <span style="font-size: 12pt; font-family: arial, helvetica, sans-serif;">[<span style="color: #000080;">Alisto de proformas</span>](CRONUS-Movimientos-Proformas-Alisto-de-proformas)</span>
 

# CRONUS-Saldos-Ubicacion-Importar-ubicaciones

<span style="color: #ff0000;">**<span style="font-size: 14pt;">Notas importantes del proceso: </span>**</span>

- <span style="font-size: 12pt; font-family: arial, helvetica, sans-serif;">Se debe contar con dichos permisos para este proceso: **PPRODCCN1 - MAVISOSINUBIC2 - PPRODCCN1.**</span>
- <span style="font-size: 12pt; font-family: arial, helvetica, sans-serif;">Requiere Código de Compañía y Sucursal.</span>
- <span style="font-size: 12pt; font-family: arial, helvetica, sans-serif;">Detalle de la Ubicación.</span>
- <span style="font-size: 12pt; font-family: arial, helvetica, sans-serif;">Use CRONUS para ver los campos indispensables.</span>
 
<span style="color: #000000; font-size: 12pt; font-family: arial, helvetica, sans-serif;">Para esto el usuario debe ingresar a la pantalla de consulta de saldos: </span>

 ![](https://ayuda.cronuserp.com/uploads/images/migrated/Screenshot_2.png)<span style="color: #000000; font-size: 12pt; font-family: arial, helvetica, sans-serif;"></span>

<span style="color: #000000; font-size: 12pt; font-family: arial, helvetica, sans-serif;">Una vez acá se debe ingresar Ubicación =&gt; Importar Ubicación: </span>

[![Screenshot_3.png](https://ayuda.cronuserp.com/uploads/images/gallery/2025-08/scaled-1680-/screenshot-3.png)](https://ayuda.cronuserp.com/uploads/images/gallery/2025-08/screenshot-3.png)<span style="color: #000000; font-size: 12pt; font-family: arial, helvetica, sans-serif;"></span>

<span style="color: #000000; font-size: 12pt; font-family: arial, helvetica, sans-serif;">Con esto el sistema le mostrará los detalles con las columnas que debe contar el XLS a importar: </span>

 ![](https://ayuda.cronuserp.com/uploads/images/migrated/Screenshot_4.png)<span style="color: #000000; font-size: 12pt; font-family: arial, helvetica, sans-serif;"></span>

<span style="color: #000000; font-size: 12pt; font-family: arial, helvetica, sans-serif;">Una vez con el XLS completo con las columnas requeridas basta con seleccionar en la carpeta de la computadora donde lo tenemos previamente guardado y poder subirlo.</span>

# CRONUS-Mantenimiento-Clientes-Proyecto

<p><span style="font-size: 12pt; font-family: arial, helvetica, sans-serif; color: #000000;"><strong>Derecho relacionado:&nbsp;</strong></span></p> <ul> <li><span style="font-size: 12pt; font-family: arial, helvetica, sans-serif; color: #000000;"><strong><span style="font-weight: 400; font-family: arial, helvetica, sans-serif;">&ldquo;MCLIENTES1_PRY&rdquo;</span></strong></span></li> </ul> <p><span style="color: #ff0000; font-size: 14pt; font-family: arial, helvetica, sans-serif;"><strong>Nota importante para el proceso:&nbsp;</strong></span></p> <ul> <li> <p><span style="font-size: 12pt; font-family: arial, helvetica, sans-serif;">Solo para tipo de facturaci&oacute;n directo, no aplica a notas de pedido</span></p> </li> </ul> <p><span style="font-weight: 400; font-size: 12pt; font-family: arial, helvetica, sans-serif;">Es posible definir precios especiales para clientes, pero solo para proyectos espec&iacute;ficos de el, esto sin necesidad de reservar uno de los seis precios que ya est&aacute;n disponibles en CRONUS.&nbsp;</span></p> <p><span style="font-weight: 400; font-size: 12pt; font-family: arial, helvetica, sans-serif;">Para esto primero que todo se debe tener configurado el formato directo en las opciones generales :</span></p> <p><span style="font-weight: 400; font-size: 12pt; font-family: arial, helvetica, sans-serif;"><img style="display: block; margin-left: auto; margin-right: auto;" src="/files/CRONUS-Mantenimiento-Clientes-Clientes-Proyecto/pro%201.png" alt="pro 1.png" width="284" height="53" /></span></p> <p>&nbsp;</p> <p><span style="font-weight: 400; font-size: 12pt; font-family: arial, helvetica, sans-serif;">Luego de esto el usuario administrador puede incluirle a un cliente "N" cantidad de proyectos, esto permite incluir, eliminar, modificar e inactivar proyectos:</span></p> <p><span style="font-weight: 400; font-size: 12pt; font-family: arial, helvetica, sans-serif;"><img style="display: block; margin-left: auto; margin-right: auto;" src="/files/CRONUS-Mantenimiento-Clientes-Clientes-Proyecto/pro%202.png" alt="pro 2.png" width="461" height="169" /></span></p> <p>&nbsp;</p> <p><span style="font-weight: 400; font-size: 12pt; font-family: arial, helvetica, sans-serif;">Todos los proyectos tienen el chance de definir un descuento m&aacute;ximo asociado a el, esto sobrepasa el descuento del cliente y del usuario que est&aacute; proformando/facturando/apartando, el porcentaje tiene un valor por defecto de CERO, esto significa que NO se permiten descuentos asociados a el, SOLO para los productos que se encuentran en el proyecto.</span></p> <p><span style="font-size: 12pt; font-family: arial, helvetica, sans-serif;"><strong>Por ejemplo:</strong></span></p> <ol> <li style="font-weight: 400;"><span style="font-weight: 400; font-size: 12pt; font-family: arial, helvetica, sans-serif;">Tenemos el producto &ldquo;Mouse&rdquo; con un precio normal de 5mil, pero asociado al proyecto tiene un precio de 3mil.</span></li> <li style="font-weight: 400;"><span style="font-weight: 400; font-size: 12pt; font-family: arial, helvetica, sans-serif;">El descuento m&aacute;ximo asociado al proyecto SOLO aplica al producto Mouse.</span></li> <li style="font-weight: 400;"><span style="font-weight: 400; font-size: 12pt; font-family: arial, helvetica, sans-serif;">Si hay productos adicionales NO incluidos al proyecto estos NO tienen este bloqueo.</span></li> </ol> <p><span style="font-weight: 400; font-size: 12pt; font-family: arial, helvetica, sans-serif;"><img style="display: block; margin-left: auto; margin-right: auto;" src="/files/CRONUS-Mantenimiento-Clientes-Clientes-Proyecto/pro%203.png" alt="pro 3.png" width="607" height="374" /></span></p> <p>&nbsp;</p> <p><span style="font-weight: 400; font-size: 12pt; font-family: arial, helvetica, sans-serif;">Una vez incluido el proyecto debemos entrar a este nuevamente para ir a incluir los productos. Los productos asociados al proyecto solo se pueden incluir ley&eacute;ndolo de una tabla de Microsoft Excel (debe tener formato de celdas &ldquo;TEXTO &ldquo; ) que cumpla con el siguiente formato :</span></p> <p><span style="font-weight: 400; font-size: 12pt; font-family: arial, helvetica, sans-serif;"><img style="display: block; margin-left: auto; margin-right: auto;" src="/files/CRONUS-Mantenimiento-Clientes-Clientes-Proyecto/pro%204.png" alt="pro 4.png" width="440" height="215" /></span></p> <p>&nbsp;</p> <p><span style="font-weight: 400; font-size: 12pt; font-family: arial, helvetica, sans-serif;">Puede exportar la lista de productos desde el mantenimiento a productos o desde el exportador en el generador de reportes. Esta es la opci&oacute;n de ir a la pantalla de productos y de esta manera puede posicionarse sobre el producto que desee agregar a la lista de excel, solamente debe darle &ldquo;CTRL + F1 &ldquo; para copiar el c&oacute;digo y lo pega en la lista para importar:</span></p> <p>&nbsp;</p> <p><span style="font-weight: 400; font-size: 12pt; font-family: arial, helvetica, sans-serif;"><img style="display: block; margin-left: auto; margin-right: auto;" src="/files/CRONUS-Mantenimiento-Clientes-Clientes-Proyecto/pro%205.png" alt="pro 5.png" width="597" height="322" /></span></p> <p>&nbsp;</p> <p><span style="font-weight: 400; font-size: 12pt; font-family: arial, helvetica, sans-serif;">Recuerde que la moneda del precio debe coincidir con la moneda actual de la lista principal y los precios no expiran hasta que se inactive el proyecto.</span></p> <p><span style="font-weight: 400; font-size: 12pt; font-family: arial, helvetica, sans-serif;">Al importar los productos, si estos tienen hijos los cambios ser&aacute;n replicados a todos ellos.</span></p> <p><span style="font-weight: 400; font-size: 12pt; font-family: arial, helvetica, sans-serif;">Para eliminar un producto de la lista, simplemente se le hace un doble click y se contin&uacute;a con la pantalla:</span></p> <p><span style="font-weight: 400; font-size: 12pt; font-family: arial, helvetica, sans-serif;"><img style="display: block; margin-left: auto; margin-right: auto;" src="/files/CRONUS-Mantenimiento-Clientes-Clientes-Proyecto/pro%206.png" alt="pro 6.png" width="389" height="177" /></span></p> <p>&nbsp;</p> <p><span style="font-size: 12pt; font-family: arial, helvetica, sans-serif;"><strong>Facturar, Proformar y Apartar:</strong></span></p> <p><span style="font-weight: 400; font-size: 12pt; font-family: arial, helvetica, sans-serif;">Cuando un producto tenga un proyecto asociado y este tenga un precio definido aparecer&aacute; una leyenda debajo de la descripci&oacute;n que lo indica, el usuario NO podr&aacute; elegir otro tipo de precio y el &uacute;nico disponible es el asociado al proyecto.</span></p> <p><span style="font-weight: 400; font-size: 12pt; font-family: arial, helvetica, sans-serif;">Si el producto no se encuentra asociado al proyecto, aplican las mismas reglas actuales:</span></p> <p><span style="font-weight: 400; font-size: 12pt; font-family: arial, helvetica, sans-serif;"><img style="display: block; margin-left: auto; margin-right: auto;" src="/files/CRONUS-Mantenimiento-Clientes-Clientes-Proyecto/pro%207.png" alt="pro 7.png" width="629" height="377" /></span></p> <p>&nbsp;</p> <p>&nbsp;</p> <p>&nbsp;</p>

# CRONUS-Saldos-Ubicacion-Ubicaciones-WMS

<span style="font-size: 12pt; font-family: arial, helvetica, sans-serif;">Permisos relacionados :</span>

- <span style="font-size: 12pt; font-family: arial, helvetica, sans-serif;"> MAVISOSINUBIC2, MAVISOSINUBIC1,MUBICACION1, WMS\_UBI\_ING, WMS\_UBI\_MOV\_GRUPAL</span>
 
<span style="font-size: 12pt; font-family: arial, helvetica, sans-serif;">En esta pantalla podremos asignar las ubicaciones a los productos manualmente. Para esto ingresamos a consulta de saldos filtramos el que requerimos y una vez seleccionado el producto ingresamos a ubicación =&gt; Ubicaciones WMS. Con esto el sistema nos abrirá la siguiente pantalla donde debemos ingresar los datos requeridos. </span>

[![Screenshot_3.png](https://ayuda.cronuserp.com/uploads/images/gallery/2025-08/scaled-1680-/screenshot-3.png)](https://ayuda.cronuserp.com/uploads/images/gallery/2025-08/screenshot-3.png)<span style="font-size: 12pt; font-family: arial, helvetica, sans-serif;"></span>

<span style="font-size: 12pt; font-family: arial, helvetica, sans-serif;">Elegimos la zona, estante, fila y columna y presionamos incluir para guardar el cambio: </span>

 ![](https://ayuda.cronuserp.com/uploads/images/migrated/Screenshot_4.png)<span style="font-size: 12pt; font-family: arial, helvetica, sans-serif;"></span>

<span style="font-size: 12pt; font-family: arial, helvetica, sans-serif;">Una vez que lo incluimos se nos presenta en la pantalla principal y basta con presionar aceptar para guardar el cambio: </span>

 ![](https://ayuda.cronuserp.com/uploads/images/migrated/Screenshot_5.png)<span style="font-size: 12pt; font-family: arial, helvetica, sans-serif;"></span>

<span style="font-size: 12pt; font-family: arial, helvetica, sans-serif;">En caso de equivocarnos con el ingreso de la ubicación, o que deseemos eliminar una ya incluida debemos presionar click derecho sobre la línea e indicar eliminar ubicación: </span>

 ![](https://ayuda.cronuserp.com/uploads/images/migrated/Screenshot_6.png)<span style="font-size: 12pt; font-family: arial, helvetica, sans-serif;"></span>

<span style="font-size: 12pt; font-family: arial, helvetica, sans-serif;">Una vez acá el sistema nos emerge una ventana de confirmación: </span>

 ![](https://ayuda.cronuserp.com/uploads/images/migrated/Screenshot_7.png)<span style="font-size: 12pt; font-family: arial, helvetica, sans-serif;"></span>

<span style="font-size: 12pt; font-family: arial, helvetica, sans-serif;">Y por último debemos confirmar la eliminación de la misma: </span>

 ![](https://ayuda.cronuserp.com/uploads/images/migrated/Screenshot_8.png)<span style="font-size: 12pt; font-family: arial, helvetica, sans-serif;"></span>

<span style="font-size: 12pt; font-family: arial, helvetica, sans-serif;">Desde esa misma opción podemos eliminar todas las ligadas a ese producto o cambiar el estado de la ubicación. </span>

 ![](https://ayuda.cronuserp.com/uploads/images/migrated/Screenshot_9.png)<span style="font-size: 12pt; font-family: arial, helvetica, sans-serif;"></span>

# CRONUS-Movimientos-Proformas-Alisto-Configuracion-de-productos

<span style="font-size: 12pt; font-family: arial, helvetica, sans-serif;">**Para configurar los productos para ser utilizados por el proceso de alisto de proformas siga los siguientes pasos**</span>

<span style="font-size: 12pt; font-family: arial, helvetica, sans-serif;">Primeramente debemos indicarle al sistema cuáles productos serán utilizados para manejo de lotes, tenemos dos maneras de realizar dicho proceso.</span>

- <span style="font-size: 12pt; font-family: arial, helvetica, sans-serif;">Se lo asignamos manual, elegimos el producto que deseamos marcar= &gt; Indicador = &gt; Inventarios = &gt; Y marcamos el check indicado (Aplica Manejo de lotes ), posteriormente le damos "aceptar" para guardar los cambios: </span>
 
 ![](https://ayuda.cronuserp.com/uploads/images/migrated/Screenshot_12.png)- <span style="font-size: 12pt; font-family: arial, helvetica, sans-serif;">También lo podemos realizar mediante una actualización masiva, para esto debemos ingresar al menú Otros= &gt; Actualización masivas de productos ahí llenamos los campos de encabezados y los campos que debemos llenar por obligación en el XLS a cargar para dicho cambio serían los marcados en la imagen : </span> <table border="1" style="border-collapse: collapse; width: 92.5108%; height: 642px;"> <tbody> <tr> ![](https://ayuda.cronuserp.com/uploads/images/migrated/Screenshot_13.png)<td style="width: 50%;"><span style="font-size: 12pt; font-family: arial, helvetica, sans-serif;"></span></td> <td style="width: 50%;">[![Screenshot_14.png](https://ayuda.cronuserp.com/uploads/images/gallery/2025-08/scaled-1680-/screenshot-14.png)](https://ayuda.cronuserp.com/uploads/images/gallery/2025-08/screenshot-14.png)<span style="font-size: 12pt; font-family: arial, helvetica, sans-serif;"></span>
    
     </td> </tr> </tbody> </table>
 

# CRONUS-Saldos-Utilitarios-Imprimir-etiqueta-de-precio

<span style="font-size: 12pt; font-family: arial, helvetica, sans-serif;">Con esta función podremos imprimir etiquetas de precio sobre el producto marcado. Para esto ingresamos a Consulta de saldos, buscamos el producto que deseamos y una vez seleccionado presionamos Utilitarios =&gt; Imprimir etiquetas de precio:</span>

 ![](https://ayuda.cronuserp.com/uploads/images/migrated/Screenshot_2.png)<span style="font-size: 12pt; font-family: arial, helvetica, sans-serif;"></span>

<span style="font-size: 12pt; font-family: arial, helvetica, sans-serif;">Una vez acá, debemos seguir los pasos acostumbrados de dicho proceso, ver manual **[aquí. ](https://ayuda.cronuserp.com/books/wiki-cronus-erp/page/CRONUS-Reportes-Etiquetas-de-Precios)**</span>

# Comisiones Tipo O de Cronus ERP

<hr /> <p style="text-align: justify;"><span style="font-size: 12pt; font-family: arial, helvetica, sans-serif;">Las comisiones siguen estos par&aacute;metros para ser calculadas:</span></p> <ul style="text-align: justify;"> <li><span style="font-size: 12pt; font-family: arial, helvetica, sans-serif;">Si el Agente tiene marcado el campo de&nbsp;Comisi&oacute;n como tipo <strong>"Agente"&nbsp;</strong></span>aplican los rangos Generales y se calculan sobre el total del documento.</li> </ul> <p><img style="display: block; margin-left: auto; margin-right: auto;" src="/files/CRONUS-Movimientos-Comisiones-Comisiones-Tipo-O/Screenshot%202025-04-03%20113137.png" alt="Screenshot 2025-04-03 113137.png" width="280" height="58" /><img style="display: block; margin-left: auto; margin-right: auto;" src="/files/CRONUS-Movimientos-Comisiones-Comisiones-Tipo-O/Screenshot%202025-04-03%20113506.png" alt="Screenshot 2025-04-03 113506.png" width="649" height="422" /></p> <ul style="text-align: justify;"> <li><span style="font-size: 12pt; font-family: arial, helvetica, sans-serif;">Si el Agente tiene marcado el campo de&nbsp;Comisi&oacute;n como tipo <strong>"Especial"&nbsp;</strong></span>aplican los rangos Especial y se calculan sobre el total del documento.</li> </ul> <p><img style="display: block; margin-left: auto; margin-right: auto;" src="/files/CRONUS-Movimientos-Comisiones-Comisiones-Tipo-O/Screenshot%202025-04-03%20113700.png" alt="Screenshot 2025-04-03 113700.png" width="276" height="59" /></p> <p><img style="display: block; margin-left: auto; margin-right: auto;" src="/files/CRONUS-Movimientos-Comisiones-Comisiones-Tipo-O/Screenshot%202025-04-03%20113642.png" alt="Screenshot 2025-04-03 113642.png" width="644" height="425" /></p> <ul> <li><span style="font-size: 12pt; font-family: arial, helvetica, sans-serif;">Si el Agente tiene marcado el campo de&nbsp;Comisi&oacute;n como tipo <strong>"Especial reducido"&nbsp;</strong></span>aplican los rangos Generales con una reduccion del 30% al porcentaje de ganancia y se calculan sobre el total del documento.</li> </ul> <hr /> <ul> <li style="text-align: justify;">Tipo Agente: Funciona comisionando los documentos en los cuales el agente aparece como agente principal, en base a la utilidad del documento se le da un porcentaje de ganancia del mismo.</li> <li style="text-align: justify;">Tipo Especial: Igual que el tipo Agente con la adicion de que se le pueden marcar una seria de categorias en las cuales el sistema automaticamente lo marca para comisiones como agente secundario en los documentos que lleven estas categorias, el calculo se hace por linea. En caso de ser Agente principal y secundario solo se toma en cuanta la comision del principal.</li> <li>Tipo Especial reducido: Igual que el tipo Especial pero a la hora de comisionar como principal recibe una reduccion del 30% en las comisiones, cuando lo hace como secundario no sucede nada.</li> </ul> <hr /> <ul> <li>Si los productos tienen marcado el check de importacion se limita el maximo porcentaje a comisionar en 1, si por ejemplo los rangos generales usan que de 25 a 30 se pague en 1.5% el mismo se vera limitado a solo 1%. <ul> <li>Para esto nos vamos a al producto en el apartado de importaciones y marcamos el check de producto importado.</li> </ul> </li> </ul>

# CRONUS-Sistema-Cambio-de-Clave

<span style="font-size: 12pt; font-family: arial, helvetica, sans-serif;">Para este proceso, basta con ingresar a sistema =&gt; cambio de clave: </span>

 ![](https://ayuda.cronuserp.com/uploads/images/migrated/Screenshot_5.png)<span style="font-size: 12pt; font-family: arial, helvetica, sans-serif;"></span>

<span style="font-size: 12pt; font-family: arial, helvetica, sans-serif;">Una vez acá el sistema emerge la pantalla, para completar con los campos necesarios y presionar "**aceptar**" para los cambios: </span>

 ![](https://ayuda.cronuserp.com/uploads/images/migrated/Screenshot_6.png)

# CRONUS-Movimientos-Proformas-Alisto-de-proformas

<span style="font-size: 12pt; font-family: arial, helvetica, sans-serif;">La pantalla de Manejo de Bodegas funciona para el control de alisto y entrega de productos a clientes, esta pantalla tiene 2 modelos de trabajo:</span>

- <span style="font-size: 12pt; font-family: arial, helvetica, sans-serif;">Alisto de Facturas (no se explica aquí).</span>
- <span style="font-size: 12pt; font-family: arial, helvetica, sans-serif;">Alisto de Proformas (Debe marcar el check de Alisto de proformas y Aprobación de crédito en Opciones Generales).</span>
 
<span style="font-size: 12pt; font-family: arial, helvetica, sans-serif;">**Funcionamiento**</span>

<span style="font-size: 12pt; font-family: arial, helvetica, sans-serif;">Para utilizar la Lectura de Códigos de Barras del empaque debe primero:</span>

- <span style="font-size: 12pt; font-family: arial, helvetica, sans-serif;">Tener la proforma en estado de "Alisto finalizado".</span>
- <span style="font-size: 12pt; font-family: arial, helvetica, sans-serif;">En el menú Mantenimiento/Inventarios/ Embalajes haber incluido registros como por ejemplo "Cajas, Sacos, Atados, etc"</span>
- <span style="font-size: 12pt; font-family: arial, helvetica, sans-serif;">Haber cargado el Código de Proveedor en el mantenimiento a productos.</span>
 
<span style="font-size: 12pt; font-family: arial, helvetica, sans-serif;">Una vez que una proforma haya pasado de Alisto Finalizado hacia Inicio de Empaque, ahora puede usar hacer Click derecho sobre la proforma y elegir la alternativa de Lectura para empaque.</span>

<span style="font-size: 12pt; font-family: arial, helvetica, sans-serif;"></span>

<span style="font-size: 12pt; font-family: arial, helvetica, sans-serif;">Al ingresar Cronus ubica el lector en el código de barras, aquí use su lector o digite el código de barras a buscar. Una vez localizado digite la cantidad contada en la pantalla siguiente y presione "Aceptar".</span>

- <span style="font-size: 12pt; font-family: arial, helvetica, sans-serif;">Todos los productos ya contados aparecen de color verde</span>
- <span style="font-size: 12pt; font-family: arial, helvetica, sans-serif;">Todos los productos no contados aparecen de color gris</span>
- <span style="font-size: 12pt; font-family: arial, helvetica, sans-serif;">No aparecen los servicios</span>
- <span style="font-size: 12pt; font-family: arial, helvetica, sans-serif;">Los productos que no tengan código de barras aparecen abajo, estos se pueden leer con un doble click sobre la línea.</span>
 
<span style="font-size: 12pt; font-family: arial, helvetica, sans-serif;"></span>

<span style="font-size: 12pt; font-family: arial, helvetica, sans-serif;">Al leer el código de barras desde el campo que aparece en la parte superior de la pantalla la cantidad de artículos asociados a esa línea va a aumentar en +1, la expectativa es que todas las líneas sean leídas para confirmar cada código y evitar empacar productos erróneos.</span>

<span style="font-size: 12pt; font-family: arial, helvetica, sans-serif;">Adicionalmente puede presionar doble click sobre el producto en donde aparece la siguiente pantalla en donde el usuario debe digitar la cantidad de artículos contados.</span>

<span style="font-size: 12pt; font-family: arial, helvetica, sans-serif;"></span>

<span style="font-size: 12pt; font-family: arial, helvetica, sans-serif;">Las líneas en la pantalla tienen 3 colores:</span>

- <span style="font-size: 12pt; font-family: arial, helvetica, sans-serif;">Grises : sin cantidad leída o digitada</span>
- <span style="font-size: 12pt; font-family: arial, helvetica, sans-serif;">Amarillo: Con cantidad leída o digitada pero inferior al total</span>
- <span style="font-size: 12pt; font-family: arial, helvetica, sans-serif;">Verde: Total digitado</span>
 
<span style="font-size: 12pt; font-family: arial, helvetica, sans-serif;">No es posible pasar a finalizar el empaque con líneas incompletas.</span>

# CRONUS-Sistema-Cambio-de-compañia

<span style="font-size: 12pt; font-family: arial, helvetica, sans-serif;">Con esta opción podremos cambiarnos entre compañía desde la misma base de datos, para ello accedemos al menú de cambio de compañía: </span>

![](https://ayuda.cronuserp.com/uploads/images/gallery/2025-10/screenshot-4.png)

<span style="font-size: 12pt; font-family: arial, helvetica, sans-serif;">Y en esta pantalla, el sistema nos mostrará la venta de las compañías de la base de datos a las que tengamos acceso para poder elegir la que deseamos y presionar aceptar para acceder a la misma:</span>

![](https://ayuda.cronuserp.com/uploads/images/gallery/2025-10/screenshot-5.png)

# CRONUS-Movimientos-Asiento-contable

<span style="font-size: 12pt; font-family: arial, helvetica, sans-serif;">Mediante esta pantalla podremos crear los asientos contables respectivos a CRONUS. </span>

<span style="font-size: 12pt; font-family: arial, helvetica, sans-serif;">Para esto ingresamos a Movimientos =&gt; Asiento Contable: </span>

 ![](https://ayuda.cronuserp.com/uploads/images/migrated/Screenshot_1.png)<span style="font-size: 12pt; font-family: arial, helvetica, sans-serif;"></span>

<span style="font-size: 12pt; font-family: arial, helvetica, sans-serif;">Una vez en esta pantalla elegimos que tipo de asiento deseamos realizar sucursal ( o si lo deseamos para todas las sucursales ) fecha, tipo. </span>

 ![](https://ayuda.cronuserp.com/uploads/images/migrated/Screenshot_2.png)<span style="font-size: 12pt; font-family: arial, helvetica, sans-serif;"></span>

<span style="font-size: 12pt; font-family: arial, helvetica, sans-serif;">Por último, basta con presionar "**aceptar**" para guardar los cambios y crear el asiento. </span>

<span style="font-size: 12pt; font-family: arial, helvetica, sans-serif;">Mediante esta misma pantalla podemos crear distintos tipos de asientos: </span>

- <span style="font-size: 12pt; font-family: arial, helvetica, sans-serif;">**Documentos:** Contabiliza todos los documentos ( facturas, NC y ND ).</span>
- <span style="font-size: 12pt; font-family: arial, helvetica, sans-serif;">**Recibos:** Se contabilizan todos los tipos de recibos, incluidos en sistema.</span>
- <span style="font-size: 12pt; font-family: arial, helvetica, sans-serif;">**Inventarios:** En este, se contabilizarán todos los movimientos de inventarios creados en sistema, llámese solicitudes, inventarios manuales, ajustes de toma física. </span>
- <span style="font-size: 12pt; font-family: arial, helvetica, sans-serif;">**Cierres de caja:** Todos los cierres de caja realizados y finalizados durante ese rango a contabilizar. </span>
- <span style="font-size: 12pt; font-family: arial, helvetica, sans-serif;">**Revaluación:** Para ajustar diferencias por tipos de cambio. </span>
 

# CRONUS-Sistema-Opciones-generales-Anular-documentos

# <span style="font-size: 12pt;">La anulación de documentos en CRONUS fue inhabilitada para la Factura Electrónica versión 4.2, no obstante con la 4.3 o posterior la D.G.T.D. habilitó la posibilidad de **no** requerir la NC electrónica si una factura fue rechazada, con esto ahora en CRONUS se habilitan 2 nuevas alternativas:</span>

1. <span style="font-size: 12pt;">Anular documentos del mismo día</span>
2. <span style="font-size: 12pt;">Anular documentos del mismo mes (Check en opciones Generales)</span>
 
# <span style="font-size: 12pt;"></span>

# <span style="font-size: 12pt;">Las validaciones aplicadas son las usuales:</span>

1. <span style="font-size: 12pt;">El documento debe estar intacto, su saldo debe coincidir con el monto neto</span>
2. <span style="font-size: 12pt;">El documento no puede estar contabilizado.</span>
3. <span style="font-size: 12pt;">El documento debe tener un estado tributario como Rechazado</span>
 
# <span style="font-size: 12pt;">Los eventos disparados son los siguientes:</span>

1. <span style="font-size: 12pt;">El inventario es devuelto con un movimiento de Entrada por Anulación de Devolución, (configurable en Opciones Generales)</span>
2. <span style="font-size: 12pt;">El documento es marcado con estado "N" y por ende no suma en reportes ni se registra contablemente.</span>
 

# CRONUS-Movimientos-Proformas-Back-order

<span style="font-size: 12pt; font-family: arial, helvetica, sans-serif;">Para el caso se va a crear una proforma como habitualmente se realiza con la única diferencia que se debe marcar el check de " Pedido" para que esto cree un pedido pendiente en base a dicha proforma creada: </span>

 ![](https://ayuda.cronuserp.com/uploads/images/migrated/Screenshot_1.png)<span style="font-size: 12pt; font-family: arial, helvetica, sans-serif;"></span>

<span style="font-size: 12pt; font-family: arial, helvetica, sans-serif;">Posteriormente, en la pantalla de proformas se puede filtrar en el marco llamado "TIPO" si se quieren ver "Pedidos" y "Proformas" : </span>

 ![](https://ayuda.cronuserp.com/uploads/images/migrated/Screenshot_2.png)<span style="font-size: 12pt; font-family: arial, helvetica, sans-serif;"></span>

<span style="font-size: 12pt; font-family: arial, helvetica, sans-serif;">Por último, </span>

- <span style="font-size: 12pt; font-family: arial, helvetica, sans-serif;">Si es Pedido, y no está Nula o Facturada va a aparecer en los reportes de "Productos por Suplir"</span>
- <span style="font-size: 12pt; font-family: arial, helvetica, sans-serif;">Estadísticas \* Proformas y Alisto \\ Productos por Suplir (4 formatos): </span>
 
[![Screenshot_3.png](https://ayuda.cronuserp.com/uploads/images/gallery/2025-08/scaled-1680-/screenshot-3.png)](https://ayuda.cronuserp.com/uploads/images/gallery/2025-08/screenshot-3.png)<span style="font-size: 12pt; font-family: arial, helvetica, sans-serif;"></span>

<span style="font-size: 12pt; font-family: arial, helvetica, sans-serif;">En este caso únicamente debemos elegir que reporte deseamos tirar y en que rango de fechas y presionar "Aceptar" . </span>

# CRONUS-Sistema Opciones Generales Configuración Manejo de costos promedio

<span style="font-weight: 400; font-size: 12pt; font-family: arial, helvetica, sans-serif;">El manejo de costo promedio en CRONUS se configura desde la pantalla de opciones generales,indicadores, inventarios por defecto es la forma de trabajo implícita:</span>

<span style="font-weight: 400; font-size: 12pt; font-family: arial, helvetica, sans-serif;">![ultimo costo.png](/files/CRONUS-Sistema-Opciones-generales-Configuracion-Manejo-de-costos-promedio/ultimo%20costo.png)</span>

<span style="font-weight: 400; font-size: 12pt; font-family: arial, helvetica, sans-serif;"> </span>

<span style="font-weight: 400; font-size: 12pt; font-family: arial, helvetica, sans-serif;">Los movimientos que afectan el costo promedio son configurados desde el menú Inventario /Inventario/Tipos de transacción:</span>

<span style="font-weight: 400; font-size: 12pt; font-family: arial, helvetica, sans-serif;">![transaccion pruebas.png](/files/CRONUS-Sistema-Opciones-generales-Configuracion-Manejo-de-costos-promedio/transaccion%20pruebas.png)</span>

<span style="font-weight: 400; font-size: 12pt; font-family: arial, helvetica, sans-serif;"> </span>

<span style="font-weight: 400; font-size: 12pt; font-family: arial, helvetica, sans-serif;">Se abre la transacción que se desea aplique para afectar el costo promedio y se marca el check (Esto queda registrado en bitácora y solo aplica a entradas):</span>

<span style="font-weight: 400; font-size: 12pt; font-family: arial, helvetica, sans-serif;"></span>

<span style="font-weight: 400; font-size: 12pt; font-family: arial, helvetica, sans-serif;"> </span>

<span style="font-weight: 400; font-size: 12pt; font-family: arial, helvetica, sans-serif;">La fórmula que se utiliza es la siguiente:</span>

<span style="font-size: 12pt; font-family: arial, helvetica, sans-serif;">**A =** <span style="font-weight: 400;">Saldo total actual = &gt; </span>**X=** <span style="font-weight: 400;">Saldo en unidades actual \* Costo unitario</span></span>

<span style="font-size: 12pt; font-family: arial, helvetica, sans-serif;">**B** <span style="font-weight: 400;">= Entrada compra =&gt; </span>**Z=** <span style="font-weight: 400;">Cantidad comprada \* Costo unitario de compra</span></span>

<span style="font-size: 12pt; font-family: arial, helvetica, sans-serif;"><span style="font-weight: 400;">Costo promedio nuevo =&gt; (</span>**A + B) / (**<span style="font-weight: 400;">(</span>**X + Z)** </span>

<span style="font-weight: 400; font-size: 12pt; font-family: arial, helvetica, sans-serif;">Por ejemplo:</span>

<span style="font-weight: 400; font-size: 12pt; font-family: arial, helvetica, sans-serif;">![co 4.png](/files/CRONUS-Sistema-Opciones-generales-Configuracion-Manejo-de-costos-promedio/co%204.png)</span>

<span style="font-weight: 400; font-size: 12pt; font-family: arial, helvetica, sans-serif;">Compra nueva:</span>

<span style="font-weight: 400; font-size: 12pt; font-family: arial, helvetica, sans-serif;">![co 5.png](/files/CRONUS-Sistema-Opciones-generales-Configuracion-Manejo-de-costos-promedio/co%205.png)</span>

<span style="font-weight: 400; font-size: 12pt; font-family: arial, helvetica, sans-serif;">Según la misma fórmula :</span>

<span style="font-size: 12pt; font-family: arial, helvetica, sans-serif;"><span style="font-weight: 400;">Costo promedio nuevo =&gt; (¢5,000</span> **+** <span style="font-weight: 400;">¢6,500</span>**) / (**<span style="font-weight: 400;">(</span>**10 + 10)** </span>

<span style="font-weight: 400; font-size: 12pt; font-family: arial, helvetica, sans-serif;">Nuevo costo promedio =&gt; ¢575</span>

<span style="font-weight: 400; font-size: 12pt; font-family: arial, helvetica, sans-serif;"> </span>

<span style="font-weight: 400; font-size: 12pt; font-family: arial, helvetica, sans-serif;">Este nuevo costo aplica a todos los movimientos consecutivos a la última compra, es importante indicar que no hay forma automátizada de revertir el cambio al costo a menos de que se incluyan compras adicionales o que otros movimientos de inventario afecten el costo y que el usuario tenga derechos en seguridad a manipularlo. Todos estos movimientos se registran en la bitácora general con fecha, hora, equipo y usuario.</span>

# CRONUS-Movimientos-Cajas-Cierres-de-caja

**<span style="font-size: 12pt; font-family: arial, helvetica, sans-serif;">Puntos importantes a tomar en cuenta: </span>**

- <span style="font-size: 12pt; font-family: arial, helvetica, sans-serif;">A los cierres de caja lo que van son los RB ( recibos ) creados a las facturas del sistema ( no las facturas ) . </span>
- <span style="font-size: 12pt; font-family: arial, helvetica, sans-serif;">Una vez creado el cierre de caja en firme, dichos depósitos agregados en el mismo serán visibles en el módulo de bancos ( Bancos-Documentos ) , con los respectivos números que fueron digitados por el usuario al crear el cierre de caja. </span>
- <span style="font-size: 12pt; font-family: arial, helvetica, sans-serif;">Los únicos depósitos que se agrean automáticamente son los que en la forma de pago del RB le definieron TF, caso contrario que tengan cualquiera otra forma de pago el usuario al momento de crear el cierre de caja debe digitar e incluir dicho depósito manualmente. </span>

<span style="font-size: 12pt; font-family: arial, helvetica, sans-serif;">En la pantalla principal de CRONUS, ingresamos a la opción de Cierre: </span>

[![Screenshot_1.png](https://ayuda.cronuserp.com/uploads/images/gallery/2026-02/scaled-1680-/Ivzscreenshot-1.png)](https://ayuda.cronuserp.com/uploads/images/gallery/2026-02/Ivzscreenshot-1.png)

<span style="font-size: 12pt; font-family: arial, helvetica, sans-serif;">Posteriormente, presionamos "Incluir": </span>

[![Screenshot_2.png](https://ayuda.cronuserp.com/uploads/images/gallery/2026-02/scaled-1680-/Vp1screenshot-2.png)](https://ayuda.cronuserp.com/uploads/images/gallery/2026-02/Vp1screenshot-2.png)

<span style="font-size: 12pt; font-family: arial, helvetica, sans-serif;">En esta pantalla debemos definir la fecha del cierre y elegir cuál o cuáles recibos deseamos cerrar. **Cabe recalcar en este punto que con la fecha definida en esta pantalla será con la que se guardarán los depósitos en el sistema de bancos.** </span>

[![Screenshot_3.png](https://ayuda.cronuserp.com/uploads/images/gallery/2026-02/scaled-1680-/xSLscreenshot-3.png)](https://ayuda.cronuserp.com/uploads/images/gallery/2026-02/xSLscreenshot-3.png)

<span style="font-size: 12pt; font-family: arial, helvetica, sans-serif;">Cuando cargamos el encabezado, posteriormente ingresar al tab Depósitos y Transferencias, en esta debemos completar el detalle de los depósitos ( ya sea para moneda local o dólares ) : </span>

[![Screenshot_4.png](https://ayuda.cronuserp.com/uploads/images/gallery/2026-02/scaled-1680-/Jxvscreenshot-4.png)](https://ayuda.cronuserp.com/uploads/images/gallery/2026-02/Jxvscreenshot-4.png)

<span style="font-size: 12pt; font-family: arial, helvetica, sans-serif;">Presionar "OK" para guardar la línea de detalle ingresado: </span>

[![Screenshot_5.png](https://ayuda.cronuserp.com/uploads/images/gallery/2026-02/scaled-1680-/8RCscreenshot-5.png)](https://ayuda.cronuserp.com/uploads/images/gallery/2026-02/8RCscreenshot-5.png)

<span style="font-size: 12pt; font-family: arial, helvetica, sans-serif;">Para guardar los cambios ingresados en dicha pantalla, presionamos "aceptar": </span>

[![Screenshot_6.png](https://ayuda.cronuserp.com/uploads/images/gallery/2026-02/scaled-1680-/rZGscreenshot-6.png)](https://ayuda.cronuserp.com/uploads/images/gallery/2026-02/rZGscreenshot-6.png)

<span style="font-size: 12pt; font-family: arial, helvetica, sans-serif;">Una vez guardado el cierre el sistema nos mostrará una pantalla de confirmación: </span>

[![Screenshot_7.png](https://ayuda.cronuserp.com/uploads/images/gallery/2026-02/scaled-1680-/oBxscreenshot-7.png)](https://ayuda.cronuserp.com/uploads/images/gallery/2026-02/oBxscreenshot-7.png)

<span style="font-size: 12pt; font-family: arial, helvetica, sans-serif;">Y por último, emerge la pantalla para la impresión del cierre si lo deseamos realizar en ese momento basta con presionar "aceptar" ( de lo contrario, salir ) : </span>

[![Screenshot_8.png](https://ayuda.cronuserp.com/uploads/images/gallery/2026-02/scaled-1680-/ayJscreenshot-8.png)](https://ayuda.cronuserp.com/uploads/images/gallery/2026-02/ayJscreenshot-8.png)

# CRONUS-Sistema-Opciones-generales-Configuración-Retención-de-notas-de-crédito

Para la ejecución de este proceso primeramente debe ejecutar la siguiente configuración:

- Ir a Opciones Generales en web a la cejilla que dice "Config."
 
- 
- Configurar el % de Retención
 
- Monto mínimo para aplicar la Renta (En moneda Local)
- Ir al cliente que desea auto-aplicarle la NC y marcar el check respectivo. Este check aparece desmarcado por defecto para todos los clientes.
 
El procedimiento se llama de forma automática al incluir un documento de crédito de los clientes que tengan los parámetros asignados, check marcado y Opciones Generales configuradas.

No obstante si se desea se puede aplicar a un documento ya existente usando el submenú "Aplicación de Documentos" y luego usando la opción "NC de retención a documento actual"

Puntos importantes a tomar en cuenta:

- Debe tener derechos sobre "PNCTIPORE1"
- La factura debe tener suficiente saldo para aplicar la NC en el porcentaje definido.
- La cuenta contable es la de Retención en "Opciones Generales"
- La sucursal es la misma que la factura
- La Fecha es la actual.
- Si el documento fue afectado por otra NC de Retención entonces queda bloqueado para este proceso.

# CRONUS-Movimientos-Proformas-Cambiar-estado-de-alisto

<span style="font-size: 12pt; font-family: arial, helvetica, sans-serif;">Recuerde configurar los productos, [use este link para ver como hacerlo... ](https://ayuda.cronuserp.com/books/wiki-cronus-erp/page/Proformas-Alisto-configura-productos)</span>

<span style="font-size: 12pt; font-family: arial, helvetica, sans-serif;">Ahora si, con los dos primeros pasos concluidos en el sistema y una vez incluida la proforma como habitualmente se realiza.</span>

<span style="font-size: 12pt; font-family: arial, helvetica, sans-serif;">Comenzamos por cambiarle el estado "Para Alisto" de esa forma nos va a aparecer en la aplicación móvil para continuar con el proceso de ingreso de lotes a productos.</span>

<span style="font-size: 12pt; font-family: arial, helvetica, sans-serif;">Para cambiar el estado a la proforma deseada, debemos ingresar a la pantalla de proformas, click derecho sobre está y le vamos a marcar la primer opción que nos muestra en la siguiente pantalla que dice "Cambiar estado de Alisto": </span>

 ![](https://ayuda.cronuserp.com/uploads/images/migrated/Screenshot_1.png)<span style="font-size: 12pt; font-family: arial, helvetica, sans-serif;"></span>

<span style="font-size: 12pt; font-family: arial, helvetica, sans-serif;">Una vez que le damos click al botón anterior, el sistema nos mostrará la siguiente pantalla: </span>

 ![](https://ayuda.cronuserp.com/uploads/images/migrated/Screenshot_2.png)<span style="font-size: 12pt; font-family: arial, helvetica, sans-serif;"></span>

<span style="font-size: 12pt; font-family: arial, helvetica, sans-serif;">En esta opción debemos indicarle en lo marcado donde dice "Para Alisto" y presionar "Aceptar": </span>[![Screenshot_3.png](https://ayuda.cronuserp.com/uploads/images/gallery/2025-08/scaled-1680-/screenshot-3.png)](https://ayuda.cronuserp.com/uploads/images/gallery/2025-08/screenshot-3.png)<span style="font-size: 12pt; font-family: arial, helvetica, sans-serif;"></span>

<span style="font-size: 12pt; font-family: arial, helvetica, sans-serif;">Una vez seleccionamos "Aceptar" se muestra la siguiente alerta: </span>

 ![](https://ayuda.cronuserp.com/uploads/images/migrated/Screenshot_4.png)<span style="font-size: 12pt; font-family: arial, helvetica, sans-serif;"></span>

<span style="font-size: 12pt; font-family: arial, helvetica, sans-serif;">Se puede reversar el proceso de estado de la proforma ( en caso de que nos equivocamos y marcamos la proforma incorrecta como para alisto ), dando click derecho sobre la misma ( como el paso anterior ) solo que debemos darle en la opción que dice "ACTIVO" y "aceptar": </span>

 ![](https://ayuda.cronuserp.com/uploads/images/migrated/Screenshot_11.png)<span style="font-size: 12pt; font-family: arial, helvetica, sans-serif;"></span>

<span style="font-size: 12pt; font-family: arial, helvetica, sans-serif;">[**El APP de Alisto de proformas funciona así...**](https://ayuda.cronuserp.com/books/wiki-cronus-erp/page/APP-Android-Alisto)</span>

# CRONUS-Sistema-Opciones-generales-manejo-de-Consignaciones

<span style="font-weight: 400; font-size: 12pt; font-family: arial, helvetica, sans-serif;">Para activar las consignaciones lo primero sería en la pantalla de “Opciones generales” marcar el siguiente check:</span>

<span style="font-weight: 400; font-size: 12pt; font-family: arial, helvetica, sans-serif;"></span>

<span style="font-weight: 400; font-size: 12pt; font-family: arial, helvetica, sans-serif;">Luego se deben incluir dos bodegas para el manejo de consignaciones. Las bodegas son la de “Consignación en reserva” y la de “Consignación para facturación”.</span>

<span style="font-weight: 400; font-size: 12pt; font-family: arial, helvetica, sans-serif;">La bodega de “Consignación en Reserva” se utiliza para guardar el producto asociado a un agente y a un cliente, y este no puede ser facturado desde la pantalla normal.</span>

<span style="font-weight: 400; font-size: 12pt; font-family: arial, helvetica, sans-serif;">La bodega de “Consignación para facturación” se utiliza para facturar directamente desde la solicitud de inventario, por medio de esta bodega se puede rastrear el saldo de inventario en consignación para un cliente específico.</span>

<span style="font-weight: 400; font-size: 12pt; font-family: arial, helvetica, sans-serif;">Estas bodegas NO aceptan devoluciones, las devoluciones tienen que asignarse a otra bodega.</span>

<span style="font-weight: 400; font-size: 12pt; font-family: arial, helvetica, sans-serif;">![consig 2.png](/files/CRONUS-Sistema-Opciones-generales-manejo-de-Consignaciones/consig%202.png)</span>

<span style="font-weight: 400; font-size: 12pt; font-family: arial, helvetica, sans-serif;">Luego de esto, las dos bodegas se deben relacionar a la sucursal para que puedan utilizarse en las solicitudes. ( Sucursales ⇒ Doble click a la sucursal ) :</span>

<span style="font-weight: 400; font-size: 12pt; font-family: arial, helvetica, sans-serif;">![consig 3.png](/files/CRONUS-Sistema-Opciones-generales-manejo-de-Consignaciones/consig%203.png)</span>

<span style="font-size: 12pt; font-family: arial, helvetica, sans-serif;">**Solicitudes de movimiento de inventario**</span>

<span style="font-weight: 400; font-size: 12pt; font-family: arial, helvetica, sans-serif;">Para iniciar la inclusión de inventarios en consignación es indispensable que no existan movimientos en otras bodegas que no correspondan a las previamente configuradas. Todos los saldos que se puedan tener de forma “manual” deben de limpiarse para incluir en solicitudes nuevas controladas por CRONUS.</span>

<span style="font-size: 12pt; font-family: arial, helvetica, sans-serif;"></span>

<span style="font-size: 12pt; font-family: arial, helvetica, sans-serif;"><span style="font-weight: 400;">Los dos tipos de traslados son los de ingreso y los de salida(facturar), el de salida es usado para todas las facturaciones o salidas por otro motivo, y los ingresos para todas las entregas de producto al cliente. </span><span style="font-weight: 400;">Al elegir cualquiera de estas dos alternativas se nos habilitan los campos de cliente y agente, el saldo siempre está guardado por estos dos campos, esto significa que el cliente puede tener saldo con dos agentes distintos y estos saldos NO se mezclarán.</span></span>

<span style="font-weight: 400; font-size: 12pt; font-family: arial, helvetica, sans-serif;">Si un cliente cambia de agente, es indispensable asegurarse de que el saldo sea trasladado de uno a otro.</span>

<span style="font-weight: 400; font-size: 12pt; font-family: arial, helvetica, sans-serif;"></span>

<span style="font-weight: 400; font-size: 12pt; font-family: arial, helvetica, sans-serif;">En el caso de los ingresos CRONUS siempre solicita la bodega de origen, esta puede ser cualquiera de las bodegas asignadas a la sucursal sobre la que el usuario tenga derechos, la bodega destino SIEMPRE va a ser una bodega marcada como “Consignación de reserva”:</span>

<span style="font-weight: 400; font-size: 12pt; font-family: arial, helvetica, sans-serif;">![consig 6.png](/files/CRONUS-Sistema-Opciones-generales-manejo-de-Consignaciones/consig%206.png)</span>

<span style="font-weight: 400; font-size: 12pt; font-family: arial, helvetica, sans-serif;">Una vez incluida la solicitud está debe ser aprobada. Al aprobar ocurre lo siguiente:</span>

- <span style="font-weight: 400; font-size: 12pt; font-family: arial, helvetica, sans-serif;">Los saldos salen de la bodega origen ( principal ).</span>
- <span style="font-weight: 400; font-size: 12pt; font-family: arial, helvetica, sans-serif;">Los saldos son incluidos en la bodega en tránsito de la sucursal.</span>
- <span style="font-weight: 400; font-size: 12pt; font-family: arial, helvetica, sans-serif;">El inventario del cliente - agente es actualizado.</span>
 
<span style="font-weight: 400; font-size: 12pt; font-family: arial, helvetica, sans-serif;">Una vez aprobada puede ser aplicada.Al aplicar ocurre lo siguiente:</span>

- <span style="font-weight: 400; font-size: 12pt; font-family: arial, helvetica, sans-serif;">Los saldos se mueven de la bodega en tránsito de la sucursal.</span>
- <span style="font-weight: 400; font-size: 12pt; font-family: arial, helvetica, sans-serif;">Los saldos de la bodega de “Consignación en reserva” son actualizados.</span>
- <span style="font-weight: 400; font-size: 12pt; font-family: arial, helvetica, sans-serif;">Los productos quedan listos para ser facturados en otra solicitud.</span>
 
<span style="font-weight: 400; font-size: 12pt; font-family: arial, helvetica, sans-serif;">Se habilitan dos botones nuevos al incluir solicitudes de consignación, la impresión del “documento de consignación” y el de “inventario de consignación”:</span>

<span style="font-weight: 400; font-size: 12pt; font-family: arial, helvetica, sans-serif;">  
</span>

<span style="font-size: 12pt; font-family: arial, helvetica, sans-serif;">**Documento :**<span style="font-weight: 400;"> Reporte específico de la consignación, solo las cantidades de producto de este movimiento, este incluye precios de venta asociados al cliente según la moneda de este y descuentos asociados a este cliente. </span><span style="font-weight: 400;">El descuento depende del descuento fijo del cliente o el descuento del producto para el cliente, si estos datos son cambiados, toda la información en solicitudes NO facturadas es cambiada también.</span></span>

<span style="font-size: 12pt; font-family: arial, helvetica, sans-serif;">**Inventario :**<span style="font-weight: 400;"> Incluye los saldos al día de hoy de este cliente + agente para todos sus productos, estos reportes se muestran a precio de venta también y su función es presentar al cliente un resumen del producto que tienen a mano.</span></span>

<span style="font-weight: 400; font-size: 12pt; font-family: arial, helvetica, sans-serif;">Es posible ir al generador de reportes y ver un reporte detallado de movimientos por consignación:</span>

<span style="font-weight: 400; font-size: 12pt; font-family: arial, helvetica, sans-serif;">![consig 8.png](/files/CRONUS-Sistema-Opciones-generales-manejo-de-Consignaciones/consig%208.png)</span>

<span style="font-size: 12pt; font-family: arial, helvetica, sans-serif;">**Facturación:**</span>

<span style="font-weight: 400; font-size: 12pt; font-family: arial, helvetica, sans-serif;">La facturación de los productos en consignación requiere de una solicitud de movimiento de inventario por salida:</span>

 ![](https://ayuda.cronuserp.com/uploads/images/migrated/Screenshot_1.png)[![33.3.3.png](https://ayuda.cronuserp.com/uploads/images/gallery/2025-08/scaled-1680-/33-3-3.png)](https://ayuda.cronuserp.com/uploads/images/gallery/2025-08/33-3-3.png)[![2222.png](https://ayuda.cronuserp.com/uploads/images/gallery/2025-08/scaled-1680-/2222.png)](https://ayuda.cronuserp.com/uploads/images/gallery/2025-08/2222.png)[](https://ayuda.cronuserp.com/uploads/images/gallery/2025-08/2222.png)<span style="font-weight: 400; font-size: 12pt; font-family: arial, helvetica, sans-serif;">  
</span>

<span style="font-weight: 400; font-size: 12pt; font-family: arial, helvetica, sans-serif;">Al elegir este tipo de movimiento, la salida siempre se da de la bodega de consignación en reserva y todo viaja a la bodega de consignación para facturar. No es posible facturar si la solicitud no ha sido aplicada:</span>

<span style="font-weight: 400; font-size: 12pt; font-family: arial, helvetica, sans-serif;">![conisg 10.png](/files/CRONUS-Sistema-Opciones-generales-manejo-de-Consignaciones/conisg%2010.png)</span>

<span style="font-weight: 400; font-size: 12pt; font-family: arial, helvetica, sans-serif;">Al consultar los productos, solo aparecen los productos con saldo para este CLIENTE y AGENTE y no es posible sobrepasar el saldo en consignación, pero si es posible solicitar menos cantidad que la guardada. Siempre es posible consultar el saldo consignado desde esta misma pantalla usando el botón correspondiente:</span>

<span style="font-weight: 400; font-size: 12pt; font-family: arial, helvetica, sans-serif;">![consig 11.png](/files/CRONUS-Sistema-Opciones-generales-manejo-de-Consignaciones/consig%2011.png)</span>

<span style="font-weight: 400; font-size: 12pt; font-family: arial, helvetica, sans-serif;">Una vez incluidos los productos la solicitud se puede imprimir, aprobar y aplicar como cualquier otra, al finalizar se puede presionar el botón “Facturar”:</span>

<span style="font-weight: 400; font-size: 12pt; font-family: arial, helvetica, sans-serif;">![consig 12.png](/files/CRONUS-Sistema-Opciones-generales-manejo-de-Consignaciones/consig%2012.png)</span>

<span style="font-size: 12pt; font-family: arial, helvetica, sans-serif;"><span style="font-weight: 400;">Recuerde que el inventario en consignación no varía en su totalidad, solamente hay un intercambio de información entre bodegas, el inventario es rebajado hasta que la factura sea incluida. </span><span style="font-weight: 400;">Al presionar el botón, CRONUS ingresará a la pantalla de facturación con todos los datos del cliente cargados, los datos del CLIENTE, AGENTE, Productos y Descuentos no podrán ser alterados de ninguna forma.</span></span>

<span style="font-weight: 400; font-size: 12pt; font-family: arial, helvetica, sans-serif;">El usuario solamente podrá llenar las observaciones, forma de pago, boleta de despacho y presionar aceptar para continuar con el proceso de facturación. La validación de crédito y facturas vencidas es siempre la misma. Una vez hecha la factura el proceso se vuelve irreversible.</span>

<span style="font-weight: 400; font-size: 12pt; font-family: arial, helvetica, sans-serif;">![consig 13.png](/files/CRONUS-Sistema-Opciones-generales-manejo-de-Consignaciones/consig%2013.png)</span>

<span style="color: #000080; font-size: 12pt; font-family: arial, helvetica, sans-serif;">**Preguntas frecuentes que se pueden dar en el proceso:** </span>

- <span style="font-weight: 400; font-size: 12pt; font-family: arial, helvetica, sans-serif;">¿ Qué pasa si un cliente me devuelve el material, después de ser facturado ? </span>
 
<span style="font-weight: 400; font-size: 12pt; font-family: arial, helvetica, sans-serif;"><span style="color: #ff0000;">**R /**</span> Aplicamos una devolución como habitualmente se realiza desde la pantalla de facturación ( En la opción de "Devolución " ) </span>

<span style="font-weight: 400; font-size: 12pt; font-family: arial, helvetica, sans-serif;"></span>

- <span style="font-weight: 400; font-size: 12pt; font-family: arial, helvetica, sans-serif;">¿ Qué pasa si aplique una solicitud por consignación y ahora necesito devolverlo ? </span>
 
<span style="color: #ff0000; font-size: 12pt; font-family: arial, helvetica, sans-serif;">**R /** <span style="color: #000000;"> Ingresamos al proceso de solicitudes de inventario y usamos la opción de devolver ( y seguimos los mismos pasos del proceso de Ingreso de la consignación ) : </span></span>

<span style="font-size: 12pt; font-family: arial, helvetica, sans-serif;"></span>

- <span style="font-size: 12pt; font-family: arial, helvetica, sans-serif;">¿ Qué pasa si tengo más de una sucursal en mi compañia, para el tema de las bodegas ? </span>
 
<span style="color: #ff0000; font-size: 12pt; font-family: arial, helvetica, sans-serif;">**R/** <span style="color: #000000;">Debo crear dos bodegas para cada sucursal y ligarlas a ella ( Una de reserva y la de facturación ) como se explica al inicio de este manual. </span></span>

# CRONUS-Mantenimiento-Clientes-Clientes-Exoneración

<span style="font-size: 12pt; font-family: arial, helvetica, sans-serif;">Las exoneraciones solo pueden aplicarse si el cliente tiene una asociada con el porcentaje exacto a cobrar, la exoneración aplica a todos los productos activos en el documento.</span>

<span style="font-size: 12pt; font-family: arial, helvetica, sans-serif;">A partir de CRONUS 6.1.344 las exoneraciones remotas son completamente inválidas porque no son recibidas por la D.G.T.D, e inclusive los clientes "NO Sujetos" como (Junta de Protección Social, Cruz Rojas, otros) deben tener una asociada con el monto exonerado.</span>

[![Exo001.png](https://ayuda.cronuserp.com/uploads/images/gallery/2025-08/scaled-1680-/exo001.png)](https://ayuda.cronuserp.com/uploads/images/gallery/2025-08/exo001.png)<span style="font-size: 12pt; font-family: arial, helvetica, sans-serif;"></span>

<span style="font-size: 12pt; font-family: arial, helvetica, sans-serif;">Para incluirle una Exoneración a un cliente, abra el mantenimiento de clientes, busque la cejilla "Crédito" y dentro de esta abajo en la pantalla podrá encontrar otra división que dice "Exoneraciones".</span>

<span style="font-size: 12pt; font-family: arial, helvetica, sans-serif;">Si su cliente está exonerado de oficio o no sujeto a impuestos, puede incluir una Exoneración y dejar completamente en blanco la casilla número de documento, de otra forma debe rellenar toda la información en pantalla.</span>

[![Exo002.png](https://ayuda.cronuserp.com/uploads/images/gallery/2025-08/scaled-1680-/exo002.png)](https://ayuda.cronuserp.com/uploads/images/gallery/2025-08/exo002.png)<span style="font-size: 12pt; font-family: arial, helvetica, sans-serif;"></span>

<span style="font-size: 12pt; font-family: arial, helvetica, sans-serif;">Estos datos son solicitados por la la D.G.T.D. y si no se envían el documentos será rechazado por defecto.</span>

<span style="font-size: 12pt; font-family: arial, helvetica, sans-serif;">**<span style="color: #ff0000;">Nota:</span>** </span>

- <span style="font-size: 12pt; font-family: arial, helvetica, sans-serif;">El campo ID es un consecutivo o número único; pero realmente solo sirve de forma interna. </span>
- <span style="font-size: 12pt; font-family: arial, helvetica, sans-serif;">El campo consecutivo será asignado por default por el sistema al momento de incluir la exoneración. </span>
- <span style="font-size: 12pt; font-family: arial, helvetica, sans-serif;">Deben elegir 1 exoneración para el Cliente o 1 para el proyecto.</span><div>
    - <span style="font-size: 12pt; font-family: arial, helvetica, sans-serif;">Sin proyecto aplica para todas (las que no son proyecto)</span>
    - <span style="font-size: 12pt; font-family: arial, helvetica, sans-serif;">Con Proyecto aplica solo la de él</span>
     
     </div>

# CRONUS-Sistema-Opciones-generales-Otros-Aceptacion-de-costos-automaticos

El sistema tiene la opción para calcular los precios automáticos basados en los costos según la última entrada por compra, mediante dos opciones:

- <span style="font-size: 12pt; color: #ff0000;">**"Al incluir una compra cambiar el costo de fábrica y recalcular precios de venta"** </span>= &gt; Esto significa que al realizar la entrada por compra de los productos el sistema modifica el costo de fábrica que cambiara los demás costos y por ende los precios de venta.
- <span style="color: #ff0000;">**"Actualiza el costo aún cuando la compra esté más baja que la anterior"** </span>= &gt; Este significa que cambiará el costo de fábrica,demás costos y precios aún cuando al realizar la entrada por compra el costo digitado en está sea inferior al actual.
 
Para acceder a estas opciones, se debe ingresar a las opciones generales/Submenú/Otros:

 ![](https://ayuda.cronuserp.com/uploads/images/migrated/Screenshot_1.png)Esto también se puede definir por cada producto si así se desea, seria en el maestro de productos elegimos el deseado mediante un doble click sobre el mismo, nos dirigimos al menú indicadores/submenú "Fijos" **(Esto aplicaría con esta opción ÚNICAMENTE para el producto indicado ) :**

 ![](https://ayuda.cronuserp.com/uploads/images/migrated/Screenshot_2.png)

# CRONUS-Movimientos-Proformas-Enviar-a-facturar

<span style="font-size: 12pt; font-family: arial, helvetica, sans-serif;">Para activar el derecho a ver la cantidad de Proformas pendientes use el siguiente proceso: **"MPROFORFA1"** ( Permiso que debe solicitar al encargado del módulo de seguridad de su compañia ) . </span>

<span style="font-size: 12pt; font-family: arial, helvetica, sans-serif;"></span>

- <span style="font-size: 12pt; font-family: arial, helvetica, sans-serif;">En el menú principal de CRONUS y en el mantenimiento a proformas, ahora podrán ver una barra de mensaje que avisa sobre las proformas ya listas (Estado D).</span>
- <span style="font-size: 12pt; font-family: arial, helvetica, sans-serif;">Puede hacer doble click sobre este marco para ir a la pantalla e iniciar el proceso de factura.</span>
- <span style="font-size: 12pt; font-family: arial, helvetica, sans-serif;">El estado se refresca cada 30 segundos y solo es un aviso para el usuario, **ningún** proceso se ejecuta de **forma automática**.</span>
 
<span style="font-size: 12pt; font-family: arial, helvetica, sans-serif;"></span>

- <span style="font-size: 12pt; font-family: arial, helvetica, sans-serif;">Al ingresar mediante el Doble click a el cuadro de Proformas pendientes, CRONUS selecciona solo las listas.</span>
- <span style="font-size: 12pt; font-family: arial, helvetica, sans-serif;">Con F7 o Click derecho sobre la proforma puede ir a factura de forma inmediata.</span>
- <span style="font-size: 12pt; font-family: arial, helvetica, sans-serif;">Todos los derechos de Proyectos, Clientes, Productos y Sucursales asociados a descuentos aplican aquí.</span>

# CRONUS-Sistema-Opciones-generales-Otros-Inactivacion-automatica-de-productos

<span style="font-size: 12pt; font-family: arial, helvetica, sans-serif;">La inactivación automática de Productos permite a CRONUS marcar los artículos como inactivos basado en los siguiente parámetros:</span>

1. <span style="font-size: 12pt; font-family: arial, helvetica, sans-serif;">No pueden ser servicios</span>
2. <span style="font-size: 12pt; font-family: arial, helvetica, sans-serif;">Deben tener Órdenes de compra sin Pendientes</span>
3. <span style="font-size: 12pt; font-family: arial, helvetica, sans-serif;">No pueden tener unidades de inventario en ninguna de las bodegas, indistinto de los derechos del usuario activo.</span>
4. <span style="font-size: 12pt; font-family: arial, helvetica, sans-serif;">La fecha del último movimiento de inventario debe cumplir la diferencia en días configurada en opciones generales.</span>
5. <span style="font-size: 12pt; font-family: arial, helvetica, sans-serif;">Solo aplica a los productos que tiene el CHECK de "Se va a inactivar cuando su saldo llegue a cero....." marcado en la lista. (Productos, Cejilla de 2. Indicadores, Sub-cejilla de Inventarios)</span>
 
<span style="font-size: 12pt; font-family: arial, helvetica, sans-serif;">Para ejecutar dicho proceso el primer paso sería configurar, estas opciones. Esto desde opciones generales de CRONUS: </span>

<span style="font-size: 12pt; font-family: arial, helvetica, sans-serif;"></span>

<span style="font-size: 12pt; font-family: arial, helvetica, sans-serif;"></span>

<span style="font-size: 12pt; font-family: arial, helvetica, sans-serif;">Inclusive una vez configurados los días podemos marcar de una vez la opción si así lo deseamos ( ya sea para Marcar o Desmarcar la opción de INACTIVAR a los productos ) , y una vez esto configurado presionamos aceptar para validar los cambios. </span>

<span style="font-size: 12pt; font-family: arial, helvetica, sans-serif;">También una vez configurado lo anterior, debemos marcarle a los productos la siguiente opción o desde opciones generales si lo ejecutamos de una vez el sistema los marcará siempre y cuando cuente con los datos requeridos, descritos anteriormente. </span>

<span style="font-size: 12pt; font-family: arial, helvetica, sans-serif;">**Pantalla desde las opciones generales ( aplica para toda la base de datos ) :** </span>

<span style="font-size: 12pt; font-family: arial, helvetica, sans-serif;">  
</span>

<span style="font-size: 12pt; font-family: arial, helvetica, sans-serif;">**Pantalla en los productos ( marcarlo uno a uno ) :** </span>

<span style="font-size: 12pt; font-family: arial, helvetica, sans-serif;">Seguidamente y configurado lo anterior. CRONUS ejecuta el proceso al ingresar la primera vez al sistema, si los parámetros han cambiado luego de que existan productos inactivos, este se puede volver a ejecutar desde la pantalla Productos \\ Utilitarios \\ Productos \\ \[ Primera opción \] : </span>

<span style="font-size: 12pt; font-family: arial, helvetica, sans-serif;"></span>

# CRONUS-Movimientos-Facturacion-documentos-Anulacion de facturas

<span style="color: #ff0000; font-size: 14pt; font-family: arial, helvetica, sans-serif;">**Notas importantes para este proceso:** </span>

- <span style="font-size: 12pt; font-family: arial, helvetica, sans-serif;">Ahora pueden anular una factura rechazada y esto reversa el inventario en la fecha del documento.</span>
- <span style="font-size: 12pt; font-family: arial, helvetica, sans-serif;">No se pueden hacer devoluciones de facturas rechazadas, únicamente sería anulando la misma. </span>
- <span style="font-size: 12pt; font-family: arial, helvetica, sans-serif;">Esto es delicado y lleva ciertas validaciones previo a la aplicación del proceso, que serían: </span>
    - <span style="font-size: 12pt; color: #333399; font-family: arial, helvetica, sans-serif;">**Fecha contable.**</span>
    - <span style="font-size: 12pt; color: #333399; font-family: arial, helvetica, sans-serif;">**Bloqueo de opciones Generales.**</span>
    - <span style="font-size: 12pt; color: #333399; font-family: arial, helvetica, sans-serif;">**Solo del mes actual.**</span>
- <span style="font-size: 12pt; color: #000000; background-color: #ffffff; font-family: arial, helvetica, sans-serif;">Una vez anulada dicha factura se marcará en color gris en la pantalla principal de facturación. </span>
- <span style="font-size: 12pt; color: #000000; background-color: #ffffff; font-family: arial, helvetica, sans-serif;">Si la factura es de contado el recibo ligado a la misma se eliminará del sistema. </span>
- <span style="font-size: 12pt; color: #000000; background-color: #ffffff; font-family: arial, helvetica, sans-serif;">Tener marcado el indicador en las opciones generales del sistema de " anular documentos de fecha distinta al mes actual ".</span>
- <span style="font-size: 12pt; color: #000000; background-color: #ffffff; font-family: arial, helvetica, sans-serif;">Tener permiso de la seguridad de anular documentos de días anteriores. ( En caso de ser un documento con fecha distinta a la del día de la anulación).</span>
- <span style="font-size: 12pt; color: #000000; background-color: #ffffff; font-family: arial, helvetica, sans-serif;">No se pueden anular si están contabilizadas o comisionadas.</span>

<span style="font-size: 12pt; color: #000000; font-family: arial, helvetica, sans-serif;">Para anular una factura, se ingresa a la pantalla principal de facturación, nos posicionamos sobre el documento deseado y elegimos la opción de anular: </span>

[![Screenshot_1.png](https://ayuda.cronuserp.com/uploads/images/gallery/2025-09/scaled-1680-/ONyscreenshot-1.png)](https://ayuda.cronuserp.com/uploads/images/gallery/2025-09/ONyscreenshot-1.png)

<span style="font-size: 12pt; color: #000000; font-family: arial, helvetica, sans-serif;">Una vez que presionamos dicho ícono, el sistema nos abrirá la pantalla de la factura en cuestión y con esto asegurarnos que es dicho documento presionando el botón de "Aceptar": </span>

[![Screenshot_2.png](https://ayuda.cronuserp.com/uploads/images/gallery/2025-09/scaled-1680-/Ddkscreenshot-2.png)](https://ayuda.cronuserp.com/uploads/images/gallery/2025-09/Ddkscreenshot-2.png)

<span style="font-size: 12pt; color: #000000; font-family: arial, helvetica, sans-serif;">Con esto el sistema emergerá el mensaje de confirmación: </span>

<span style="font-size: 12pt; color: #000000; font-family: arial, helvetica, sans-serif;">[![Screenshot_3.png](https://ayuda.cronuserp.com/uploads/images/gallery/2025-09/scaled-1680-/FQxscreenshot-3.png)](https://ayuda.cronuserp.com/uploads/images/gallery/2025-09/FQxscreenshot-3.png)</span>

<span style="font-size: 12pt; color: #000000; font-family: arial, helvetica, sans-serif;">En el momento que el usuario confirme dicha anulación, saldrá un cuadro donde debe incluir el detalle de esta: </span>

[![Screenshot_4.png](https://ayuda.cronuserp.com/uploads/images/gallery/2025-09/scaled-1680-/ftUscreenshot-4.png)](https://ayuda.cronuserp.com/uploads/images/gallery/2025-09/ftUscreenshot-4.png)

<span style="font-size: 12pt; color: #000000; font-family: arial, helvetica, sans-serif;">Y una vez confirmado esto el sistema arroja la confirmación finalizada de la anulación.</span><span style="font-size: 12pt; color: #000000; font-family: arial, helvetica, sans-serif;">Ya con esto se termina el proceso de anulación y ahora podrán observar el documento nulo en la pantalla principal.</span>

<span style="font-size: 12pt; color: #000000; font-family: arial, helvetica, sans-serif;">Para localizar el movimiento de inventario relacionado a dicha anulación, en la pantalla de Inventarios se podrá visualizar: </span>

# CRONUS-Sistema-Opciones-generales-Otros-Validación-de-bodegas

En las Opciones Generales de CRONUS ahora puede configurar si desea que apliquen las validaciones de Bodega por Sucursal, esto funciona de la siguiente manera.

En el submenú Otros:

 ![](https://ayuda.cronuserp.com/uploads/images/migrated/Screenshot_1.png)[![CRONUSBodSuc001.png](https://ayuda.cronuserp.com/uploads/images/gallery/2025-08/scaled-1680-/cronusbodsuc001.png)](https://ayuda.cronuserp.com/uploads/images/gallery/2025-08/cronusbodsuc001.png)[![CRONUSBodSuc002.png](https://ayuda.cronuserp.com/uploads/images/gallery/2025-08/scaled-1680-/cronusbodsuc002.png)](https://ayuda.cronuserp.com/uploads/images/gallery/2025-08/cronusbodsuc002.png)- Todas las sucursales tienen una lista de Bodegas Asociadas, está es definida de forma preliminar por un administrador.
- Si la bodega no corresponde a la Sucursal vigente el usuario recibe un mensaje de 3 formas distintas: 
    - Si el primer check está desmarcado, NO hay validación.
    - Si el primer check está marcado y el segundo está marcado, hay validación y CRONUS hará la pregunta al usuario si desea continuar.
    - Si el primer check está marcado y el segundo no está marcado, hay validación y CRONUS bloqueará la bodega por completo.
 

# CRONUS-Otros-Actualizaciones-masivas-de-productos

<span style="font-size: 14pt; color: #ff0000;">**Nota importante del proceso:** </span>

- <span style="color: #000000; font-size: 12pt; font-family: arial, helvetica, sans-serif;">Los precios que va a incluir el usuario en el XLS a importar; deben ser sin IVA. </span>

<span style="font-size: 12pt; font-family: arial, helvetica, sans-serif;">Para este proceso se debe ingresar a Otros =&gt; Actualizaciones masivas de productos: </span>

[![Screenshot_1.png](https://ayuda.cronuserp.com/uploads/images/gallery/2025-09/scaled-1680-/rTXscreenshot-1.png)](https://ayuda.cronuserp.com/uploads/images/gallery/2025-09/rTXscreenshot-1.png)

<span style="font-size: 12pt; font-family: arial, helvetica, sans-serif;">Una vez en esta pantalla, presionamos incluir. </span><span style="font-size: 12pt; font-family: arial, helvetica, sans-serif;">De este modo el sistema nos abrirá la pantalla para llenar los campos requeridos de la actualización. Detalle, fecha de aplicación y presionar "**aceptar**" . </span>

<span style="font-size: 12pt; font-family: arial, helvetica, sans-serif;">[![Screenshot_2.png](https://ayuda.cronuserp.com/uploads/images/gallery/2025-09/scaled-1680-/smKscreenshot-2.png)](https://ayuda.cronuserp.com/uploads/images/gallery/2025-09/smKscreenshot-2.png)</span>

<span style="font-size: 12pt; font-family: arial, helvetica, sans-serif;">Acá es importante recalcar, que tenemos varias opciones para la fecha de aplicación. Si se desea ejecutar en el momento que la estamos realizando entonces NO debemos definir fecha en el campo indicado ( se dejara en blanco para ejecutarlo de una vez ) , pero si deseamos que la actualización se realice otro día ( esto un cambio que se hará automático ) entonces **SI** debemos ingresar la fecha que deseamos se apliquen los cambios. </span>

<span style="font-size: 12pt; font-family: arial, helvetica, sans-serif;">Cuando presionamos "Aceptar" el sistema emerge una ventana de confirmación para incluir los productos: </span>

[![Screenshot_3.png](https://ayuda.cronuserp.com/uploads/images/gallery/2025-09/scaled-1680-/85Uscreenshot-3.png)](https://ayuda.cronuserp.com/uploads/images/gallery/2025-09/85Uscreenshot-3.png)

<span style="font-size: 12pt; font-family: arial, helvetica, sans-serif;">Una vez aquí, el sistema va a abrir la pantalla para listar los productos y escoger la opción que deseamos realizar. Para este caso escogemos =&gt; Importar =&gt; Precios finales: </span>

[![Screenshot_4.png](https://ayuda.cronuserp.com/uploads/images/gallery/2025-09/scaled-1680-/s9zscreenshot-4.png)](https://ayuda.cronuserp.com/uploads/images/gallery/2025-09/s9zscreenshot-4.png)

<span style="font-size: 12pt; font-family: arial, helvetica, sans-serif;">Cuando presionamos dicha opción, se nos mostrará la ventana con los campos que debe llevar el XLS a importar: </span>

[![Screenshot_5.png](https://ayuda.cronuserp.com/uploads/images/gallery/2025-09/scaled-1680-/yMfscreenshot-5.png)](https://ayuda.cronuserp.com/uploads/images/gallery/2025-09/yMfscreenshot-5.png)

<span style="font-size: 12pt; font-family: arial, helvetica, sans-serif;">Una vez tengamos importado el XLS que vamos a modificar, entonces el último paso sería ( sino definimos fecha de aplicación ) y deseamos realizarlo de una vez entonces nos devolvemos a la pantalla principal y presionamos "**ejecutar**" : </span>

[![Screenshot_6.png](https://ayuda.cronuserp.com/uploads/images/gallery/2025-09/scaled-1680-/Xxascreenshot-6.png)](https://ayuda.cronuserp.com/uploads/images/gallery/2025-09/Xxascreenshot-6.png)

<span style="font-size: 12pt; font-family: arial, helvetica, sans-serif;">Por lo contrario, si la opción elegida fue con fecha de aplicación entonces nada más debemos presionar aceptar y listo la actualización quedará guardada en el sistema y se ejecutará en la fecha que el usuario digitó. ( El proceso de ejecución cuando se le define a " X " fecha será un proceso automático, que ya el sistema por si solo ejecutará ese día ) . </span>

# CRONUS-Mantenimiento-Clientes-Clientes-Recálculo-de-Categoría

<p>Donde se ejecuta: Mantenimiento de Clientes &#92; Men&uacute; Utilitarios &#92; Rec&aacute;lculo de Categor&iacute;a</p> <hr /> <p>Para clasificar los clientes de forma autom&aacute;tica con una categor&iacute;a debe tomar en cuenta lo siguiente:</p> <ul> <li>Debe tener incluidas los siguientes tipos de categor&iacute;as (Obligatorios) <ul> <li>NA = No aplica - <strong>Cualquiera que no aplique a los par&aacute;metros de abajo</strong></li> <li>A = Retraso de menos de 3 meses</li> <li>B = Retraso de 3 meses</li> <li>C = Retraso de 3.1 a 6 meses</li> <li>X = Mas de 6 meses o cancelada mediante Cobro Judicial o Extrajudicial <strong>-&nbsp;Indicador de problemas de Cr&eacute;dito en SI</strong></li> <li>Y = Cuenta en proceso de cobro Judicial o Extrajudicial - <strong>Solo el cliente lo puede procesar, Cronus no reconoce el valor</strong></li> <li>Z = Cuenta de dudosa recuperaci&oacute;n -<strong> Indicador de Incobrable ha sido marcado para el cliente</strong>&nbsp;</li> </ul> </li> <li>Puede tener otras categor&iacute;as no obstante no van ser ser utilizadas en el c&aacute;lculo autom&aacute;tico.</li> <li>Si falta alguna de las categor&iacute;as al proceso no se ejecuta del todo.</li> <li>Se dan de gracias 3 documentos fijos (no configurables)</li> </ul> <p><strong>&iquest;C&oacute;mo se calcula cada categor&iacute;a?</strong></p> <p>La fecha en que se cancela el saldo total del documento es la base para el c&aacute;lculo, y los d&iacute;as son posteriores a la fecha mencionada, entonces por ejemplo si un documento tiene fecha de 01 de Enero y su plazo es de 30 d&iacute;as, su Fecha plazo es del 30 de Enero.</p> <p>Los d&iacute;as de diferencia se calculan a partir de la Fecha Plazo y no la fecha original.</p> <p><strong>Bit&aacute;cora</strong></p> <p>Se registra una bit&aacute;cora de clientes de tipo 'A' que indica la categor&iacute;a anterior y la nueva, con fecha, hora y usuario.</p> <p>&nbsp;</p>

# CRONUS-Sistema-Procesar-seguridad

<span style="font-size: 12pt; font-family: arial, helvetica, sans-serif;">Mediante esta opción el usuario puede validar los permisos que le fueron asignados en caso de estar usando el sistema y de esta manera no tener que salirse por completo del sistema, entonces únicamente tendría que presionar esta opción: </span>

![](https://ayuda.cronuserp.com/uploads/images/migrated/Screenshot_6.png)<span style="font-size: 12pt; font-family: arial, helvetica, sans-serif;"></span>

<span style="font-size: 12pt; font-family: arial, helvetica, sans-serif;">Una vez presionado este indicador, el sistema emerge un mensaje de confirmación y ya con eso los permisos que nos fueron asignados quedarán validados y así poder hacer uso de los mismos inmediatamente: </span>

 ![](https://ayuda.cronuserp.com/uploads/images/migrated/Screenshot_7.png)

# CRONUS-Movimientos-Facturacion-documentos-Aplicar-recibo-a-Saldo-de-Factura

<span style="font-size: 12pt; font-family: arial, helvetica, sans-serif;">Para este proceso ingresamos a la pantalla principal de facturas, de está manera buscamos la factura a la que deseamos aplicar el RB y mediante el click derecho nos sale la opción de "Aplicar recibo a saldo de factura " : </span>

 ![](https://ayuda.cronuserp.com/uploads/images/migrated/Screenshot_1.png)<span style="font-size: 12pt; font-family: arial, helvetica, sans-serif;"></span>

<span style="font-size: 12pt; font-family: arial, helvetica, sans-serif;">Con esta opción, nos abre la pantalla de recibos para realizar el mismo. Lo primero sería digitar el monto que deseamos aplicar a la factura: </span>

 ![](https://ayuda.cronuserp.com/uploads/images/migrated/Screenshot_2.png)<span style="font-size: 12pt; font-family: arial, helvetica, sans-serif;"></span>

<span style="font-size: 12pt; font-family: arial, helvetica, sans-serif;">Seguidamente, ingresamos a "Definir o cambiar forma de pago": </span>

[![Screenshot_3.png](https://ayuda.cronuserp.com/uploads/images/gallery/2025-08/scaled-1680-/screenshot-3.png)](https://ayuda.cronuserp.com/uploads/images/gallery/2025-08/screenshot-3.png)<span style="font-size: 12pt; font-family: arial, helvetica, sans-serif;"></span>

<span style="font-size: 12pt; font-family: arial, helvetica, sans-serif;">En esta pantalla ingresamos los datos requeridos y presionamos "aceptar" para guardar los cambios: </span>

 ![](https://ayuda.cronuserp.com/uploads/images/migrated/Screenshot_4.png)<span style="font-size: 12pt; font-family: arial, helvetica, sans-serif;"></span>

<span style="font-size: 12pt; font-family: arial, helvetica, sans-serif;">Una vez con esto nos devuelve a la pantalla principal para confirmar la aplicación con el botón de "aceptar": </span>

 ![](https://ayuda.cronuserp.com/uploads/images/migrated/Screenshot_5.png)<span style="font-size: 12pt; font-family: arial, helvetica, sans-serif;"></span>

<span style="font-size: 12pt; font-family: arial, helvetica, sans-serif;">Y por último nos emerge el mensaje de confirmación: </span>

 ![](https://ayuda.cronuserp.com/uploads/images/migrated/Screenshot_6.png)<span style="font-size: 12pt; font-family: arial, helvetica, sans-serif;"></span>

# CRONUS Reportes Generador de reportes

<span style="font-size: 12pt; font-family: arial, helvetica, sans-serif;">Desde esta opción podremos acceder a los múltiples reportes de CRONUS que maneja el sistema : </span>

 ![](https://ayuda.cronuserp.com/uploads/images/migrated/Screenshot_1.png)<span style="font-size: 12pt; font-family: arial, helvetica, sans-serif;"></span>

<span style="font-size: 12pt; font-family: arial, helvetica, sans-serif;">Una vez acá se nos despliega la pantalla principal de reportes y ahí podremos ubicar cuál deseamos generar: </span>

 ![](https://ayuda.cronuserp.com/uploads/images/migrated/Screenshot_2.png)<span style="font-size: 12pt; font-family: arial, helvetica, sans-serif;"></span>

<span style="font-size: 12pt; font-family: arial, helvetica, sans-serif;">En dicha pantalla los reportes son múltiples y con distintos parámetros para todos, entonces con ayuda de los binóculos podremos ubicarnos mejor en el que realmente necesitamos. </span>

<span style="font-size: 12pt; font-family: arial, helvetica, sans-serif;">Para desplegar las opciones entre uno y otro, basta con presionar sobre el + y así el sistema nos va a ir mostrando los reportes por cada pestaña seleccionada y una vez con el reporte seleccionado utilizar los parámetros que necesitamos. </span>

<span style="font-size: 12pt; font-family: arial, helvetica, sans-serif;">WIKIS RELACIONADOS:</span>

- <span style="font-size: 12pt; font-family: arial, helvetica, sans-serif;">[<span style="color: #000080;">01-Sucursales Resumen</span>](CRONUS-Reportes-Generador-de-reportes-Estadisticas-Sucursales-01-Sucursales-Resumen)</span>
- <span style="font-family: arial, helvetica, sans-serif; font-size: 12pt; color: #000080;">[Reportes por Grupo](CRONUS-Reportes-Generador-de-reportes-por-grupo)</span>
- <span style="font-family: arial, helvetica, sans-serif; font-size: 12pt; color: #000080;">[Derechos especiales](CRONUS-Reportes-Generador-de-reportes-Derechos-especiales)</span>

# CRONUS-Movimientos-Asiento-contable-Revaluación

<p>El asiento de revaluaci&oacute;n de cuentas por cobrar permite al usuario recalcular el saldo actual en D&oacute;lares de la compa&ntilde;&iacute;a y compararlo con el saldo actual contable (que est&aacute; guardado en colones).</p> <p><strong>Reglas iniciales</strong></p> <ol> <li>El Usuario debe elegir el Tipo de cambio al que desea revaluar</li> <li>Las cuentas que se evaluan son las cuentas por cobrar configuradas en las sucursales</li> <li>La cuenta por cobrar (Activo) debe ser la misma para todas las sucursales, esto debido a que las facturas de una sucursal pueden ser canceladas en otra, esto hace que manejar una cuenta contable distinta por sucursal sea imposible.</li> <li>El saldo inicial del mes en cuesti&oacute;n debe estar calculado, para esto es imperativo que el mes anterior haya sido CERRADO (no solo mayorizado y no puede ser preliminar)</li> <li>Si el usuario ha cambiado la cuenta contable por otra distinta al mes anterior o ha manipulado los saldos con asientos manuales el resultado ser&aacute; err&oacute;neo</li> <li>El asiento de CXC de Cronus tuvo que haber sido generado previamente, esto va a alimentar los d&eacute;bitos y cr&eacute;ditos del mes. <ol> <li>Documentos</li> <li>Recibos</li> <li>NC</li> <li>ND</li> <li>Todos los movimientos que puedan afectar la CXC</li> </ol> </li> </ol> <p><strong>C&aacute;lculo</strong></p> <ol> <li>El sistema calcula el saldo inicial de la cuenta</li> <li>El sistema suma los d&eacute;bitos y cr&eacute;ditos del mes</li> <li>El saldo final contable en moneda local tiene la siguiente f&oacute;rmula: Saldo inicial + D&eacute;bitos - Cr&eacute;ditos</li> <li>En resumen el saldo es "Dinero que nos deb&iacute;an el mes anterior + Facturas - Pagos</li> <li>Este total incluye los cobros en Moneda local + los D&oacute;lares</li> <li>El sistema genera internamente el reporte de Antiguedad de Saldos y multiplica los d&oacute;lares por el tipo de cambio que el usuario haya definido.</li> </ol> <p><strong>F&oacute;rmula</strong></p> <ol> <li>CXC contable&nbsp; - CXC de auxiliar multiplicando los d&oacute;lares por el T.C. ajustado</li> <li>Asiento con el monto de diferencia <ol> <li>Si el monto del auxiliar es mayor (T.C aument&oacute;) entonces la cuenta se debita</li> <li>Si el monto del auxiliar es menor (T.C disminuy&oacute;) entonces la cuenta se acredita</li> </ol> </li> </ol> <p><strong>Diferencias de CXC Vs Contabilidad (Documentos Pendientes de pago y aplicaciones posteriores)</strong></p> <p>Otro eventualidad que ayuda a controlar este proceso son las diferencias entre la Cuenta por Cobrar en Contabilidad y la Cuenta por Cobrar seg&uacute;n la Antiguedad de Saldos.</p> <p>Es importante recalcar que no existen asientos de las aplicaciones parciales de Recibos o Notas de Cr&eacute;dito, esto implica una diferencia en la Cuenta por Cobrar que se puede ir arrastrando cuando los documentos son aplicados en meses distintos en los que fueron creados y el proceso de Revaluaci&oacute;n nunca fue ejecutado en el pasado.</p> <p>Si la CXC fue manipulada desde contabilidad para reflejar un dato espec&iacute;fico esto afecta todos los c&aacute;lculos subsecuentes hasta que no existan mas recibos o notas de cr&eacute;dito con saldo.</p> <p>&nbsp;</p> <p>&nbsp;</p>

# CRONUS-Movimiento-Notas-de-pedido-Anular-multiples-Notas-de-pedido

<span style="font-size: 12pt; font-family: arial, helvetica, sans-serif;">Para realizar este proceso, debemos ingresar a Notas de Pedido = &gt; Utilitarios: </span>

 ![](https://ayuda.cronuserp.com/uploads/images/migrated/Screenshot_1.png)<span style="font-size: 12pt; font-family: arial, helvetica, sans-serif;"></span>

<span style="font-size: 12pt; font-family: arial, helvetica, sans-serif;">Una vez presionando esta opción el sistema nos mostrará, una pantalla donde debemos ingresar la fecha "hasta" que deseamos listar para dicha anulación. Cuando definimos la fecha límite se debe presionar el botón de "refrescar " para que las mismas sean mostradas en pantalla y tendremos en la parte de abajo la opción para marcar o desmarcar según necesitemos :</span>

 ![](https://ayuda.cronuserp.com/uploads/images/migrated/Screenshot_2.png)<span style="font-size: 12pt; font-family: arial, helvetica, sans-serif;"></span>

<span style="font-size: 12pt; font-family: arial, helvetica, sans-serif;">Cuando marquemos las que deseamos anular, presionamos el ícono de "aceptar" y confirmar el mensaje para completar dicho proceso: </span>

[![Screenshot_3.png](https://ayuda.cronuserp.com/uploads/images/gallery/2025-08/scaled-1680-/screenshot-3.png)](https://ayuda.cronuserp.com/uploads/images/gallery/2025-08/screenshot-3.png)<span style="font-size: 12pt; font-family: arial, helvetica, sans-serif;"></span>

<span style="font-size: 12pt; font-family: arial, helvetica, sans-serif;">Una vez que confirmemos el mensaje, el sistema emerge la ventana a continuación para validar el proceso, a la cuál solamente debemos presionar " OK " : </span>

 ![](https://ayuda.cronuserp.com/uploads/images/migrated/Screenshot_4.png)<span style="font-size: 12pt; font-family: arial, helvetica, sans-serif;"></span>

# CRONUS-Movimientos-Facturacion-documentos-Cambios-de-factura

<span style="font-size: 14pt;">**<span style="color: #ff0000;">Notas importantes del proceso: </span>**</span>

- <span style="font-size: 12pt; font-family: arial, helvetica, sans-serif;">Esto hace los cambios sin tener que volver a digitar la NP y todo el proceso como tal. </span>
- <span style="font-size: 12pt; font-family: arial, helvetica, sans-serif;">Si el cambio es de productos o cantidades entonces no aplica. </span>
 
<span style="color: #000000; font-size: 12pt; font-family: arial, helvetica, sans-serif;">Para esto ingresamos a la pantalla de facturación, buscamos la factura en cuestión presionamos click derecho =&gt; Cambios de factura: </span>

 ![](https://ayuda.cronuserp.com/uploads/images/migrated/Screenshot_1.png)<span style="color: #000000; font-size: 12pt; font-family: arial, helvetica, sans-serif;"></span>

<span style="color: #000000; font-size: 12pt; font-family: arial, helvetica, sans-serif;">Ahí según la opción elegida el sistema le abre la pantalla para realizar dicho cambio. </span>

# CRONUS-Movimientos-Cajas-Cierres-de-caja-Ingreso-de-registro-de-caja-chica

Primeramente el usuario debe ingresar a la pantalla de cierres de caja:

 ![](https://ayuda.cronuserp.com/uploads/images/migrated/Screenshot_1.png)Una vez en esta ingresar al ícono de caja chica:

 ![](https://ayuda.cronuserp.com/uploads/images/migrated/Screenshot_2.png)De esta manera el sistema mostrará la siguiente pantalla:

 [![Screenshot_3.png](https://ayuda.cronuserp.com/uploads/images/gallery/2025-08/scaled-1680-/screenshot-3.png)](https://ayuda.cronuserp.com/uploads/images/gallery/2025-08/screenshot-3.png)![](https://ayuda.cronuserp.com/uploads/images/migrated/Screenshot_4.png)En está el usuario debe ingresar los campos requeridos que se explican a continuación:

- **Proveedor:** Nombre del proveedor del documento que vamos a ingresar ( podemos halar el del sistema si esta ingresado o digitar manualmente el nombre del lugar )
- **Observac:** Son las observaciones o detalle del registro que se esta ingresando ( almuerzo, viáticos, uber,etc )
- **Gasto:** El tipo de gasto que corresponde según el documento que estemos ingresando. Presionando el ícono de GASTO podemos ingresar al mantenimiento de estos y halar el que corresponde.
- **Fecha:** La fecha del documento ingresado.
- **Gasto Local:** Monto del gasto. ( Debe ser únicamente en moneda local )
- **Documento:** Número de documento que estamos ingresando ( si no lo tuviera pueden ingresar el que el usuario desee )
 
Una vez digitados dichos campos solamente debemos presionar Aceptar, como se muestra en la imagen anterior para el ejemplo.

En caso que el usuario se equivoque en la linea de detalle puede modificar la misma presionando doble click sobre está:

 ![](https://ayuda.cronuserp.com/uploads/images/migrated/Screenshot_5.png)Cuando el documento que se esta ingresando proviene de una Factura Electrónica se debe marcar el indicador resaltado en dicha pantalla, esto para que el departamento encargado de su empresa realice dicha operación de subir el XML correspondiente a la misma:

 ![](https://ayuda.cronuserp.com/uploads/images/migrated/Screenshot_6.png)**Para finalizar, tenemos varios puntos importantes a considerar para dicho proceso:**

- El ID del proveedor no es necesario ingresarlo,y este tampoco debe estar en la lista de proveedores.
- Al realizar el cierre de caja en firme estos registros de caja chica se rebajarán del total por depositar. Y nos lo mostrará en una casilla adicional:
 
 ![](https://ayuda.cronuserp.com/uploads/images/migrated/Screenshot_7.png)- Podemos ir ingresando los datos como deseemos durante el día ( como un temporal al igual que con los cierres de caja o recibos que vamos marcando en el mismo )
- Al aplicar el cierre de caja en firme, en la impresión de esté ahora nos mostrará un desglose de los datos de caja chica ingresados:
 
 ![](https://ayuda.cronuserp.com/uploads/images/migrated/Screenshot_8.png)

# CRONUS-Movimientos-Facturacion-documentos-Devoluciones

<span style="font-size: 12pt; font-family: arial, helvetica, sans-serif; color: #ff0000;">**Notas importantes del proceso:** </span>

- <span style="font-size: 12pt; font-family: arial, helvetica, sans-serif;">Una vez creada la devolución esta no podrá ser reversada ( únicamente por movimientos de inventarios directamente ) . </span>
- <span style="font-size: 12pt; font-family: arial, helvetica, sans-serif;">El sistema creará dos documentos, una devolución que es el movimiento que afecta inventario y una NC que será el documento que afecte la factura. </span>
- <span style="font-size: 12pt; font-family: arial, helvetica, sans-serif;">En el caso de la NC que afecta la factura si la misma no tiene saldo, dicha NC quedará con saldo para ser usada en otro documento a este cliente y si la factura tiene saldo el sistema se la aplica a esta misma. </span>

<span style="font-size: 12pt; font-family: arial, helvetica, sans-serif;">Para realizar el proceso de devoluciones. Se debe ingresar a la pantalla de facturas y acá se elige la que se le desea aplicar devolución. Una vez en esta pantalla se selecciona la factura a la que deseamos devolver y mediante un click derecho sobre la misma ingresamos a la opción de " devolución " : </span>

[![Screenshot_1.png](https://ayuda.cronuserp.com/uploads/images/gallery/2025-09/scaled-1680-/dLJscreenshot-1.png)](https://ayuda.cronuserp.com/uploads/images/gallery/2025-09/dLJscreenshot-1.png)

<span style="font-size: 12pt; font-family: arial, helvetica, sans-serif;">En la siguiente pantalla será donde se debe ingresar los datos de la devolución. </span>

<span style="font-size: 12pt; font-family: arial, helvetica, sans-serif;">Detalle de la devolución,tipo, cantidad, porcentaje de castigo ( si aplica ) y una vez con estos datos completos se presiona el ícono de " Aceptar " ubicado en la parte de arriba a la izquierda de dicha pantalla. </span>

[![Screenshot_2.png](https://ayuda.cronuserp.com/uploads/images/gallery/2025-09/scaled-1680-/0jNscreenshot-2.png)](https://ayuda.cronuserp.com/uploads/images/gallery/2025-09/0jNscreenshot-2.png)

<span style="font-size: 12pt; font-family: arial, helvetica, sans-serif;">Seguidamente el sistema muestra un mensaje de confirmación.</span>

[![Screenshot_3.png](https://ayuda.cronuserp.com/uploads/images/gallery/2025-09/scaled-1680-/Obwscreenshot-3.png)](https://ayuda.cronuserp.com/uploads/images/gallery/2025-09/Obwscreenshot-3.png)

<span style="font-size: 12pt; font-family: arial, helvetica, sans-serif;">Y por último presenta el mensaje de inclusión.</span>

[![Screenshot_4.png](https://ayuda.cronuserp.com/uploads/images/gallery/2025-09/scaled-1680-/ajQscreenshot-4.png)](https://ayuda.cronuserp.com/uploads/images/gallery/2025-09/ajQscreenshot-4.png)

<span style="font-size: 12pt; font-family: arial, helvetica, sans-serif;">Para visualizar las devoluciones ya creadas pueden ingresar al menú de "Devoluciones". Una vez en esta pantalla por defecto aparecen todos los documentos registrados, y ahí se pueden filtrar por fechas, ver los de hoy, hace 1 día, 1 semana o 1 mes o con rango definido. </span>

[![Screenshot_5.png](https://ayuda.cronuserp.com/uploads/images/gallery/2025-09/scaled-1680-/U6Yscreenshot-5.png)](https://ayuda.cronuserp.com/uploads/images/gallery/2025-09/U6Yscreenshot-5.png)

<span lang="ES-CR" style="font-size: 12.0pt; line-height: 107%; font-family: 'Arial',sans-serif; mso-ansi-language: ES-CR;">Si desean visualizar la NC ligada a la factura y a la devolución pueden ingresar a la pantalla de notas de crédito y en esta pantalla los podrán ubicar: </span>

<span lang="ES-CR" style="font-size: 12.0pt; line-height: 107%; font-family: 'Arial',sans-serif; mso-ansi-language: ES-CR;">[![Screenshot_6.png](https://ayuda.cronuserp.com/uploads/images/gallery/2025-09/scaled-1680-/k5fscreenshot-6.png)](https://ayuda.cronuserp.com/uploads/images/gallery/2025-09/k5fscreenshot-6.png)</span>

<span style="font-size: 12pt; font-family: arial, helvetica, sans-serif;">Wikis relacionados:</span>

- <span style="font-size: 12pt; font-family: arial, helvetica, sans-serif;">[Devoluciones y castigos](https://ayuda.cronuserp.com/books/wiki-cronus-erp/page/cronus-movimientos-facturacion-documentos-devoluciones-castigos)</span>

# CRONUS-Mantenimiento-Clientes-Clientes-Imagen-de-cliente

<span style="font-size: 12pt; font-family: arial, helvetica, sans-serif;">Con este proceso ahora se puede incluir dentro del maestro de clientes una imagen con la información de las personas autorizadas a retirar producto, que normalmente incluye nombre, cédula y la firma (ejemplo una foto con estos datos). Entre otras imágenes que desee agregar el usuario, esto para usar de referencia sobre el cliente y si desea pueden habilitar ( con el permiso respectivo ) a los bodegueros, para que tengan una ventana de consulta y poder ver quienes son los autorizados para retirar la mercadería. </span>

<span style="font-size: 12pt; color: #ff0000; font-family: arial, helvetica, sans-serif;">**Notas importantes para el proceso:** </span>

- <span style="font-size: 12pt; font-family: arial, helvetica, sans-serif;">Únicamente se puede subir imágenes en formato JPG. </span>
- <span style="font-size: 12pt; font-family: arial, helvetica, sans-serif;">Permiso para ver imágenes "MCLIENTES1\_IMG2"</span>
- <span style="font-size: 12pt; font-family: arial, helvetica, sans-serif;">Permiso para procesar imágenes "MCLIENTES1\_IMG1" </span>
 
<span style="font-size: 12pt; font-family: arial, helvetica, sans-serif;">Para incluir la imagen se debe ingresar al cliente deseado doble click para abrir la pantalla del mismo, una vez en esta, presionamos el ícono de "imágenes":</span>

 ![](https://ayuda.cronuserp.com/uploads/images/migrated/Screenshot_1.png)<span style="font-size: 12pt; font-family: arial, helvetica, sans-serif;"></span>

<span style="font-size: 12pt; font-family: arial, helvetica, sans-serif;">Una vez en esta ventana el usuario debe ingresar a la pestaña de Incluir/Modificar: </span>

 ![](https://ayuda.cronuserp.com/uploads/images/migrated/Screenshot_2.png)<span style="font-size: 12pt; font-family: arial, helvetica, sans-serif;"></span>

<span style="font-size: 12pt; font-family: arial, helvetica, sans-serif;">Posteriormente presionar el botón de Buscar con esto debe ir a la carpeta de la computadora donde tiene previamente guardadas las imágenes, posicionarse sobre la deseada y presionar "Abrir": </span>

[![Screenshot_3.png](https://ayuda.cronuserp.com/uploads/images/gallery/2025-08/scaled-1680-/screenshot-3.png)](https://ayuda.cronuserp.com/uploads/images/gallery/2025-08/screenshot-3.png)<span style="font-size: 12pt; font-family: arial, helvetica, sans-serif;"></span>

<span style="font-size: 12pt; font-family: arial, helvetica, sans-serif;">Una vez que tengamos cargada la imagen se debe agregar una pequeña descripción sobre la misma y presionar "Incluir": </span>

 ![](https://ayuda.cronuserp.com/uploads/images/migrated/Screenshot_4.png)![](https://ayuda.cronuserp.com/uploads/images/migrated/Screenshot_5.png)<span style="font-size: 12pt; font-family: arial, helvetica, sans-serif;"></span>

<span style="font-size: 12pt; font-family: arial, helvetica, sans-serif;">Cuando las imágenes están incluidas se acomodan en la lista de inclusión, con un doble click sobre la línea deseada nos llevará a ver la imagen y si ya no se desea agregar más imágenes se debe presionar "Salir": </span>

 ![](https://ayuda.cronuserp.com/uploads/images/migrated/Screenshot_6.png)<span style="font-size: 12pt; font-family: arial, helvetica, sans-serif;"></span>

<span style="font-size: 12pt; font-family: arial, helvetica, sans-serif;">**Para seguir el proceso de visualización de las imágenes en la pantalla de alisto, haga click [aquí](https://ayuda.cronuserp.com/books/wiki-cronus-erp/page/Imgenes-de-cliente-en-pantalla-de-alisto)**</span>

<span style="font-size: 12pt; font-family: arial, helvetica, sans-serif;">Wikis relacionados:</span>

- <span style="font-size: 12pt; font-family: arial, helvetica, sans-serif;">[<span style="color: #000080;">Ver imagen desde bodegas</span>](Cronus-Mantenimiento-Clientes-Ver-imagen-del-cliente)</span>
 

# CRONUS-Movimientos-Facturacion-documentos-Facturacion

<span style="font-size: 14pt; color: #ff0000; font-family: arial, helvetica, sans-serif;">**Notas importantes del proceso:** </span>

- <span style="font-size: 12pt; font-family: arial, helvetica, sans-serif;">Cuando las facturas son marcadas con un color verde claro es porque las mismas son en moneda dólares. </span>
- <span style="font-size: 12pt; font-family: arial, helvetica, sans-serif;">Cuando la primer columna de la pantalla principal está en color café es porque las facturas están rechazadas por la DGT. ( En este caso deben revisar el motivo de rechazo, corregir, anular y volver a facturar ).Por medio de un click derecho sobre la misma con la opción de "Ver detalle del documento " se puede ver el motivo de rechazo. ( Esto desde el sistema WEB en Documentos de CXC, para ver el detalle del rechazo ) . </span>
- <span style="font-size: 12pt; font-family: arial, helvetica, sans-serif;">Cuando la primer columna esta en color rosa es porque las mismas se encuentran pendientes de respuesta por parte de la DGT y esto es</span><span style="font-size: 12pt; font-family: arial, helvetica, sans-serif;"> porque no tienen CABYS correcto los productos o servicios o porque los datos del cliente están erróneos ( número de cédula, tipo de cédula, e-mail, etc. ) para ello se debe ingresar al cliente, corregir datos y esperar respuesta de parte de la DGT.</span>

<span style="font-family: arial, helvetica, sans-serif; font-size: 12pt;">Ahora, bien explicamos el paso paso para crear facturas en sistema. Presione el botón **"Factura"** ubicado en la barra de botones de la pantalla principal de Cronus. </span>

<div class="align-center" id="bkmrk-"><span style="font-size: 12pt; font-family: arial, helvetica, sans-serif;">[![Screenshot_1.png](https://ayuda.cronuserp.com/uploads/images/gallery/2025-09/scaled-1680-/QGEscreenshot-1.png)](https://ayuda.cronuserp.com/uploads/images/gallery/2025-09/QGEscreenshot-1.png)</span></div><div id="bkmrk--2" style="text-align: justify;"></div><span style="font-size: 12pt; font-family: arial, helvetica, sans-serif;"><span style="background-color: #ffffff;">Para crear una factura nueva presionamos el botón </span> **"Incluir"** <span style="background-color: #ffffff;"> ubicado arriba a la izquierda de la pantalla. </span></span>

<span style="font-size: 12pt; font-family: arial, helvetica, sans-serif;"><span style="background-color: #ffffff;">[![Screenshot_2.png](https://ayuda.cronuserp.com/uploads/images/gallery/2025-09/scaled-1680-/CDbscreenshot-2.png)](https://ayuda.cronuserp.com/uploads/images/gallery/2025-09/CDbscreenshot-2.png)</span></span>

<span style="font-size: 12pt; font-family: arial, helvetica, sans-serif;"><span style="background-color: #ffffff;">Lo primero que debemos de hacer es identificar el tipo de documento si es factura de crédito o de contado. La fecha es sugerida de forma automática por el servidor, luego debemos de identificar al cliente al que deseamos facturarle, si sabe el número de código lo puede digitar, si no lo sabe, puede presionar el botón con un símbolo de pregunta, ubicado bajo el campo de "Número"</span> <span style="background-color: #ffffff;">y buscar en la lista, para escogerlo haga doble click sobre el nombre del cliente. También debe escoger el proyecto si aplicará que se posiciona en la parte de abajo de la casilla del cliente **( PRY )** ; y por último el agente ubicado en la parte de abajo de la casilla del proyecto ( si desea cambiarlo, porque por defecto el sistema pondrá el del cliente seleccionado) .</span></span><span style="font-size: 12pt; font-family: arial, helvetica, sans-serif;">Importante, también debemos seleccionar la moneda del documento ( por default, el sistema pondrá la moneda definida en el cliente ) pero si el usuario tiene permiso, podrá facturar en distinta moneda a la del cliente.</span>

<span style="font-size: 12pt; font-family: arial, helvetica, sans-serif;">[![Screenshot_3.png](https://ayuda.cronuserp.com/uploads/images/gallery/2025-09/scaled-1680-/Emyscreenshot-3.png)](https://ayuda.cronuserp.com/uploads/images/gallery/2025-09/Emyscreenshot-3.png)</span>

<span style="font-size: 12pt; font-family: arial, helvetica, sans-serif;"><span style="background-color: #ffffff;">Al lado derecho de la pantalla en la parte superior hay un campo de </span> **Observaciones** <span style="background-color: #ffffff;">,en el puede hacer anotaciones o recordatorios , estas observaciones saldrán impresas en la factura.</span></span>

[![Screenshot_4.png](https://ayuda.cronuserp.com/uploads/images/gallery/2025-09/scaled-1680-/QYpscreenshot-4.png)](https://ayuda.cronuserp.com/uploads/images/gallery/2025-09/QYpscreenshot-4.png)

<span style="display: block; text-align: center; font-size: 12pt; font-family: arial, helvetica, sans-serif;">  
</span>  
<span style="font-family: arial, helvetica, sans-serif; font-size: 12pt;">Seguidamente seria el proceso de búsqueda de productos para facturar, funciona de la misma manera que la búsqueda de clientes, si usted sabe el código del producto lo puede digitar en el campo **"Producto"** o buscarlo digitando palabras claves en el campo que dice **"Búsqueda F4"**. Al hacerlo, el sistema le mostrará todos los productos que contengan esas palabras en su descripción. Para escogerlo y poderlo facturar debe de hacer doble click sobre él. Después llenar los campos de cantidad, bodega y porcentaje de descuento (si aplica) luego presione el botón **"Incluir"**. Este procedimiento lo tiene que hacer con cada producto que desee facturar. Una vez cargados todos productos, verifique los precios, las cantidades y los descuentos aplicados, si tiene que modificar alguno, solo haga doble click sobre él y modifique la información.</span>

[![Screenshot_5.png](https://ayuda.cronuserp.com/uploads/images/gallery/2025-09/scaled-1680-/JnWscreenshot-5.png)](https://ayuda.cronuserp.com/uploads/images/gallery/2025-09/JnWscreenshot-5.png)

<span style="font-family: arial, helvetica, sans-serif; font-size: 12pt;">Para crear la factura e imprimirla presione el botón "Aceptar" ubicado en la parte inferior izquierda de la pantalla. Es importante recalcar que una vez presionado este botón la factura se vuelve intocable, no se puede modificar ni eliminar, si está errónea, deben anularla con nota de crédito y volver a facturar. </span>

<span style="font-family: arial, helvetica, sans-serif; font-size: 12pt;">[![Screenshot_6.png](https://ayuda.cronuserp.com/uploads/images/gallery/2025-09/scaled-1680-/VuRscreenshot-6.png)](https://ayuda.cronuserp.com/uploads/images/gallery/2025-09/VuRscreenshot-6.png)</span>

<span style="background-color: #ffffff; font-family: arial, helvetica, sans-serif; font-size: 12pt;">Por último en esta pantalla por defecto aparecen todos los documentos registrados, y ahí se pueden filtrar por fechas, ver los de hoy, hace 1 día, 1 semana o 1 mes o con rango definido. </span>

[![Screenshot_7.png](https://ayuda.cronuserp.com/uploads/images/gallery/2025-09/scaled-1680-/screenshot-7.png)](https://ayuda.cronuserp.com/uploads/images/gallery/2025-09/screenshot-7.png)

<span style="font-size: 12pt; font-family: arial, helvetica, sans-serif;">Wikis relacionados:</span>

- [<span style="color: #000080; font-size: 12pt; font-family: arial, helvetica, sans-serif;">Mensajes Frecuentes</span>](https://ayuda.cronuserp.com/books/wiki-cronus-erp/page/mensajes-frecuentes)
- <span style="color: #000080; font-size: 12pt; font-family: arial, helvetica, sans-serif;">[Anulación de facturas](https://ayuda.cronuserp.com/books/wiki-cronus-erp/page/cronus-movimientos-facturacion-documentos-anulacion-de-facturas)</span>
- <span style="color: #000080; font-size: 12pt; font-family: arial, helvetica, sans-serif;">[Cambios de factura](https://ayuda.cronuserp.com/books/wiki-cronus-erp/page/cronus-movimientos-facturacion-documentos-cambios-de-factura)</span>
- <span style="font-size: 12pt; font-family: arial, helvetica, sans-serif;">[<span style="color: #000080;">Busqueda de productos </span>](https://ayuda.cronuserp.com/REVISAR_MANUAL)</span>
- <span style="font-size: 12pt; font-family: arial, helvetica, sans-serif;">[Devolución](https://ayuda.cronuserp.com/REVISAR_MANUAL)</span>
- <span style="font-size: 12pt; font-family: arial, helvetica, sans-serif;">[Solicitud de devolución](https://ayuda.cronuserp.com/books/wiki-cronus-erp/page/cronus-movimientos-facturacion-documentos-solicitud-de-notas-de-credito)</span>
- <span style="font-size: 12pt; font-family: arial, helvetica, sans-serif;">[Aplicar recibo a saldo de factura](https://ayuda.cronuserp.com/books/wiki-cronus-erp/page/cronus-movimientos-facturacion-documentos-aplicar-recibo-a-saldo-de-factura)</span>
- <span style="font-size: 12pt; font-family: arial, helvetica, sans-serif;">[Cambios de factura](https://ayuda.cronuserp.com/books/wiki-cronus-erp/page/Cronus-Movimientos-Facturacion-documentos-Cambios-de-factura)</span>
- <span style="font-size: 12pt; font-family: arial, helvetica, sans-serif;">[Tipos de derechos de notas de credito](https://ayuda.cronuserp.com/books/wiki-cronus-erp/page/cronus-movimientos-facturacion-documentos-facturacion-tipos-de-nc)</span>
- <span style="font-size: 12pt; font-family: arial, helvetica, sans-serif;">[Nc saldos menores](https://ayuda.cronuserp.com/REVISAR_MANUAL)</span>

<span style="font-size: 12pt; font-family: arial, helvetica, sans-serif;"><span style="display: block; text-align: center;">  
</span> <span style="display: block; text-align: center;">  
</span></span>

# CRONUS - Movimiento - Notas de Pedido confirmación de transferencia

**Derechos asociados**

- <span style="font-size: 12pt; font-family: arial, helvetica, sans-serif;">"MNOTASPC4" permite acceder al botón en el menú Principal</span>
- <span style="font-size: 12pt; font-family: arial, helvetica, sans-serif;">"MNOTASPC5" permite confirmar una Transferencia asociada a una NP</span>
- <span style="font-size: 12pt; font-family: arial, helvetica, sans-serif;">"MRECIBOS1" permite ver los recibos desde la pantalla de Confirmación</span>
- <span style="font-size: 12pt; font-family: arial, helvetica, sans-serif;">"DSRECCRED2" poder incluir Recibos de Adelanto</span>
 
<span style="font-size: 12pt; font-family: arial, helvetica, sans-serif;">**Versión**</span>

<span style="font-size: 12pt; font-family: arial, helvetica, sans-serif;">Se incluye en CRONUS 6.2.328 +</span>

<span style="font-size: 12pt; font-family: arial, helvetica, sans-serif;">**Notas de Pedido**</span>

<span style="font-size: 12pt; font-family: arial, helvetica, sans-serif;">El proceso de confirmación le permite al usuario elegir NP que tengan un documento adjunto con la información de pago, este luego se toma y es usado como base para crear un Depósito en Bancos y un Recibo de dinero de adelanto en el módulo de Cajas.</span>

- <span style="font-size: 12pt; font-family: arial, helvetica, sans-serif;">El agente de ventas debe incorporar al menos un adjunto para que la NP aparezca como lista para Confirmar dentro de las pantallas subsecuentes.</span>
- <span style="font-size: 12pt; font-family: arial, helvetica, sans-serif;">El documento adjunto debe ser un PDF o Imagen.</span>
- <span style="font-size: 12pt; font-family: arial, helvetica, sans-serif;">El agente vendedor puede generar un reporte desde esta pantalla.</span>
 
<span style="font-size: 12pt; font-family: arial, helvetica, sans-serif;"></span>

<span style="font-size: 12pt; font-family: arial, helvetica, sans-serif;">**Confirmación**</span>

<span style="font-size: 12pt; font-family: arial, helvetica, sans-serif;">La pantalla se refresca por defecto cada minuto (configurable desde el menú función), el usuario puede ver la NP, ir a Recibos o confirmar su estado de rastreo.</span>

- <span style="font-size: 12pt; font-family: arial, helvetica, sans-serif;">Click derecho a la NP o F6 los lleva a la pantalla de detalle para confirmar una NP con transferencia y Depósito.</span>
- <span style="font-size: 12pt; font-family: arial, helvetica, sans-serif;">Click derecho la pantalla o F7 los lleva a la pantalla de detalle para confirmar una transferencia y Depósito con un cliente asociado.</span>
 
<span style="font-size: 12pt; font-family: arial, helvetica, sans-serif;"></span>

<span style="font-size: 12pt; font-family: arial, helvetica, sans-serif;">**Confirmar Transferencia con NP**</span>

<span style="font-size: 12pt; font-family: arial, helvetica, sans-serif;">La moneda sugerida es la misma moneda de la NP, y el monto es el mismo de esta. Si al final un monto no coincide, si el adelanto fue para múltiples NP o va a quedar con saldo es prerrogativa del encargado.</span>

<span style="font-size: 12pt; font-family: arial, helvetica, sans-serif;">Por defecto se sugiere AD como tipo de recibo, no hay posibilidad de cambiarlo.</span>

<span style="font-size: 12pt; font-family: arial, helvetica, sans-serif;"></span>

<span style="font-size: 12pt; font-family: arial, helvetica, sans-serif;">**Confirmar Transferencia con Cliente**</span>

<span style="font-size: 12pt; font-family: arial, helvetica, sans-serif;">En el caso de no tener una NP como referencia, debe definir un cliente en la cejilla habilitada a la derecha. El proceso crea el depósito asociado al cliente con datos en el beneficiario y detalle.</span>

<span style="font-size: 12pt; font-family: arial, helvetica, sans-serif;">Si el cliente tiene nombre modificable debe alterarlo, de otra forma se usa el nombre del mantenimiento de clientes.</span>

<span style="font-size: 12pt; font-family: arial, helvetica, sans-serif;"></span>

<span style="font-size: 12pt; font-family: arial, helvetica, sans-serif;">**Datos Generales de la pantalla**</span>

- <span style="font-size: 12pt; font-family: arial, helvetica, sans-serif;">Puede consultar adjuntos y otros recibos desde aquí.</span>
- <span style="font-size: 12pt; font-family: arial, helvetica, sans-serif;">Se presentan datos con 15 días de diferencia.</span>
- <span style="font-size: 12pt; font-family: arial, helvetica, sans-serif;">Montos con diferencias de 10% superior o inferior.</span>
- <span style="font-size: 12pt; font-family: arial, helvetica, sans-serif;">SI hay recibos de dinero creados que hagan referencia a este mismo depósito entonces aparecen en lista.</span>
    - <span style="font-size: 12pt; font-family: arial, helvetica, sans-serif;">Sin Cierre.</span>
    - <span style="font-size: 12pt; font-family: arial, helvetica, sans-serif;">Estos deben ser idénticos hasta en el número.</span>
 

# CRONUS Mantenimiento Inventario Productos Definir Ubicación de productos

<p style="text-align: justify;"><span style="font-weight: 400; font-size: 12pt; font-family: arial, helvetica, sans-serif;">Para definir las ubicaciones de los productos dentro de la sucursal debemos ingresar a cada producto dentro del mantenimiento principal o en la pantalla de consulta de saldos:</span></p> <p style="text-align: justify;"><span style="font-weight: 400; font-size: 12pt; font-family: arial, helvetica, sans-serif;"><img style="display: block; margin-left: auto; margin-right: auto;" src="/files/CRONUS-Mantenimiento-Inventario-Productos-Definir-Ubicacion-de-productos/UB%201.png" alt="UB 1.png" width="176" height="96" /></span></p> <p style="text-align: justify;">&nbsp;</p> <p style="text-align: justify;"><span style="font-size: 12pt; font-family: arial, helvetica, sans-serif;"><span style="font-weight: 400;">Cuando se tienen que incluir cambios de ubicaci&oacute;n a m&uacute;ltiples productos o cuando se hace luego de que el producto se haya ingresado, es mejor hacerlo desde la </span><strong>Consulta de saldos:<img style="display: block; margin-left: auto; margin-right: auto;" src="/files/CRONUS-Mantenimiento-Inventario-Productos-Definir-Ubicacion-de-productos/UB%202.png" alt="UB 2.png" width="309" height="99" /></strong></span></p> <p style="text-align: justify;">&nbsp;</p> <p style="text-align: justify;"><span style="font-weight: 400; font-size: 12pt; font-family: arial, helvetica, sans-serif;">Para generar una lista completa de todos los productos que NO tienen ubicaci&oacute;n definida en la base de datos, nos vamos a la pantalla de consulta de saldos al submen&uacute; de utilitarios:</span></p> <p style="text-align: justify;"><span style="font-weight: 400; font-size: 12pt; font-family: arial, helvetica, sans-serif;"><img style="display: block; margin-left: auto; margin-right: auto;" src="/files/CRONUS-Mantenimiento-Inventario-Productos-Definir-Ubicacion-de-productos/UB%203.png" alt="UB 3.png" width="626" height="264" /></span></p> <p style="text-align: justify;">&nbsp;</p> <p style="text-align: justify;"><span style="font-size: 12pt; font-family: arial, helvetica, sans-serif;"><span style="font-weight: 400;">El mismo formato con que se exportan los productos puede ser usado para importar las ubicaciones, el exportador solo genera la sucursal y compa&ntilde;&iacute;a marcados por defecto.</span><span style="font-weight: 400;">Para cambiar la ubicaci&oacute;n de un solo producto, se puede hacer desde esta misma pantalla con el bot&oacute;n ubicado al lado del c&oacute;digo de producto:</span></span></p> <p style="text-align: justify;"><span style="font-weight: 400; font-size: 12pt; font-family: arial, helvetica, sans-serif;"><img style="display: block; margin-left: auto; margin-right: auto;" src="/files/CRONUS-Mantenimiento-Inventario-Productos-Definir-Ubicacion-de-productos/UB%204.png" alt="UB 4.png" width="630" height="94" /></span></p> <p style="text-align: justify;">&nbsp;</p> <p style="text-align: justify;"><span style="font-weight: 400; font-size: 12pt; font-family: arial, helvetica, sans-serif;">En esta pantalla pueden definir la ubicaci&oacute;n del art&iacute;culo dentro de cada sucursal y dentro de la compa&ntilde;&iacute;a (si aplica), los tres valores deben de tener un n&uacute;mero superior a cero de no mas de 3 d&iacute;gitos:</span></p> <p style="text-align: justify;"><span style="font-weight: 400; font-size: 12pt; font-family: arial, helvetica, sans-serif;"><img style="display: block; margin-left: auto; margin-right: auto;" src="/files/CRONUS-Mantenimiento-Inventario-Productos-Definir-Ubicacion-de-productos/UB%205.png" alt="UB 5.png" width="497" height="103" /></span></p> <p style="text-align: justify;">&nbsp;</p> <p style="text-align: justify;"><span style="font-weight: 400; font-size: 12pt; font-family: arial, helvetica, sans-serif;">Si desea, pueden actualizar la ubicaci&oacute;n en todas las sucursales a las que su usuario tenga derecho si marca el check que aparece en el c&iacute;rculo rojo.</span></p> <p style="text-align: justify;"><span style="font-weight: 400; font-size: 12pt; font-family: arial, helvetica, sans-serif;">Si el producto no tiene ubicaci&oacute;n por sucursal, se usar&aacute; la ubicaci&oacute;n por compa&ntilde;&iacute;a. Esto en la impresi&oacute;n de boletas de despacho.</span></p> <p style="text-align: justify;">&nbsp;</p>

# CRONUS-Movimientos-Facturación-documentos-Solicitud de Notas de crédito

<span style="font-size: 12pt; font-family: arial, helvetica, sans-serif;">**Derechos de seguridad requeridos**</span>

- <span style="font-size: 12pt; font-family: arial, helvetica, sans-serif;">"MANSOLINCAVEJ" "SNC. Solicitud de Nota de Crédito - Aplicar "</span>
- <span style="font-size: 12pt; font-family: arial, helvetica, sans-serif;">"MANSOLINCAVAP" "DV. Solicitud NC aprobar"</span>
- <span style="font-size: 12pt; font-family: arial, helvetica, sans-serif;">"MANSOLINCAVMD" "SNC. Solicitud de Nota de Crédito - Modificar "</span>
- <span style="font-size: 12pt; font-family: arial, helvetica, sans-serif;">"MANSOLINCAVAAN" "SNC. Solicitud de Nota de Crédito - ANULAR "</span>
- <span style="font-size: 12pt; font-family: arial, helvetica, sans-serif;">"MANSOLINCAVAG" "SNC. Solicitud de Nota de Crédito - Incluir "</span>
- <span style="font-size: 12pt; font-family: arial, helvetica, sans-serif;">"PDEVESPE4" "DV. Devoluciones multifactura, permite aplicar a Facturas de agente distinto"</span>
- <span style="font-size: 12pt; font-family: arial, helvetica, sans-serif;">Según tipos de NC</span>
    - <span style="font-size: 12pt; font-family: arial, helvetica, sans-serif;">"PASNC\_DX" "SNC. Solicitud de Nota de Crédito - Aprobar 'Diferencia de precios'"</span>
    - <span style="font-size: 12pt; font-family: arial, helvetica, sans-serif;">"PASNC\_EX" "SNC. Solicitud de Nota de Crédito - Aprobar 'Exoneración de impuesto'"</span>
    - <span style="font-size: 12pt; font-family: arial, helvetica, sans-serif;">"PASNC\_RE" "SNC. Solicitud de Nota de Crédito - Aprobar 'Retención de renta'"</span>
    - <span style="font-size: 12pt; font-family: arial, helvetica, sans-serif;">"PASNC\_DP" "SNC. Solicitud de Nota de Crédito - Aprobar 'Descuento especial'"</span>
    - <span style="font-size: 12pt; font-family: arial, helvetica, sans-serif;">"PASNC\_VA" "SNC. Solicitud de Nota de Crédito - Aprobar 'Varios'"</span>
    - <span style="font-size: 12pt; font-family: arial, helvetica, sans-serif;">"PASNC\_PP" "SNC. Solicitud de Nota de Crédito - Aprobar 'Pronto Pago'"</span>
    - <span style="font-size: 12pt; font-family: arial, helvetica, sans-serif;">"PASNC\_OT" "SNC. Solicitud de Nota de Crédito - Aprobar 'Otros'"</span>
    - <span style="font-size: 12pt; font-family: arial, helvetica, sans-serif;">"PASNC\_AJ" "SNC. Solicitud de Nota de Crédito - Aprobar 'Ajustes'"</span>

<span style="font-size: 12pt; font-family: arial, helvetica, sans-serif;">**Para procesar Solicitudes se requieren los siguiente derechos:**</span>

- <span style="font-size: 12pt; font-family: arial, helvetica, sans-serif;">Incluir</span>
- <span style="font-size: 12pt; font-family: arial, helvetica, sans-serif;">Aprobar</span>
- <span style="font-size: 12pt; font-family: arial, helvetica, sans-serif;">Aplicar</span>

<span style="font-size: 12pt; font-family: arial, helvetica, sans-serif;">**Puntos importantes a tomar en cuenta para el proceso:** </span>

- <span style="font-size: 12pt; font-family: arial, helvetica, sans-serif;">Deben configurar los tipos de devolución, esto lo hacen en sistema WEB, desde Mantenimientos / Facturación / Tipos de Devolución (Derecho asociado "MTIPO\_DEVOLU1") . Haga click **[aquí](https://ayuda.cronuserp.com/books/cxc/page/web-cxc-mantenimientos-facturacion-ventas-tipo-de-devolucion)**, para validar dicha configuración. </span>
- <span style="font-size: 12pt; font-family: arial, helvetica, sans-serif;">Las Devoluciones tipo "OT - Otros" , "AJ - Ajustes" y "VA - Varios" tienen la posibilidad de digitar el monto de forma directa; o incluso realizar este proceso desde la pantalla habitual de NC esto únicamente con las NC que no viajan a la DGTD mientras que todos los otros tipos obligan al usuario a digitar producto por producto.</span>
- <span style="font-size: 12pt; font-family: arial, helvetica, sans-serif;">El único tipo de NC, que puede ser procesada desde la pantalla habitual de NC, es la llamada "DP-Descuento especial (trib ) , este documento es considerado financiero y se enviará a la DGT sin productos. </span>

<span style="font-size: 12pt; font-family: arial, helvetica, sans-serif;">Las Solicitudes de NC permiten hacer una petición previa a la creación del documento en firme. Esto mediante un control de Creación, Aprobación y Aplicación que puede tener distintos responsables en su empresa.Para comenzar con la creación de la solicitud, ingresa a lista =&gt; Solicitud NC: </span>

[![SNC 1.png](https://ayuda.cronuserp.com/uploads/images/gallery/2026-07/scaled-1680-/snc-1.png)](https://ayuda.cronuserp.com/uploads/images/gallery/2026-07/snc-1.png)[![snc2.png](https://ayuda.cronuserp.com/uploads/images/gallery/2026-07/scaled-1680-/snc2.png)](https://ayuda.cronuserp.com/uploads/images/gallery/2026-07/snc2.png)

<span style="font-size: 12pt; font-family: arial, helvetica, sans-serif;">En la siguiente pantalla, presionar Incluir y debemos completar los campos obligatorios ( cliente, tipo de NC y detalle de la misma ) :</span>

[![Screenshot_844.png](https://ayuda.cronuserp.com/uploads/images/gallery/2026-01/scaled-1680-/screenshot-844.png)](https://ayuda.cronuserp.com/uploads/images/gallery/2026-01/screenshot-844.png)

<span style="font-size: 12pt; font-family: arial, helvetica, sans-serif;">Una vez con esta confirmación realizada y datos ingresados correctamente, el sistema habilita la pantalla de detalle para que el usuario escoja la o las facturas que desea afectar, según los productos detallados. Para esto basta con digitar en el buscador la palabra clave o descripción del producto y la fecha, de esta manera el sistema encontrará todas las coincidencias en base a este detalle que se ha ingresado: </span>

[![CRONUS_SNC02.png](https://ayuda.cronuserp.com/uploads/images/gallery/2025-08/scaled-1680-/cronus-snc02.png)](https://ayuda.cronuserp.com/uploads/images/gallery/2025-08/cronus-snc02.png)

<span style="font-size: 12pt; font-family: arial, helvetica, sans-serif;">Una vez ingresado los datos anteriores, nos devolvemos al encabezado del documento y presionamos el ícono de " Guardar " . Con esto el sistema emerge un mensaje de confirmación: </span>

<span style="font-size: 12pt; font-family: arial, helvetica, sans-serif;">[![snc3.png](https://ayuda.cronuserp.com/uploads/images/gallery/2026-07/scaled-1680-/snc3.png)](https://ayuda.cronuserp.com/uploads/images/gallery/2026-07/snc3.png)[![snc4.png](https://ayuda.cronuserp.com/uploads/images/gallery/2026-07/scaled-1680-/snc4.png)](https://ayuda.cronuserp.com/uploads/images/gallery/2026-07/snc4.png)</span>

<span style="font-size: 12pt; font-family: arial, helvetica, sans-serif;">Seguidamente debemos, abrir nuevamente la solicitud para aprobar la misma:</span>

[![apro.png](https://ayuda.cronuserp.com/uploads/images/gallery/2025-08/scaled-1680-/apro.png)](https://ayuda.cronuserp.com/uploads/images/gallery/2025-08/apro.png)

<span style="font-size: 12pt; font-family: arial, helvetica, sans-serif;">Finalmente ingresa nuevamente a la solicitud y presiona "aplicar": </span>

<span style="font-size: 12pt; font-family: arial, helvetica, sans-serif;">[![snc5.png](https://ayuda.cronuserp.com/uploads/images/gallery/2026-07/scaled-1680-/snc5.png)](https://ayuda.cronuserp.com/uploads/images/gallery/2026-07/snc5.png)</span>

[![snc6.png](https://ayuda.cronuserp.com/uploads/images/gallery/2026-07/scaled-1680-/snc6.png)](https://ayuda.cronuserp.com/uploads/images/gallery/2026-07/snc6.png)

<span style="font-size: 12pt; font-family: arial, helvetica, sans-serif;">En el momento que se confirme el mensaje anterior, quedará la NC creada en firme en sistema y como bien lo indica el mensaje anterior se aplicará a documentos con saldo disponible, de lo contrario quedará la NC con saldo para ser utilizada posteriormente. </span>

<span style="font-size: 12pt; font-family: arial, helvetica, sans-serif;">Para revisar la NC como tal, ingresamos a la pantalla habitual de NC y ahí podremos visualizar el documento ya sea que este aplicado o pendiente de aplicar. </span>

[![snc7.png](https://ayuda.cronuserp.com/uploads/images/gallery/2026-07/scaled-1680-/snc7.png)](https://ayuda.cronuserp.com/uploads/images/gallery/2026-07/snc7.png)

<span style="font-size: 12pt; font-family: arial, helvetica, sans-serif;"> </span>

<span style="font-size: 12pt; font-family: arial, helvetica, sans-serif;">  
</span>

<span style="font-size: 12pt; font-family: arial, helvetica, sans-serif;"> </span>

<span style="font-size: 12pt; font-family: arial, helvetica, sans-serif;">  
</span>

<span style="font-size: 12pt; font-family: arial, helvetica, sans-serif;">  
</span>

# CRONUS-Movimientos-Cajas-Presupuesto-de-caja-chica

<span style="font-size: 14pt; font-family: arial, helvetica, sans-serif; color: #ff0000;">**Tipos de gasto**</span>

<span style="font-size: 12pt; font-family: arial, helvetica, sans-serif;">Mantenimientos =&gt; Caja Chica =&gt; Tipos de Gasto: </span>

<span style="font-size: 12pt; font-family: arial, helvetica, sans-serif;"></span>

<span style="font-size: 12pt; font-family: arial, helvetica, sans-serif;">Una vez en esta pantalla debemos incluir el tipo de gasto, para esto vamos a presionar el ícono de "Incluir" : </span>

 ![](https://ayuda.cronuserp.com/uploads/images/migrated/Screenshot_2.png)<span style="font-size: 12pt; font-family: arial, helvetica, sans-serif;"></span>

<span style="font-size: 12pt; font-family: arial, helvetica, sans-serif;">En esta pantalla se debe agregar ciertos campos para completar la información requerida: </span>

- <span style="font-size: 12pt; font-family: arial, helvetica, sans-serif;">**Código:** Este permite un máximo de 3 caracteres que pueden ser alfa-numéricos, numéricos o solamente letras ( queda a gusto del usuario el control que desee llevar para esto ) . </span>
- <span style="font-size: 12pt; font-family: arial, helvetica, sans-serif;">**Descripción:** Mismo caso que el código debe ser digitada y a criterio del usuario la definición que le desee dar al mismo. </span>
- <span style="font-size: 12pt; font-family: arial, helvetica, sans-serif;">**Cuenta de gasto:** La que defina el departamento de contabilidad de su empresa para este fin. </span>
- <span style="font-size: 12pt; font-family: arial, helvetica, sans-serif;">**Cuenta electrónica:** La que defina el departamento de contabilidad de su empresa para dicho fin.</span>
 
<span style="font-size: 12pt; font-family: arial, helvetica, sans-serif;">Los tipos de gastos las pueden inactivar en caso de que no deseen utilizar más, para esto ingresamos a la misma ( mediante el ícono de "modificar" o presionando doble click sobre la misma ) y le indican el estado "Inactiva" : </span>

[![Screenshot_3.png](https://ayuda.cronuserp.com/uploads/images/gallery/2025-08/scaled-1680-/screenshot-3.png)](https://ayuda.cronuserp.com/uploads/images/gallery/2025-08/screenshot-3.png)<span style="font-size: 12pt; font-family: arial, helvetica, sans-serif;"></span>

<span style="font-size: 12pt; font-family: arial, helvetica, sans-serif;">Otro punto importante a tomar en cuenta para dicho proceso sería : </span>

- <span style="font-size: 12pt; font-family: arial, helvetica, sans-serif;">**Bloquea presupuesto especial:** Esto quiere decir que para este tipo de gasto el presupuesto será específico para dicha línea y no aplicaría con el monto global. </span>
 
 ![](https://ayuda.cronuserp.com/uploads/images/migrated/Screenshot_4.png)<span style="font-size: 12pt; font-family: arial, helvetica, sans-serif;"></span>

<span style="font-size: 12pt; font-family: arial, helvetica, sans-serif;">Ahora bien, una vez definidos los tipos de gastos. Se debe crear los presupuestos de cada sucursal para la caja chica, para seguir los pasos para este proceso haga click ![](https://ayuda.cronuserp.com/books/wiki-cronus-erp/page/Presupuestos-de-Caja-Chica)![](https://ayuda.cronuserp.com/books/wiki-cronus-erp/page/Presupuestos-de-Caja-Chica)![](https://ayuda.cronuserp.com/books/wiki-cronus-erp/page/Presupuestos-de-Caja-Chica)[aquí.](https://ayuda.cronuserp.com/books/wiki-cronus-erp/page/Presupuestos-de-Caja-Chica)</span>

# CRONUS-Movimientos-NOTAS DE PEDIDO

<span lang="ES-CR" style="font-size: 12.0pt; line-height: 107%; font-family: 'Arial',sans-serif; mso-ansi-language: ES-CR;">Para crear una nota de pedido, vamos a ingresar al ícono de pedido, ubicado en la pantalla principal de CRONUS: </span>

[![Screenshot_1.png](https://ayuda.cronuserp.com/uploads/images/gallery/2025-09/scaled-1680-/GoLscreenshot-1.png)](https://ayuda.cronuserp.com/uploads/images/gallery/2025-09/GoLscreenshot-1.png)

<span lang="ES-CR" style="font-size: 12.0pt; line-height: 107%; font-family: 'Arial',sans-serif; mso-ansi-language: ES-CR;">Una vez acá, presionamos incluir: </span>

[![Screenshot_2.png](https://ayuda.cronuserp.com/uploads/images/gallery/2025-09/scaled-1680-/SIzscreenshot-2.png)](https://ayuda.cronuserp.com/uploads/images/gallery/2025-09/SIzscreenshot-2.png)

<span lang="ES-CR" style="font-size: 12.0pt; line-height: 107%; font-family: 'Arial',sans-serif; mso-ansi-language: ES-CR;">Con esto ya el sistema nos abrirá una pantalla, para incluir el documento. en dicha pantalla debemos empezar a ingresar los datos del cliente ( agente en caso de desear cambiarlo porque por defecto nos va a halar el configurado en el cliente ), productos ( si nos sabemos el código del producto lo podremos digitar en el campo de código y presionar TAB ) en caso de que no lo sepamos ingresamos al signo de pregunta ubicado a la izquierda del campo y desde ahí el sistema nos abrirá una pantalla para buscar el producto exacto y por medio de un doble click lo halamos a la pantalla de la NP, con las líneas ya digitadas cargamos cantidades, si aplica descuento, etc yt presionamos incluir, una vez lista presionamos "guardar" para validar los cambios: </span>

[![222.png](https://ayuda.cronuserp.com/uploads/images/gallery/2025-08/scaled-1680-/222.png)](https://ayuda.cronuserp.com/uploads/images/gallery/2025-08/222.png)

<span style="font-size: 12pt; font-family: arial, helvetica, sans-serif;">Cuando presionamos "guardar" el sistema nos emerge la siguiente ventana para completar una serie de campos, que sería lo que corresponde al retiro o entrega del pedido, forma de pago y forma de contacto. </span>

[![Screenshot_3.png](https://ayuda.cronuserp.com/uploads/images/gallery/2025-09/scaled-1680-/sDPscreenshot-3.png)](https://ayuda.cronuserp.com/uploads/images/gallery/2025-09/sDPscreenshot-3.png)

<span style="font-size: 12pt; font-family: arial, helvetica, sans-serif;">Una vez con esto completado, presionamos "**aceptar**" para guardar los cambios y con eso el sistema nos emerge la pantalla para completar los datos del Documento electrónico una vez con esos datos llenos presionamos aceptar: </span>

<span style="font-size: 12pt; font-family: arial, helvetica, sans-serif;">[![Screenshot_4.png](https://ayuda.cronuserp.com/uploads/images/gallery/2025-09/scaled-1680-/HiIscreenshot-4.png)](https://ayuda.cronuserp.com/uploads/images/gallery/2025-09/HiIscreenshot-4.png)</span>

<span style="font-size: 12pt; font-family: arial, helvetica, sans-serif;">Con esto nos muestra el mensaje de confirmación de la creación de la nota de pedido:</span>

<span style="font-size: 12pt; font-family: arial, helvetica, sans-serif;">[![Screenshot_5.png](https://ayuda.cronuserp.com/uploads/images/gallery/2025-09/scaled-1680-/wiescreenshot-5.png)](https://ayuda.cronuserp.com/uploads/images/gallery/2025-09/wiescreenshot-5.png)</span>

<span style="font-size: 12pt; font-family: arial, helvetica, sans-serif;">Para facturar la nota de pedido, solamente debemos ingresar a la pantalla de facturación y en el campo de N.PEDIDO, digitar el número de la misma y presionamos "cargar". Ya con esto se nos carga la información en pantalla y presionamos "guardar" para crear la factura en firme.</span>

[![Screenshot_6.png](https://ayuda.cronuserp.com/uploads/images/gallery/2025-09/scaled-1680-/i41screenshot-6.png)](https://ayuda.cronuserp.com/uploads/images/gallery/2025-09/i41screenshot-6.png)

[![Screenshot_7.png](https://ayuda.cronuserp.com/uploads/images/gallery/2025-09/scaled-1680-/sbvscreenshot-7.png)](https://ayuda.cronuserp.com/uploads/images/gallery/2025-09/sbvscreenshot-7.png)

[![Screenshot_8.png](https://ayuda.cronuserp.com/uploads/images/gallery/2025-09/scaled-1680-/screenshot-8.png)](https://ayuda.cronuserp.com/uploads/images/gallery/2025-09/screenshot-8.png)

[![Screenshot_9.png](https://ayuda.cronuserp.com/uploads/images/gallery/2025-09/scaled-1680-/screenshot-9.png)](https://ayuda.cronuserp.com/uploads/images/gallery/2025-09/screenshot-9.png)

<span style="font-size: 12pt; font-family: arial, helvetica, sans-serif;">Wikis relacionados:</span>

- <span style="font-family: arial, helvetica, sans-serif; font-size: 12pt; color: #000080;">[Rastreo de Notas de Pedido](https://ayuda.cronuserp.com/books/wiki-cronus-erp/page/CRONUS-Movimientos-Notas-de-pedido-Rastreo-de-pedidos)</span>
- <span style="font-family: arial, helvetica, sans-serif; font-size: 12pt; color: #000080;">[Entrada y salida de reservaciones](https://ayuda.cronuserp.com/books/wiki-cronus-erp/page/CRONUS-Movimiento-Notas-de-pedido-Entrada-y-salida-de-reservaciones)</span>
- <span style="font-size: 12pt; color: #000080; font-family: arial, helvetica, sans-serif;">[Anulación masiva](https://ayuda.cronuserp.com/books/wiki-cronus-erp/page/CRONUS-Movimiento-Notas-de-pedido-Anular-multiples-Notas-de-pedido)</span>
- <span style="color: #000080; font-size: 12pt; font-family: arial, helvetica, sans-serif;">[Confirmación de Transferencias](https://ayuda.cronuserp.com/books/wiki-cronus-erp/page/CRONUS-Movimiento-Notas-de-pedido-confirmacion-de-transferencia)</span>
- <span style="color: #000080; font-size: 12pt; font-family: arial, helvetica, sans-serif;">[Solicitudes de Nota de Crédito](https://ayuda.cronuserp.com/books/wiki-cronus-erp/page/cronus-movimientos-facturacion-documentos-solicitud-de-notas-de-credito)</span>
- <span style="color: #000080; font-size: 12pt; font-family: arial, helvetica, sans-serif;">[Opciones generales de NP](https://ayuda.cronuserp.com/books/wiki-cronus-erp/page/CRONUS-Sistema-Opciones-Generales-Adicionales-Notas-de-Pedido) </span>

# CRONUS-Mantenimiento-Clientes-Clientes-Reasignación-de-agente

<span style="font-size: 12pt; font-family: arial, helvetica, sans-serif;">Con este proceso nos permite hacer un cambio de agentes para los clientes masivamente. Para ello debemos ingresar a la pantalla principal de clientes = &gt; Útil = &gt; Reasignación de agente:</span>

 ![](https://ayuda.cronuserp.com/uploads/images/migrated/Screenshot_1.png)<span style="font-size: 12pt; font-family: arial, helvetica, sans-serif;"></span>

<span style="font-size: 12pt; font-family: arial, helvetica, sans-serif;">En esta pantalla tendremos la opción de realizar el cambio. Y tenemos dos opciones ya sea por el agente principal o el gestor de cobro ( que sería el primer parámetro que debemos definir ) este primer campo sería básicamente el agente o gestor de cobro ( destino ) . </span>

 ![](https://ayuda.cronuserp.com/uploads/images/migrated/Screenshot_2.png)<span style="font-size: 12pt; font-family: arial, helvetica, sans-serif;"></span>

<span style="font-size: 12pt; font-family: arial, helvetica, sans-serif;">Seguidamente debemos escoger los filtros del origen para el traslado de clientes y acá tendremos tres opciones: Agente actual, Zona actual o Gestor actual:</span>

[![Screenshot_3.png](https://ayuda.cronuserp.com/uploads/images/gallery/2025-08/scaled-1680-/screenshot-3.png)](https://ayuda.cronuserp.com/uploads/images/gallery/2025-08/screenshot-3.png)<span style="font-size: 12pt; font-family: arial, helvetica, sans-serif;"></span>

<span style="font-size: 12pt; font-family: arial, helvetica, sans-serif;">Una vez elegidos los dos primeros parámetros debemos presionar "refrescar" o "TAB" para que nos cargue la información de los clientes en pantalla. Y una vez con la lista cargada podemos elegir si deseamos cambiarla para todos los clientes listados o solamente al marcado ( se debe marcar uno ) y presionar "ACEPTAR" para procesar: </span>

 ![](https://ayuda.cronuserp.com/uploads/images/migrated/Screenshot_4.png)<span style="font-size: 12pt; font-family: arial, helvetica, sans-serif;"></span>

<span style="font-size: 12pt; font-family: arial, helvetica, sans-serif;">Una vez que presionemos "aceptar" el sistema nos emerge un mensaje de confirmación donde nos indica que cambio se realizará: </span>

 ![](https://ayuda.cronuserp.com/uploads/images/migrated/Screenshot_5.png)<span style="font-size: 12pt; font-family: arial, helvetica, sans-serif;"></span>

<span style="font-size: 12pt; font-family: arial, helvetica, sans-serif;">De estar seguros, basta con presionar " SI " para aplicar el cambio y con esto el sistema emerge el mensaje de que el cambio se realizó correctamente: </span>

 ![](https://ayuda.cronuserp.com/uploads/images/migrated/Screenshot_6.png)<span style="font-size: 12pt; font-family: arial, helvetica, sans-serif;"></span>

<span style="font-size: 12pt; font-family: arial, helvetica, sans-serif;">A lo cuál debemos presionar "aceptar " y listo, el cambio de agente principal y/o gestor de cobro quedará aplicado en firme. </span>

# CRONUS-Movimientos-Cajas-Recibos

<span style="font-size: 12pt; font-family: arial, helvetica, sans-serif;">Cronus Caja - Recibos </span>

<span style="font-size: 12pt; font-family: arial, helvetica, sans-serif;">[![Screenshot_1361.png](https://ayuda.cronuserp.com/uploads/images/gallery/2026-07/scaled-1680-/screenshot-1361.png)](https://ayuda.cronuserp.com/uploads/images/gallery/2026-07/screenshot-1361.png)</span>

<span style="font-size: 12pt; font-family: arial, helvetica, sans-serif;">Una vez acá, presionamos el botón de "Incluir": </span>

<span style="font-size: 12pt; font-family: arial, helvetica, sans-serif;">[![Screenshot_1362.png](https://ayuda.cronuserp.com/uploads/images/gallery/2026-07/scaled-1680-/screenshot-1362.png)](https://ayuda.cronuserp.com/uploads/images/gallery/2026-07/screenshot-1362.png)</span>

<span style="font-size: 12pt; font-family: arial, helvetica, sans-serif;">Con esto el sistema nos abrirá la pantalla para realizar dicha inclusión, en la cuál debemos llenar el encabezado. Fecha, nombre del cliente, moneda y tipo de recibo. **Cabe recalcar en este punto que la moneda del recibo debe ser la misma de la factura o del documento a cancelar, de lo contrario no se mostrarán los saldos pendientes del cliente.**</span>

[![Screenshot_1363.png](https://ayuda.cronuserp.com/uploads/images/gallery/2026-07/scaled-1680-/screenshot-1363.png)](https://ayuda.cronuserp.com/uploads/images/gallery/2026-07/screenshot-1363.png)

<span style="font-size: 12pt; font-family: arial, helvetica, sans-serif;">Seguidamente el sistema nos mostrará la o las facturas con saldo de dicho cliente y de esta manera que el usuario defina que documentos afectar: </span>

<span style="font-size: 12pt; font-family: arial, helvetica, sans-serif;">[![Screenshot_1364.png](https://ayuda.cronuserp.com/uploads/images/gallery/2026-07/scaled-1680-/screenshot-1364.png)](https://ayuda.cronuserp.com/uploads/images/gallery/2026-07/screenshot-1364.png)</span>

<span style="font-size: 12pt; font-family: arial, helvetica, sans-serif;">El siguiente paso, sería elegir la forma de pago: </span>

![Screenshot_1365.png](https://ayuda.cronuserp.com/uploads/images/gallery/2026-07/scaled-1680-/screenshot-1365.png)

<span style="font-size: 12pt; font-family: arial, helvetica, sans-serif;">Una vez en esta pantalla, debemos ingresar los datos de la forma de pago del documento. En esta pantalla tendremos varias formas de pago, efectivo $ , efectivo ¢ , transferencias , NC , Recibos de adelanto , tarjetas $ , tarjetas ¢ ( ya previamente definidas ) , para ver la configuración de las mismas puede guiarse haciendo click **<span style="background-color: #ffffff;">[aquí ](https://ayuda.cronuserp.com/books/wiki-cronus-erp/page/Cierres-de-cajatarjetas-de-crditoRetenciones-e-Impuestos)</span>**</span>

[![Screenshot_1366.png](https://ayuda.cronuserp.com/uploads/images/gallery/2026-07/scaled-1680-/screenshot-1366.png)](https://ayuda.cronuserp.com/uploads/images/gallery/2026-07/screenshot-1366.png)

<span style="font-size: 12pt; font-family: arial, helvetica, sans-serif;">Para guardar dichos cambios en esta pantalla , se debe presionar el botón de "aceptar": </span>

[![Screenshot_1368.png](https://ayuda.cronuserp.com/uploads/images/gallery/2026-07/scaled-1680-/screenshot-1368.png)](https://ayuda.cronuserp.com/uploads/images/gallery/2026-07/screenshot-1368.png)

<span style="font-size: 12pt; font-family: arial, helvetica, sans-serif;">Y por último, para guardar el documento como tal presionamos el ícono de "aceptar" de la pantalla principal del recibo:</span>

[![Screenshot_1367.png](https://ayuda.cronuserp.com/uploads/images/gallery/2026-07/scaled-1680-/screenshot-1367.png)](https://ayuda.cronuserp.com/uploads/images/gallery/2026-07/screenshot-1367.png)

<span style="font-size: 12pt; font-family: arial, helvetica, sans-serif;">Con esto el sistema nos emerge una ventana para confirmación de la inclusión del documento: </span>

[![Screenshot_1369.png](https://ayuda.cronuserp.com/uploads/images/gallery/2026-07/scaled-1680-/screenshot-1369.png)](https://ayuda.cronuserp.com/uploads/images/gallery/2026-07/screenshot-1369.png)

- <span style="font-family: arial, helvetica, sans-serif; font-size: 12pt;">[Recibos por adelantos de dinero](https://ayuda.cronuserp.com/CRONUS-Movimientos-Cajas-Recibos-adelantados)</span>

# CRONUS-Mantenimiento-Clientes-Ver-imagen-del-cliente

<span style="font-size: 12pt; font-family: arial, helvetica, sans-serif;">Ingresamos primeramente a la pantalla de manejo de bodega: </span>

 ![](https://ayuda.cronuserp.com/uploads/images/migrated/Screenshot_7.png)<span style="font-size: 12pt; font-family: arial, helvetica, sans-serif;"></span>

<span style="font-size: 12pt; font-family: arial, helvetica, sans-serif;">Una vez en esta, elegimos la factura deseada, presionamos el botón Otros = &gt; Ver imágenes de cliente: </span>

 ![](https://ayuda.cronuserp.com/uploads/images/migrated/Screenshot_8.png)<span style="font-size: 12pt; font-family: arial, helvetica, sans-serif;"></span>

<span style="font-size: 12pt; font-family: arial, helvetica, sans-serif;">En esa opción el sistema mostrará la ventana con las imágenes para que el usuario encargado tome nota y el cuidado respectivo sobre la persona encargada del retiro de mercadería: </span>

 ![](https://ayuda.cronuserp.com/uploads/images/migrated/Screenshot_11.png)<span style="font-size: 12pt; font-family: arial, helvetica, sans-serif;"></span>

# CRONUS Comisiones Tipo A

Actualizado : <span style="color: rgb(35, 111, 161);">**2026-08-18 10:44**</span>

Las comisiones **TIPO A** siguen estos parámetros para ser calculadas:

1. Las facturas deben estar canceladas (saldo 0)
2. Las NC tipo **"AJ"** no serán tomadas en cuenta.
3. Las NC que se reversan son **('DE','DP','DX','VA'')**
4. Si el Agente tiene marcado tipo "Proyecto" aplican los rangos por Proyecto y se calculan sobre el porcentaje de utilidad.
5. Si el Agente tiene marcado tipo "Mayoreo" aplican los rangos por Mayoreo y se calculan sobre el porcentaje de utilidad.
6. A cualquier otro tipo de Agente se le aplican los siguientes parámetros: 
    1. **Comisión por familia:** Si la familia es del código 04 o 05 se paga sobre el descuento de 0 a 15 un 2 y cualquier otro descuento un 1 (Fijo dentro de CRONUS, no es configurable por el usuario).
    2. **Comisión por producto:** Esta se le define a cada artículo dentro de su respectivo mantenimiento y es un porcentaje sobre el precio de venta (indistinto del costo, descuento o utilidad.
    3. **Comisión por bodega:** Si el artículo se vende de X bodega se toma el porcentaje digitado sobre el precio de venta (indistinto del costo, descuento o utilidad). Funciona por ejemplo para bodegas de Saldos o producto de muy baja rotación.
    4. **Comisión por Agente:** Si ninguna de las reglas anteriores aplica entonces se usa el porcentaje FIJO del agente y se calcula sobre el precio de venta (indistinto del costo, descuento o utilidad)
7. Los rangos para los filtros aplicables para Proyectos y Mayoreo se aplican dentro de la pantalla de Comisiones, Utilitarios "Rangos de comisiones y castigos"

# CRONUS-Movimientos-Comisiones-Comisiones-Tipo-G

<span style="font-size: 12pt; font-family: arial, helvetica, sans-serif;">El cálculo funciona de la siguiente manera:</span>

<span style="font-size: 12pt; font-family: arial, helvetica, sans-serif;">**Opciones Generales**</span>

- <span style="font-size: 12pt; font-family: arial, helvetica, sans-serif;">75 días expira la comisión (con configurable).</span>
- <span style="font-size: 12pt; font-family: arial, helvetica, sans-serif;">Los porcentajes de comisión (del 100%) configurables para el agente principal y el secundario se definen en la cejilla de Comisiones en las Opciones Generales.</span>
 
<span style="font-size: 12pt; font-family: arial, helvetica, sans-serif;">**Productos**</span>

- <span style="font-size: 12pt; font-family: arial, helvetica, sans-serif;">Mantenimiento a productos, Cejilla de Indicadores, subdivisión de "Comisiones".</span>
- <span style="font-size: 12pt; font-family: arial, helvetica, sans-serif;">Se pueden definir 2 rangos de comisiones para el producto.</span>
 
<span style="font-size: 12pt; font-family: arial, helvetica, sans-serif;"> 1. Porcentaje fijo **(A)**</span>

<span style="font-size: 12pt; font-family: arial, helvetica, sans-serif;"></span>

<span style="font-size: 12pt; font-family: arial, helvetica, sans-serif;">2. Porcentaje adicional **(B).**</span>

<span style="font-size: 12pt; font-family: arial, helvetica, sans-serif;"></span>

<span style="font-size: 12pt; font-family: arial, helvetica, sans-serif;">**Documentos**</span>

- <span style="font-size: 12pt; font-family: arial, helvetica, sans-serif;">Se leen todos documentos pendientes de generar comisión tipo FA, FC y NC.</span>
- <span style="font-size: 12pt; font-family: arial, helvetica, sans-serif;">Cuya fecha de cancelación sea igual o inferior a la fecha de corte. (Saldo debe estar en cero).</span>
 
<span style="font-size: 12pt; font-family: arial, helvetica, sans-serif;">**Reglas de cálculo de comisiones de producto**</span>

- <span style="font-size: 12pt; font-family: arial, helvetica, sans-serif;">La comisión **(A)** aplica en su totalidad en todos los casos.</span>
- <span style="font-size: 12pt; font-family: arial, helvetica, sans-serif;">La comisión **(B)** aplica solamente bajo las siguientes condiciones.</span>
    - <span style="font-size: 12pt; font-family: arial, helvetica, sans-serif;">Si el descuento es menor o igual a 5% entonces se calcula el porcentaje total de **(B).**</span>
    - <span style="font-size: 12pt; font-family: arial, helvetica, sans-serif;">Si el descuento va de 10.0001 a 15% y la comisión adicional fue definida entonces se resta 1% del **(B).**</span>
    - <span style="font-size: 12pt; font-family: arial, helvetica, sans-serif;">Si el descuento es mayor a 15% se le resta un 2% del **(B).**</span>
    - <span style="font-size: 12pt; font-family: arial, helvetica, sans-serif;">Es clave indicar que NO hay rebajo de porcentaje de descuento si **(B)** no fue definido.</span>
 
<span style="font-size: 12pt; font-family: arial, helvetica, sans-serif;">Entonces, si un artículo tiene un 5% de comisión **(A)** y un adicional de 0% **(B)** no importa el descuento aplicado, no se va a ejecutar ningún rebajo de la comisión total.</span>

<span style="font-size: 12pt; font-family: arial, helvetica, sans-serif;">, </span>

# CRONUS-Movimientos-Comisiones-Comisiones-Tipo-J

<span style="font-size: 12pt; font-family: arial, helvetica, sans-serif;">Reglas para el cálculo de este tipo de Comisión:</span>

<span style="font-size: 12pt; font-family: arial, helvetica, sans-serif;">Sobre el porcentaje a pagar:</span>

1. <span style="font-size: 12pt; font-family: arial, helvetica, sans-serif;">Si el agente tiene una comisión específica esta aplica previo a las siguientes.</span>
2. <span style="font-size: 12pt; font-family: arial, helvetica, sans-serif;">Si el producto tiene una comisión fija esta aplica previo a las siguientes.</span>
3. <span style="font-size: 12pt; font-family: arial, helvetica, sans-serif;">Si la Bodega tiene una comisión fija esta aplica previo a las siguientes.</span>
 
<span style="font-size: 12pt; font-family: arial, helvetica, sans-serif;"></span>

<span style="font-size: 12pt; font-family: arial, helvetica, sans-serif;">Otros puntos de configuración claves:</span>

1. <span style="font-size: 12pt; font-family: arial, helvetica, sans-serif;">En las Opciones Generales de CRONUS ==&gt; Pestaña Config. ==&gt; el tipo de comisión debe estar configurado como "J"</span>
2. <span style="font-size: 12pt; font-family: arial, helvetica, sans-serif;">El producto debe tener el indicador de "Calcular comisiones de ventas" marcado para todos los que apliquen.</span>
 
<span style="font-size: 12pt; font-family: arial, helvetica, sans-serif;"></span>

<span style="font-size: 12pt; font-family: arial, helvetica, sans-serif;">Sobre el cálculo:</span>

1. <span style="font-size: 12pt; font-family: arial, helvetica, sans-serif;">Las NC se ponderan para calcular el total de la comisión, por ejemplo si una factura es de 10mil y la NC es de 3mil (Solo aplica a los tipos DE, DP, DX y VA) entonces se castiga un 30% del total de la comisión.</span>
2. <span style="font-size: 12pt; font-family: arial, helvetica, sans-serif;">Solo aparecen las facturas cuyo saldo sea menor a 5 y cuya cancelación se haya hecho en la fecha de corte, entonces si se calcula una comisión al 30 de Abril y la factura tiene saldo cero pero porque fue afectada por un recibo de Mayo esta no aparecería.</span>
 
<span style="font-size: 12pt; font-family: arial, helvetica, sans-serif;"></span>

<span style="font-size: 12pt; font-family: arial, helvetica, sans-serif;">Sobre tabla de rangos:</span>

<span style="font-size: 12pt; font-family: arial, helvetica, sans-serif;">Para configurar esto se debe ingresar a movimientos = &gt; comisiones:</span>

<span style="font-size: 12pt; font-family: arial, helvetica, sans-serif;">![imagen 1.png](/files/CRONUS-Movimientos-Comisiones-Comisiones-Tipo-J/imagen%201.png)</span>

<span style="font-size: 12pt; font-family: arial, helvetica, sans-serif;">Una vez en esa pantalla ingresamos a Utilitarios = &gt; Rangos de comisiones y castigos: </span>

<span style="font-size: 12pt; font-family: arial, helvetica, sans-serif;">![imagen 2.png](/files/CRONUS-Movimientos-Comisiones-Comisiones-Tipo-J/imagen%202.png)</span>

<span style="font-size: 12pt; font-family: arial, helvetica, sans-serif;">Y en esa opción el sistema nos mostrará la pantalla emergente para configurar dichos campos: </span>

<span style="font-size: 12pt; font-family: arial, helvetica, sans-serif;">![imagen 3.png](/files/CRONUS-Movimientos-Comisiones-Comisiones-Tipo-J/imagen%203.png)</span>

# CRONUS Mantenimiento Inventario Productos Importar Exportar Bloqueados

**<span style="font-size: 12pt; font-family: arial, helvetica, sans-serif;">Derecho </span>**

<span style="font-size: 12pt; font-family: arial, helvetica, sans-serif;"><span style="color: #000000; font-size: 12pt; font-family: arial, helvetica, sans-serif;">Para desbloquear "INVSOLIC4".</span></span>

<span style="font-size: 12pt; font-family: arial, helvetica, sans-serif;">Por medio de este proceso el usuario puede definir si desea bloquear productos por sucursal para que los mismos no sean utilizados o se presenten alertas de avisos en solicitudes de inventario. </span>

<span style="color: #ff0000; font-size: 12pt; font-family: arial, helvetica, sans-serif;">**Notas importantes a tomar en cuenta para el proceso:** </span>

- <span style="color: #000000; font-size: 12pt; font-family: arial, helvetica, sans-serif;">Deben configurar un e-mail para el aviso por correo si así lo desean. </span>
- <span style="color: #000000; font-size: 12pt; font-family: arial, helvetica, sans-serif;">No se puede aprobar porque ahora da un mensaje.</span>
- <span style="color: #000000; font-size: 12pt; font-family: arial, helvetica, sans-serif;">Lo pueden ver en la última columna de las solicitudes.</span>
- <span style="color: #000000; font-size: 12pt; font-family: arial, helvetica, sans-serif;">En las Solicitudes, el SP que valida todos los ingresos o cambios (desde XLS inclusive) valida si lleva un producto que se encuentra en bloqueo la marca como BLOQUEADA.</span>
 
<span style="color: #000000; font-size: 12pt; font-family: arial, helvetica, sans-serif;">Lo primero que debemos realizar es importar los productos bloqueados por sucursal, esto lo realizamos de la siguiente manera:</span>

<span style="color: #000000; font-size: 12pt; font-family: arial, helvetica, sans-serif;">Ingresamos al maestro de productos =&gt;Utilitarios =&gt;Importar/Exportar:</span>

<span style="color: #000000; font-size: 12pt; font-family: arial, helvetica, sans-serif;">![imagen 1.png](/files/CRONUS-Mantenimiento-Inventario-Productos-Importar-Exportar-Bloqueados/imagen%201.png)</span>

<span style="color: #000000; font-size: 12pt; font-family: arial, helvetica, sans-serif;">En esta opción debemos importar los productos, respetando las indicaciones que nos presentan para la carga del XLS. </span>

<span style="color: #000000; font-size: 12pt; font-family: arial, helvetica, sans-serif;">Posteriormente necesitamos configurar el aviso/alerta para que llegue el e-mail a los usuarios encargados de la aprobación del caso, para esto ingresamos a sucursales =&gt; Avisos/alertas. La alerta PK0012 es para que les avise, importante, DEBEN configurar un EMAIL distinto en Compañías para el uso de esto.</span>

<span style="color: #000000; font-size: 12pt; font-family: arial, helvetica, sans-serif;">![imagen 2.png](/files/CRONUS-Mantenimiento-Inventario-Productos-Importar-Exportar-Bloqueados/imagen%202.png)</span>

<span style="color: #000000; font-size: 12pt; font-family: arial, helvetica, sans-serif;">En la seguridad de la compañía deben configurar un e-mail para estos envíos desde esta opción: </span>

[![Screenshot_3.png](https://ayuda.cronuserp.com/uploads/images/gallery/2025-08/scaled-1680-/screenshot-3.png)](https://ayuda.cronuserp.com/uploads/images/gallery/2025-08/screenshot-3.png)<span style="color: #000000; font-size: 12pt; font-family: arial, helvetica, sans-serif;"></span>

<span style="color: #000000; font-size: 12pt; font-family: arial, helvetica, sans-serif;">Una vez configurados los pasos de arriba, cuando el usuario realice una solicitud de inventario de dicha sucursal y producto, se presentarán los bloqueos y/o avisos configurados, para ver el funcionamiento haga click **Aquí** </span>

# Tiquetes

<span style="font-size: 12pt; font-family: arial, helvetica, sans-serif;">**Seguridad:**</span>

- <span style="font-size: 12pt; font-family: arial, helvetica, sans-serif;">**TIKETSAPROB**</span>
 
<span style="font-size: 12pt; font-family: arial, helvetica, sans-serif;">**Rutas:**</span>

- <span style="font-size: 12pt; font-family: arial, helvetica, sans-serif;">**Cronus =&gt; Movimientos =&gt; Tiquetes**</span>
 
<span style="font-size: 12pt; font-family: arial, helvetica, sans-serif;"></span>

<span style="font-size: 12pt; font-family: arial, helvetica, sans-serif;">**Proceso:**</span>

<span style="font-size: 12pt;">Los tiquetes son un proceso que permite a los usuarios pedir permisos para poder realizar ciertos procesos cuando no se cuenta con el derecho de dicho apartado. </span>  
<span style="font-size: 12pt;">Los procesos mencionados cuentan con un aviso en caso de que el usuario desee que se le avise en la creación del tiquete. En caso de que quiera saber más sobre los avisos los puede revisar [aquí.](https://ayuda.cronuserp.com/books/wiki-cronus-erp/page/CRONUS-Mantenimiento-Sucursales-Bodegas-y-derechos-Avisos-Alertas)</span>

<span style="font-size: 12pt;">Los procesos son los siguientes:</span>

- <span style="font-size: 12pt;">Anular documento de CXP cuando no se cuenta con el derecho ELIDOCCXP. El aviso asociado es "PK0003".</span>
- <span style="font-size: 12pt;">Anular movimiento de inventario cuando no se cuenta con el derecho INVENELI01. El aviso asociado es "PK0003".</span>
- <span style="font-size: 12pt;">Anular Notas de Crédito cuando no se cuenta con el derecho CXCPERMNNC. El aviso asociado es "PK0003".</span>
- <span style="font-size: 12pt;">Notas de Débito cuando no se cuenta con el derecho CXCPERMNND. El aviso asociado es "PK0003".</span>
- <span style="font-size: 12pt;">Anular un Recibo cuando no se cuenta con el derecho ANULA\_RECIBOS. El aviso asociado es "PK0004".</span>
- <span style="font-size: 12pt;">Documentos Vencidos cuando no se cuenta con el derecho BLOQUEO\_FACT\_VE. El aviso asociado es "PK0004".</span>
- <span style="font-size: 12pt;">Reimprimir boleta de despacho cuando no se cuenta con alguno de los derechos:</span>
    - <span style="font-size: 12pt;">REIMP\_BOLETA</span>
    - <span style="font-size: 12pt;">BLOQUEO\_FACTM31</span>
    - <span style="font-size: 12pt;">BLOQUEO\_FACTMC</span>
    - <span style="font-size: 12pt;">BLOQUEO\_FACTMD</span>
    - <span style="font-size: 12pt;">El aviso asociado es "PK0020".</span>
 
<span style="font-size: 12pt;">Este proceso puede ser realizado desde el sistema web o desde nuestra app.</span>  
<span style="font-size: 12pt;">Aqui podra encontrar las guias apropiadas para cada uno:</span>

- <span style="font-size: 12pt;">[Tiquetes desde sistema web](https://ayuda.cronuserp.com/books/wiki-cronus-erp/page/Cronus-WEB-Movimientos-Tiquetes).</span>
- <span style="font-size: 12pt;">[Tiquetes desde app](https://ayuda.cronuserp.com/books/wiki-cronus-erp/page/Cronus-Movil-Movimientos-Tiquetes).</span>
 

# CRONUS Movimientos Lista de documentos/movimientos

<span style="font-size: 12pt; font-family: arial, helvetica, sans-serif;">La pantalla tiene múltiples alternativas en el combo a la derecha, debajo de este pueden encontrarse funciones específicas de cada tipo de documento.</span>

<span style="font-size: 12pt; font-family: arial, helvetica, sans-serif;"></span>

<span style="font-size: 12pt; font-family: arial, helvetica, sans-serif;">Al elegir cualquiera de las opciones, se activan diferentes submenús y opciones dentro de ellos, abajo se detallan todas las funciones de cada una: </span>

- <span style="font-size: 12pt; font-family: arial, helvetica, sans-serif;">**Solicitud de confirmación de transferencia:** Cuando usan el proceso para confirmar transferencias en los documentos y aplicar a recibos previo a los cierres. </span>
- <span style="font-size: 12pt; font-family: arial, helvetica, sans-serif;">**Facturas:** La pantalla principal de facturación, donde se realizan las ventas a los clientes.</span>
- <span style="font-size: 12pt; font-family: arial, helvetica, sans-serif;">**Devoluciones:** Donde vemos ingresadas las devoluciones aplicadas a las facturas que hemos realizado NC.</span>
- <span style="font-size: 12pt; font-family: arial, helvetica, sans-serif;">**N.Débito y N. Crédito:** La pantalla donde nos van a mostrar todas las Notas de crédito y Notas de débito creadas en el sistema a los documentos del sistema. </span>
- <span style="font-size: 12pt; font-family: arial, helvetica, sans-serif;">**Solicitud NC:** Donde van a crearse las notas de crédito que debemos crear por medio de solicitud. </span>
- <span style="font-size: 12pt; font-family: arial, helvetica, sans-serif;">**Recibos:** Donde se crean los documentos de cancelaciones en el sistema. </span>
- <span style="font-size: 12pt; font-family: arial, helvetica, sans-serif;">**Recibos físicos:** Cuando se lleva un control de recibos físicos los podremos controlar desde está pantalla. </span>
- <span style="font-size: 12pt; font-family: arial, helvetica, sans-serif;">**Comisiones:** Para llevar el control del cálculo de comisiones en sistema. </span>
- <span style="font-size: 12pt; font-family: arial, helvetica, sans-serif;">**Inventarios:** La pantalla para controlar los distintos movimientos de inventario desde el sistema. </span>
- <span style="font-size: 12pt; font-family: arial, helvetica, sans-serif;">**Inventario de tramos:** Cuando utilizan el proceso de control de inventarios por tramos. </span>
- <span style="font-size: 12pt; font-family: arial, helvetica, sans-serif;">**Inventarios Topes por Sucursal:** Cuando tienen un control más estricto de los saldos topes de inventarios los crean desde está pantalla. </span>
- <span style="font-size: 12pt; font-family: arial, helvetica, sans-serif;">**Toma Fisíca:** Para el control de tomas fisícas en el sistema. </span>
- <span style="font-size: 12pt; font-family: arial, helvetica, sans-serif;">**Solicitud de inventario:** Donde podremos visualizar las solicitudes de inventario creadas en sistema. </span>
- <span style="font-size: 12pt; font-family: arial, helvetica, sans-serif;">**Producción ( compuesto ) :** Cuando se crean las composiciones de los productos en sistema, lo podremos realizar desde está pantalla. </span>
- <span style="font-size: 12pt; font-family: arial, helvetica, sans-serif;">**Boletas de trámite:** Para llevar el control de trámite de facturas. </span>
- <span style="font-size: 12pt; font-family: arial, helvetica, sans-serif;">**Cierres de caja:** Para tener el control de los cierres de caja diarios de la empresa. </span>
- <span style="font-size: 12pt; font-family: arial, helvetica, sans-serif;">**Actualización masiva:** El proceso de cambios masivos a precios, familias, costos, etc en los productos. </span>
- <span style="font-size: 12pt; font-family: arial, helvetica, sans-serif;">**Pronóstico Avanzado:** El proceso de poder visualizar las estadísticas para las compras de productos por suplir. </span>
- <span style="font-size: 12pt; font-family: arial, helvetica, sans-serif;">**N.D por morosidad:** El proceso para crear notas de débito de morosidad en el sistema a los clientes con facturas muy vencidas. </span>

# Cronus_nota de pedido y facturación con códigos No imprimibles para venta de producción

<span style="color: #0000ff; font-size: 12pt; font-family: arial, helvetica, sans-serif;">**Puntos importantes a tomar en cuenta:** </span>

- <span style="font-size: 12pt; font-family: arial, helvetica, sans-serif;">Se debe de crear un producto ( por ejemplo código de producto 9999 ) y este será el código modificable (configurable en Opciones Generales)</span>
- <span style="font-size: 12pt; font-family: arial, helvetica, sans-serif;">Los otros productos abajo que se ingresen en la NP se deben marcar cómo "no imprimibles"</span>
- <span style="font-size: 12pt; font-family: arial, helvetica, sans-serif;">Cuando se imprime la NP y Factura,podremos ver que pasa con esto (el sistema saca los productos, pero solo muestra el 9999) entonces esa "producción" se arma al imprimir.</span>
- <span style="font-size: 12pt; font-family: arial, helvetica, sans-serif;">La cantidad en el momento de montar la NP y factura con el código 9999 debe ser 1, y el precio 0 (porque el precio se calcula basado en la sumatoria de los productos de abajo que sean NO imprimibles). </span>
- <span style="font-size: 12pt; font-family: arial, helvetica, sans-serif;">Los productos ingresados en la NP ( excepto el código modificable ) deben ser productos normales con inventario, con precios, etc. </span>
- <span style="font-size: 12pt; font-family: arial, helvetica, sans-serif;">En el XML van todos los productos que componen el combo. </span>
 
<span style="font-size: 12pt; font-family: arial, helvetica, sans-serif;">Para este proceso primeramente, se debe de configurar el producto de código modificable en las opciones generales de CRONUS, para esto ingresamos a CXC-OPCIONES GENERALES: </span>

<span style="font-size: 12pt; font-family: arial, helvetica, sans-serif;"> </span>

![opc 1.png](/files/Cronus-nota-de-pedido-y-facturacin-con-cdigos-No-imprimibles-para-venta-de-produccin/opc%201.png)

<span style="font-size: 12pt; font-family: arial, helvetica, sans-serif;">Una vez acá, ingresamos a facturar y se debe de configurar el producto creado para este efecto: </span>

<span style="font-size: 12pt; font-family: arial, helvetica, sans-serif;"></span>

<span style="font-size: 12pt; font-family: arial, helvetica, sans-serif;">Con ese código configurado,lo podremos usar en la nota de pedido y facturación para armar nuestro combo. Con el proceso habitual de dicho proceso, seleccionamos el cliente y cargamos cómo primera línea el producto de código modificable, seguidamente de los productos que armarán el combo en la facturación final. Importante recalcar que estos códigos deben ser marcados cómo " no imprimibles " ( excepto el modificable ). </span>

<span style="font-size: 12pt; font-family: arial, helvetica, sans-serif;">Para esto solamente debemos seleccionar las líneas que deseamos marcar cómo no imprimibles y con click derecho seleccionamos " NO imprimir las líneas marcadas" </span>

<span style="font-size: 12pt; font-family: arial, helvetica, sans-serif;"></span>

<span style="font-size: 12pt; font-family: arial, helvetica, sans-serif;">Una vez que realizamos esto el sistema nos emerge un mensaje de confirmación: </span>

<span style="font-size: 12pt; font-family: arial, helvetica, sans-serif;"></span>

<span style="font-size: 12pt; font-family: arial, helvetica, sans-serif;">En el momento que confirmamos el sistema los resaltará esos códigos con un color amarrillo claro en la pantalla,lo que nos indica que son líneas marcadas cómo no imprimibles: </span>

<span style="font-size: 12pt; font-family: arial, helvetica, sans-serif;"></span>

<span style="font-size: 12pt; font-family: arial, helvetica, sans-serif;">Por último, al momento de guardar la NP nos emerge el mensaje de la creación para confirmar: </span>

<span style="font-size: 12pt; font-family: arial, helvetica, sans-serif;"></span>

<span style="font-size: 12pt; font-family: arial, helvetica, sans-serif;">Por último, al momento de facturar la NP también observaremos las líneas en color distinto a la principal ( código modificable ) : </span>

<span style="font-size: 12pt; font-family: arial, helvetica, sans-serif;"></span>

<span style="font-size: 12pt; font-family: arial, helvetica, sans-serif;">Una vez que guardemos la factura, el sistema nos emerge un mensaje para confirmar: </span>

<span style="font-size: 12pt; font-family: arial, helvetica, sans-serif;"></span>

<span style="font-size: 12pt; font-family: arial, helvetica, sans-serif;">Con estos pasos realizados en el momento de imprimir ya sea la NP o factura el único código que saldrá será el principal, pero para efectos de sistema y XML ocurre lo explicado en el inicio de este manual. </span>

# CRONUS Erp DGT 4.4

<p><a href="https://crfusion.editme.com/CRONUSERPDGTD44PRINCIPALES">Principales cambios</a><br /><br />Se detallan a continuaci&oacute;n la lista de cambios asociados a la 4.4. con respecto a los paquetes de CRONUS Erp (Eos, Proyectec y Cronus)</p> <p>Link a los cambios directo en a <a href="https://atv.hacienda.go.cr/ATV/ComprobanteElectronico/docs/esquemas/2024/v4.4/ANEXOS%20Y%20ESTRUCTURAS_V4.4.pdf" target="_blank" rel="noopener">DGTD</a></p> <p>P&aacute;gina 1,&nbsp;<a href="https://crfusion.editme.com/CRONUSerpDgt44p2">ir a la p&aacute;gina 2 aqu&iacute;&nbsp;</a>(145 puntos en total)</p> <table style="height: 3293px; width: 1399px;"> <tbody> <tr style="height: 39px;"> <td style="width: 25.0469px; height: 29px; border-color: #000000; border-style: solid; background-color: #298dd9;"> <p><span style="color: #ffffff;"><strong><span style="font-size: 12pt;">#</span></strong></span></p> </td> <td style="width: 447.953px; height: 29px; border-color: #000000; border-style: solid; background-color: #298dd9;"> <p><span style="color: #ffffff;"><strong><span style="font-size: 12pt;">Descripci&oacute;n</span></strong></span></p> </td> <td style="width: 196.406px; text-align: center; height: 29px; border-color: #000000; border-style: solid; background-color: #298dd9;"> <p style="text-align: center;"><span style="color: #ffffff;"><strong><span style="font-size: 12pt;">&iquest;Cliente debe configurar?</span></strong></span></p> </td> <td style="width: 199.422px; text-align: center; height: 29px; border-color: #000000; border-style: solid; background-color: #298dd9;"> <p><span style="color: #ffffff;"><strong><span style="font-size: 12pt;">Pantallas que afecta</span></strong></span></p> </td> <td style="width: 107.219px; border-color: #000000; border-style: solid; text-align: center; background-color: #298dd9; height: 29px;"> <p><span style="color: #ffffff;"><strong><span style="font-size: 12pt;">Finalizado</span></strong></span></p> </td> <td style="width: 421.953px; height: 29px; border-color: #000000; border-style: solid; background-color: #298dd9;"> <p><span style="color: #ffffff;"><strong><span style="font-size: 12pt;">Otras consideraciones</span></strong></span></p> </td> </tr> <tr style="height: 39px;"> <td style="width: 25.0469px; height: 39px; border-color: #000000; border-style: solid;"> <p><span style="font-weight: 400;">1</span></p> </td> <td style="width: 447.953px; height: 39px; border-color: #000000; border-style: solid;"> <p><span style="font-weight: 400;"> Se ajusta la nota 2 incorporando el XML Schema, para los comprobantes &ldquo;Factura Electr&oacute;nica de Compra&rdquo;, &ldquo;Factura Electr&oacute;nica de Exportaci&oacute;n&rdquo; y &ldquo;Recibo Electronico de Pago&rdquo;</span></p> </td> <td style="width: 196.406px; text-align: center; height: 39px; border-color: #000000; border-style: solid;"> <p><span style="font-weight: 400;">No aplica&nbsp;</span></p> </td> <td style="width: 199.422px; text-align: center; height: 39px; border-color: #000000; border-style: solid;"> <p><span style="font-weight: 400;">No aplica&nbsp;</span></p> </td> <td style="width: 107.219px; border-color: #000000; border-style: solid; text-align: center; height: 39px;"> <p><span style="font-weight: 400;">No aplica&nbsp;</span></p> </td> <td style="width: 421.953px; height: 39px; border-color: #000000; border-style: solid;"> <p><span style="font-weight: 400;">&nbsp;</span></p> </td> </tr> <tr style="height: 39px;"> <td style="width: 25.0469px; height: 39px; border-color: #000000; border-style: solid;"> <p><span style="font-weight: 400;">2&nbsp;</span></p> </td> <td style="width: 447.953px; height: 39px; border-color: #000000; border-style: solid;"> <p><span style="font-weight: 400;">Se ajusta la descripci&oacute;n del campo &ldquo;Clave&rdquo; incluyendo la referencia a la nota 3</span></p> </td> <td style="width: 196.406px; text-align: center; height: 39px; border-color: #000000; border-style: solid;"> <p><span style="font-weight: 400;">&nbsp;No aplica</span></p> </td> <td style="width: 199.422px; text-align: center; height: 39px; border-color: #000000; border-style: solid;"> <p><span style="font-weight: 400;">No aplica&nbsp;</span></p> </td> <td style="width: 107.219px; border-color: #000000; border-style: solid; text-align: center; height: 39px;"> <p><span style="font-weight: 400;">No aplica&nbsp;</span></p> </td> <td style="width: 421.953px; height: 39px; border-color: #000000; border-style: solid;"> <p><span style="font-weight: 400;">&nbsp;</span></p> </td> </tr> <tr style="height: 39px;"> <td style="width: 25.0469px; height: 39px; border-color: #000000; border-style: solid;"> <p><span style="font-weight: 400;"> 3</span></p> </td> <td style="width: 447.953px; height: 39px; border-color: #000000; border-style: solid;"> <p><span style="font-weight: 400;">Se incluye el campo de &ldquo;Proveedor de Sistemas&rdquo; para identificar los sistemas de emisi&oacute;n de comprobantes electr&oacute;nicos.&nbsp;</span></p> </td> <td style="width: 196.406px; text-align: center; height: 39px; border-color: #000000; border-style: solid;"> <p><span style="font-weight: 400;">NO&nbsp;</span></p> </td> <td style="width: 199.422px; text-align: center; height: 39px; border-color: #000000; border-style: solid;"> <p><span style="font-weight: 400;">NINGUNA&nbsp;</span></p> </td> <td style="width: 107.219px; border-color: #000000; border-style: solid; text-align: center; height: 39px;"> <p><span style="font-weight: 400;">SI</span></p> </td> <td style="width: 421.953px; height: 39px; border-color: #000000; border-style: solid;">Cambio interno que indica la c&eacute;dula jur&iacute;dica de Cronus ERP</td> </tr> <tr style="height: 39px;"> <td style="width: 25.0469px; height: 39px; border-color: #000000; border-style: solid;"> <p><span style="font-weight: 400;">4&nbsp;</span></p> </td> <td style="width: 447.953px; height: 39px; border-color: #000000; border-style: solid;"> <p><span style="font-weight: 400;">Se incluye en la nota 3, la codificaci&oacute;n correspondiente a los campos de &ldquo;Clave&rdquo; y &ldquo;Consecutivo&rdquo;</span></p> </td> <td style="width: 196.406px; text-align: center; height: 39px; border-color: #000000; border-style: solid;"> <p>NO</p> </td> <td style="width: 199.422px; text-align: center; height: 39px; border-color: #000000; border-style: solid;"> <p><span style="font-weight: 400;">Recibos&nbsp;</span></p> </td> <td style="width: 107.219px; border-color: #000000; border-style: solid; text-align: center; height: 39px;"> <p>&nbsp;</p> </td> <td style="width: 421.953px; height: 39px; border-color: #000000; border-style: solid;"> <p><span style="font-weight: 400;">&nbsp;</span></p> </td> </tr> <tr style="height: 39px;"> <td style="width: 25.0469px; height: 39px; border-color: #000000; border-style: solid;"> <p><span style="font-weight: 400;">5</span></p> </td> <td style="width: 447.953px; height: 39px; border-color: #000000; border-style: solid;"> <p><span style="font-weight: 400;">Se incluye en la nota 3, el c&oacute;digo 10 correspondiente al tipo de comprobante &ldquo;Recibo Electronico de Pago&rdquo;</span></p> </td> <td style="width: 196.406px; text-align: center; height: 39px; border-color: #000000; border-style: solid;"><span style="font-weight: 400;">No aplica&nbsp;</span></td> <td style="width: 199.422px; text-align: center; height: 39px; border-color: #000000; border-style: solid;"><span style="font-weight: 400;">No aplica&nbsp;</span></td> <td style="width: 107.219px; border-color: #000000; border-style: solid; text-align: center; height: 39px;"><span style="font-weight: 400;">No aplica&nbsp;</span></td> <td style="width: 421.953px; height: 39px; border-color: #000000; border-style: solid;">&nbsp;</td> </tr> <tr style="height: 39px;"> <td style="width: 25.0469px; height: 39px; border-color: #000000; border-style: solid;"> <p><span style="font-weight: 400;">6</span></p> </td> <td style="width: 447.953px; height: 39px; border-color: #000000; border-style: solid;"> <p><span style="font-weight: 400;">Se incluye el campo de &ldquo;C&oacute;digo de actividad econ&oacute;mica del receptor&rdquo;. Se incluye nota al pie sobre la comunicaci&oacute;n oportuna para el uso obligatorio de este campo.</span></p> </td> <td style="width: 196.406px; text-align: center; height: 39px; border-color: #000000; border-style: solid;">NO</td> <td style="width: 199.422px; text-align: center; height: 39px; border-color: #000000; border-style: solid;">NINGUNA</td> <td style="width: 107.219px; border-color: #000000; border-style: solid; text-align: center; height: 39px;">SI</td> <td style="width: 421.953px; height: 39px; border-color: #000000; border-style: solid;">Por ahora aplica solo para FEC, donde se utiliza la actividad econ&oacute;mica de la compa&ntilde;&iacute;a</td> </tr> <tr style="height: 60px;"> <td style="width: 25.0469px; height: 60px; border-color: #000000; border-style: solid;"> <p><span style="font-weight: 400;">7</span></p> </td> <td style="width: 447.953px; height: 60px; border-color: #000000; border-style: solid;"> <p><span style="font-weight: 400;">Se ajusta en el campo &ldquo;Tipo de identificaci&oacute;n del emisor&rdquo; la descripci&oacute;n de los tipos de identificaci&oacute;n, incluyendo el tipo &ldquo;Extranjero No Domiciliado&rdquo; para usar &uacute;nicamente en la factura de compra.</span></p> </td> <td style="width: 196.406px; text-align: center; height: 60px; border-color: #000000; border-style: solid;">En caso de requerir</td> <td style="width: 199.422px; text-align: center; height: 60px; border-color: #000000; border-style: solid;">Proveedores</td> <td style="width: 107.219px; border-color: #000000; border-style: solid; text-align: center; height: 60px;">SI</td> <td style="width: 421.953px; height: 60px; border-color: #000000; border-style: solid;">Se agrega el tipo de cedula en el mantenimiento indicado</td> </tr> <tr style="height: 60px;"> <td style="width: 25.0469px; height: 60px; border-color: #000000; border-style: solid;"> <p><span style="font-weight: 400;">8</span></p> </td> <td style="width: 447.953px; height: 60px; border-color: #000000; border-style: solid;"> <p><span style="font-weight: 400;">Se ajusta en el campo &ldquo;Tipo de identificaci&oacute;n del emisor&rdquo; la descripci&oacute;n de los tipos de identificaci&oacute;n, incluyendo el tipo &ldquo;No Contribuyente&rdquo; para usar &uacute;nicamente en la factura de compra.</span></p> </td> <td style="width: 196.406px; text-align: center; height: 60px; border-color: #000000; border-style: solid;">En caso de requerir</td> <td style="width: 199.422px; text-align: center; height: 60px; border-color: #000000; border-style: solid;">Proveedores</td> <td style="width: 107.219px; border-color: #000000; border-style: solid; text-align: center; height: 60px;">SI</td> <td style="width: 421.953px; height: 60px; border-color: #000000; border-style: solid;">Se agrega el tipo de cedula en el mantenimiento indicado</td> </tr> <tr style="height: 39px;"> <td style="width: 25.0469px; height: 39px; border-color: #000000; border-style: solid;"> <p><span style="font-weight: 400;">9</span></p> </td> <td style="width: 447.953px; height: 39px; border-color: #000000; border-style: solid;"> <p><span style="font-weight: 400;">Se incluye en la nota 4 el c&oacute;digo 05 para el tipo de identificaci&oacute;n &ldquo;Extranjero No Domiciliado&rdquo;, junto con nota explicativa al pie de p&aacute;gina</span></p> </td> <td style="width: 196.406px; text-align: center; height: 39px; border-color: #000000; border-style: solid;"><span style="font-weight: 400;">No aplica&nbsp;</span></td> <td style="width: 199.422px; text-align: center; height: 39px; border-color: #000000; border-style: solid;"><span style="font-weight: 400;">No aplica&nbsp;</span></td> <td style="width: 107.219px; border-color: #000000; border-style: solid; text-align: center; height: 39px;"><span style="font-weight: 400;">No aplica&nbsp;</span></td> <td style="width: 421.953px; height: 39px; border-color: #000000; border-style: solid;">&nbsp;</td> </tr> <tr style="height: 39px;"> <td style="width: 25.0469px; height: 39px; border-color: #000000; border-style: solid;"> <p><span style="font-weight: 400;">10</span></p> </td> <td style="width: 447.953px; height: 39px; border-color: #000000; border-style: solid;"> <p><span style="font-weight: 400;">Se incluye en la nota 4 el c&oacute;digo 06 para el tipo de identificaci&oacute;n &ldquo;No Contribuyente&rdquo;, junto con nota explicativa al pie de p&aacute;gina</span></p> </td> <td style="width: 196.406px; text-align: center; height: 39px; border-color: #000000; border-style: solid;"><span style="font-weight: 400;">No aplica&nbsp;</span></td> <td style="width: 199.422px; text-align: center; height: 39px; border-color: #000000; border-style: solid;"><span style="font-weight: 400;">No aplica&nbsp;</span></td> <td style="width: 107.219px; border-color: #000000; border-style: solid; text-align: center; height: 39px;"><span style="font-weight: 400;">No aplica&nbsp;</span></td> <td style="width: 421.953px; height: 39px; border-color: #000000; border-style: solid;">&nbsp;</td> </tr> <tr style="height: 60px;"> <td style="width: 25.0469px; height: 60px; border-color: #000000; border-style: solid;"> <p><span style="font-weight: 400;">11</span></p> </td> <td style="width: 447.953px; height: 60px; border-color: #000000; border-style: solid;"> <p><span style="font-weight: 400;">Se ajusta la descripci&oacute;n y se ampl&iacute;a el tama&ntilde;o del campo &ldquo;N&uacute;mero de c&eacute;dula f&iacute;sica/ jur&iacute;dica/NITE/DIMEX/Extranjero No domiciliado/No contribuyente, del emisor&rdquo; a 20 caracteres cuando se use el c&oacute;digo 05 de la nota 4.&nbsp;</span></p> </td> <td style="width: 196.406px; text-align: center; height: 60px; border-color: #000000; border-style: solid;"><span style="font-weight: 400;">No aplica&nbsp;</span></td> <td style="width: 199.422px; text-align: center; height: 60px; border-color: #000000; border-style: solid;"><span style="font-weight: 400;">No aplica&nbsp;</span></td> <td style="width: 107.219px; border-color: #000000; border-style: solid; text-align: center; height: 60px;"><span style="font-weight: 400;">No aplica&nbsp;</span></td> <td style="width: 421.953px; height: 60px; border-color: #000000; border-style: solid;">&nbsp;</td> </tr> <tr style="height: 39px;"> <td style="width: 25.0469px; height: 39px; border-color: #000000; border-style: solid;"> <p><span style="font-weight: 400;">12</span></p> </td> <td style="width: 447.953px; height: 39px; border-color: #000000; border-style: solid;"> <p><span style="font-weight: 400;">Se incluye el campo de &ldquo;Registro fiscal de bebidas Alcoh&oacute;licas Ley 8707&rdquo;.</span></p> </td> <td style="width: 196.406px; text-align: center; height: 39px; border-color: #000000; border-style: solid;">En caso de requerir</td> <td style="width: 199.422px; text-align: center; height: 39px; border-color: #000000; border-style: solid;">Configuraci&oacute;n ATV</td> <td style="width: 107.219px; border-color: #000000; border-style: solid; text-align: center; height: 39px;">SI</td> <td style="width: 421.953px; height: 39px; border-color: #000000; border-style: solid;">Se agrega campo en la pantalla indicada para configurar el n&uacute;mero de registro</td> </tr> <tr style="height: 39px;"> <td style="width: 25.0469px; height: 39px; border-color: #000000; border-style: solid;"> <p><span style="font-weight: 400;">13</span></p> </td> <td style="width: 447.953px; height: 39px; border-color: #000000; border-style: solid;"> <p><span style="font-weight: 400;">Se ajusta la condici&oacute;n del campo &ldquo;Nombre Comercial Emisor&rdquo; a Opcional.&nbsp;</span></p> </td> <td style="width: 196.406px; text-align: center; height: 39px; border-color: #000000; border-style: solid;"><span style="font-weight: 400;">No aplica</span></td> <td style="width: 199.422px; text-align: center; height: 39px; border-color: #000000; border-style: solid;"><span style="font-weight: 400;">No aplica</span></td> <td style="width: 107.219px; border-color: #000000; border-style: solid; text-align: center; height: 39px;"><span style="font-weight: 400;">No aplica</span></td> <td style="width: 421.953px; height: 39px; border-color: #000000; border-style: solid;">&nbsp;</td> </tr> <tr style="height: 60px;"> <td style="width: 25.0469px; height: 60px; border-color: #000000; border-style: solid;"> <p><span style="font-weight: 400;">14</span></p> </td> <td style="width: 447.953px; height: 60px; border-color: #000000; border-style: solid;"> <p><span style="font-weight: 400;">Se convierte el nodo de &ldquo;Ubicaci&oacute;n&rdquo; para el emisor en condicional para la Factura Electr&oacute;nica de Compra cuando en el campo &ldquo;Tipo de identificaci&oacute;n del emisor&rdquo; se est&eacute; P&aacute;gina 4 de 98 utilizando el c&oacute;digo 05 y 06 de la nota 4, donde no ser&aacute; obligatorio.</span></p> </td> <td style="width: 196.406px; text-align: center; height: 60px; border-color: #000000; border-style: solid;"><span style="font-weight: 400;">No aplica</span></td> <td style="width: 199.422px; text-align: center; height: 60px; border-color: #000000; border-style: solid;"><span style="font-weight: 400;">No aplica</span></td> <td style="width: 107.219px; border-color: #000000; border-style: solid; text-align: center; height: 60px;"><span style="font-weight: 400;">No aplica</span></td> <td style="width: 421.953px; height: 60px; border-color: #000000; border-style: solid;">&nbsp;</td> </tr> <tr style="height: 39px;"> <td style="width: 25.0469px; height: 39px; border-color: #000000; border-style: solid;"> <p><span style="font-weight: 400;">15</span></p> </td> <td style="width: 447.953px; height: 39px; border-color: #000000; border-style: solid;"> <p><span style="font-weight: 400;">Se ajusta la condicionalidad del campo &ldquo;Barrio&rdquo; de condicional a opcional y se habilita la escritura.</span></p> </td> <td style="width: 196.406px; text-align: center; height: 39px; border-color: #000000; border-style: solid;"><span style="font-weight: 400;">No aplica</span></td> <td style="width: 199.422px; text-align: center; height: 39px; border-color: #000000; border-style: solid;"><span style="font-weight: 400;">No aplica</span></td> <td style="width: 107.219px; border-color: #000000; border-style: solid; text-align: center; height: 39px;"><span style="font-weight: 400;">No aplica</span></td> <td style="width: 421.953px; height: 39px; border-color: #000000; border-style: solid;">&nbsp;</td> </tr> <tr style="height: 60px;"> <td style="width: 25.0469px; height: 60px; border-color: #000000; border-style: solid;"> <p><span style="font-weight: 400;">16</span></p> </td> <td style="width: 447.953px; height: 60px; border-color: #000000; border-style: solid;"> <p><span style="font-weight: 400;">Se incluye el campo &ldquo;Otras Se&ntilde;as Extranjero&rdquo; de uso exclusivo en la Factura Electr&oacute;nica de Compra para cuando en el campo &ldquo;Tipo de identificaci&oacute;n del emisor&rdquo; se este utilizando el c&oacute;digo 05 de la nota 4.</span></p> </td> <td style="width: 196.406px; text-align: center; height: 60px; border-color: #000000; border-style: solid;"><span style="font-weight: 400;">No aplica</span></td> <td style="width: 199.422px; text-align: center; height: 60px; border-color: #000000; border-style: solid;"><span style="font-weight: 400;">No aplica</span></td> <td style="width: 107.219px; border-color: #000000; border-style: solid; text-align: center; height: 60px;"><span style="font-weight: 400;">No aplica</span></td> <td style="width: 421.953px; height: 60px; border-color: #000000; border-style: solid;">&nbsp;</td> </tr> <tr style="height: 60px;"> <td style="width: 25.0469px; height: 60px; border-color: #000000; border-style: solid;"> <p><span style="font-weight: 400;">17</span></p> </td> <td style="width: 447.953px; height: 60px; border-color: #000000; border-style: solid;"> <p><span style="font-weight: 400;">Se ajustan descripciones del campo &ldquo;N&uacute;mero de Tel&eacute;fono&rdquo; en el nodo &ldquo;Tel&eacute;fono&rdquo; tanto para el emisor como para el receptor, estableci&eacute;ndose un m&iacute;nimo de 8 d&iacute;gitos y un m&aacute;ximo de 20.</span></p> </td> <td style="width: 196.406px; text-align: center; height: 60px; border-color: #000000; border-style: solid;">En caso de requerir</td> <td style="width: 199.422px; text-align: center; height: 60px; border-color: #000000; border-style: solid;">Clientes, Compa&ntilde;&iacute;a</td> <td style="width: 107.219px; border-color: #000000; border-style: solid; text-align: center; height: 60px;">SI</td> <td style="width: 421.953px; height: 60px; border-color: #000000; border-style: solid;">Se expande el tama&ntilde;o m&aacute;ximo para el n&uacute;mero de tel&eacute;fono</td> </tr> <tr style="height: 39px;"> <td style="width: 25.0469px; height: 39px; border-color: #000000; border-style: solid;"> <p><span style="font-weight: 400;">18</span></p> </td> <td style="width: 447.953px; height: 39px; border-color: #000000; border-style: solid;"> <p><span style="font-weight: 400;">Se elimina el nodo de &ldquo;Fax&rdquo;, tanto para el nodo del emisor como para el nodo del receptor.</span></p> </td> <td style="width: 196.406px; text-align: center; height: 39px; border-color: #000000; border-style: solid;"><span style="font-weight: 400;">No aplica</span></td> <td style="width: 199.422px; text-align: center; height: 39px; border-color: #000000; border-style: solid;"><span style="font-weight: 400;">No aplica</span></td> <td style="width: 107.219px; border-color: #000000; border-style: solid; text-align: center; height: 39px;"><span style="font-weight: 400;">No aplica</span></td> <td style="width: 421.953px; height: 39px; border-color: #000000; border-style: solid;">&nbsp;</td> </tr> <tr style="height: 39px;"> <td style="width: 25.0469px; height: 39px; border-color: #000000; border-style: solid;"> <p><span style="font-weight: 400;">19</span></p> </td> <td style="width: 447.953px; height: 39px; border-color: #000000; border-style: solid;"> <p><span style="font-weight: 400;">Se ampl&iacute;a el n&uacute;mero de repeticiones del campo &ldquo;Direcci&oacute;n de correo electr&oacute;nico del emisor&rdquo; a cuatro y se ajusta la condici&oacute;n del campo a condicional en factura de compra.</span></p> </td> <td style="width: 196.406px; text-align: center; height: 39px; border-color: #000000; border-style: solid;"><span style="font-weight: 400;">No aplica</span></td> <td style="width: 199.422px; text-align: center; height: 39px; border-color: #000000; border-style: solid;"><span style="font-weight: 400;">No aplica</span></td> <td style="width: 107.219px; border-color: #000000; border-style: solid; text-align: center; height: 39px;"><span style="font-weight: 400;">No aplica</span></td> <td style="width: 421.953px; height: 39px; border-color: #000000; border-style: solid;">&nbsp;</td> </tr> <tr style="height: 60px;"> <td style="width: 25.0469px; height: 60px; border-color: #000000; border-style: solid;"> <p><span style="font-weight: 400;">20</span></p> </td> <td style="width: 447.953px; height: 60px; border-color: #000000; border-style: solid;"> <p><span style="font-weight: 400;">Se incluye en la nota 5 de &ldquo;Condiciones de la Venta&rdquo;, el c&oacute;digo 12 para &ldquo;Venta de Mercanc&iacute;a No Nacionalizada&rdquo; para el comprobante de factura electr&oacute;nica, junto con nota explicativa al pie de p&aacute;gina</span></p> </td> <td style="width: 196.406px; text-align: center; height: 60px; border-color: #000000; border-style: solid;">En caso de requerir</td> <td style="width: 199.422px; text-align: center; height: 60px; border-color: #000000; border-style: solid;">Facturaci&oacute;n</td> <td style="width: 107.219px; border-color: #000000; border-style: solid; text-align: center; height: 60px;">SI</td> <td style="width: 421.953px; height: 60px; border-color: #000000; border-style: solid;">Se agrega un nuevo tipo de condici&oacute;n de la venta</td> </tr> <tr style="height: 60px;"> <td style="width: 25.0469px; height: 60px; border-color: #000000; border-style: solid;"> <p><span style="font-weight: 400;">21</span></p> </td> <td style="width: 447.953px; height: 60px; border-color: #000000; border-style: solid;"> <p><span style="font-weight: 400;">Se incluye en la nota 5 de &ldquo;Condiciones de la Venta&rdquo;, el c&oacute;digo 13 para &ldquo;Venta Bienes Usados No Contribuyente&rdquo; para el comprobante de factura electr&oacute;nica, junto con nota explicativa al pie de p&aacute;gina</span></p> </td> <td style="width: 196.406px; text-align: center; height: 60px; border-color: #000000; border-style: solid;">En caso de requerir</td> <td style="width: 199.422px; text-align: center; height: 60px; border-color: #000000; border-style: solid;">Facturaci&oacute;n</td> <td style="width: 107.219px; border-color: #000000; border-style: solid; text-align: center; height: 60px;">SI</td> <td style="width: 421.953px; height: 60px; border-color: #000000; border-style: solid;">Se agrega un nuevo tipo de condici&oacute;n de la venta</td> </tr> <tr style="height: 39px;"> <td style="width: 25.0469px; height: 39px; border-color: #000000; border-style: solid;"> <p><span style="font-weight: 400;">22</span></p> </td> <td style="width: 447.953px; height: 39px; border-color: #000000; border-style: solid;"> <p><span style="font-weight: 400;">Se incluye en la nota 5 de &ldquo;Condiciones de la Venta&rdquo;, el c&oacute;digo 14 para &ldquo;Arrendamiento Operativo&rdquo;, junto con nota explicativa al pie de p&aacute;gina</span></p> </td> <td style="width: 196.406px; text-align: center; height: 39px; border-color: #000000; border-style: solid;">En caso de requerir</td> <td style="width: 199.422px; text-align: center; height: 39px; border-color: #000000; border-style: solid;">Facturaci&oacute;n</td> <td style="width: 107.219px; border-color: #000000; border-style: solid; text-align: center; height: 39px;">SI</td> <td style="width: 421.953px; height: 39px; border-color: #000000; border-style: solid;">Se agrega un nuevo tipo de condici&oacute;n de la venta</td> </tr> <tr style="height: 39px;"> <td style="width: 25.0469px; height: 39px; border-color: #000000; border-style: solid;"> <p><span style="font-weight: 400;">23</span></p> </td> <td style="width: 447.953px; height: 39px; border-color: #000000; border-style: solid;"> <p><span style="font-weight: 400;">Se incluye en la nota 5 de &ldquo;Condiciones de la Venta&rdquo;, el c&oacute;digo 15 para &ldquo;Arrendamiento Financiero&rdquo;, junto con nota explicativa al pie de p&aacute;gina.</span></p> </td> <td style="width: 196.406px; text-align: center; height: 39px; border-color: #000000; border-style: solid;">En caso de requerir</td> <td style="width: 199.422px; text-align: center; height: 39px; border-color: #000000; border-style: solid;">Facturaci&oacute;n</td> <td style="width: 107.219px; border-color: #000000; border-style: solid; text-align: center; height: 39px;">SI</td> <td style="width: 421.953px; height: 39px; border-color: #000000; border-style: solid;">Se agrega un nuevo tipo de condici&oacute;n de la venta</td> </tr> <tr style="height: 39px;"> <td style="width: 25.0469px; height: 39px; border-color: #000000; border-style: solid;"> <p><span style="font-weight: 400;">24</span></p> </td> <td style="width: 447.953px; height: 39px; border-color: #000000; border-style: solid;"> <p><span style="font-weight: 400;">Se ajusta en la nota 5 la descripci&oacute;n del pie de p&aacute;gina del c&oacute;digo 09 &ldquo;Pago de servicios prestado al Estado&rdquo;</span></p> </td> <td style="width: 196.406px; text-align: center; height: 39px; border-color: #000000; border-style: solid;"><span style="font-weight: 400;">No aplica</span></td> <td style="width: 199.422px; text-align: center; height: 39px; border-color: #000000; border-style: solid;"><span style="font-weight: 400;">No aplica</span></td> <td style="width: 107.219px; border-color: #000000; border-style: solid; text-align: center; height: 39px;"><span style="font-weight: 400;">No aplica</span></td> <td style="width: 421.953px; height: 39px; border-color: #000000; border-style: solid;">Se explica con m&aacute;s&nbsp;detalle en el documento oficial de la DGT cuando usar esta condici&oacute;n de venta</td> </tr> <tr style="height: 39px;"> <td style="width: 25.0469px; height: 39px; border-color: #000000; border-style: solid;"> <p><span style="font-weight: 400;">25</span></p> </td> <td style="width: 447.953px; height: 39px; border-color: #000000; border-style: solid;"> <p><span style="font-weight: 400;">Se ajusta en la nota 5 la descripci&oacute;n del pie de p&aacute;gina del c&oacute;digo 11 &ldquo;Pago de venta a cr&eacute;dito en IVA hasta 90 d&iacute;as (Art&iacute;culo 27, LIVA)&rdquo;.</span></p> </td> <td style="width: 196.406px; text-align: center; height: 39px; border-color: #000000; border-style: solid;"><span style="font-weight: 400;">No aplica</span></td> <td style="width: 199.422px; text-align: center; height: 39px; border-color: #000000; border-style: solid;"><span style="font-weight: 400;">No aplica</span></td> <td style="width: 107.219px; border-color: #000000; border-style: solid; text-align: center; height: 39px;"><span style="font-weight: 400;">No aplica</span></td> <td style="width: 421.953px; height: 39px; border-color: #000000; border-style: solid;">Se explica con m&aacute;s&nbsp;detalle en el documento oficial de la DGT cuando usar esta condici&oacute;n de venta</td> </tr> <tr style="height: 39px;"> <td style="width: 25.0469px; height: 39px; border-color: #000000; border-style: solid;"> <p><span style="font-weight: 400;">26</span></p> </td> <td style="width: 447.953px; height: 39px; border-color: #000000; border-style: solid;"> <p><span style="font-weight: 400;">Se ajusta la condici&oacute;n del nodo &ldquo;Identificaci&oacute;n del Receptor&rdquo; en factura electr&oacute;nica de exportaci&oacute;n a obligatorio.</span></p> </td> <td style="width: 196.406px; text-align: center; height: 39px; border-color: #000000; border-style: solid;">NO</td> <td style="width: 199.422px; text-align: center; height: 39px; border-color: #000000; border-style: solid;"><span style="font-weight: 400;">NINGUNA&nbsp;</span></td> <td style="width: 107.219px; border-color: #000000; border-style: solid; text-align: center; height: 39px;">SI</td> <td style="width: 421.953px; height: 39px; border-color: #000000; border-style: solid;">Se ajusta internamente el XML para que incluya el nodo</td> </tr> <tr style="height: 60px;"> <td style="width: 25.0469px; height: 60px; border-color: #000000; border-style: solid;"> <p><span style="font-weight: 400;">27</span></p> </td> <td style="width: 447.953px; height: 60px; border-color: #000000; border-style: solid;"> <p><span style="font-weight: 400;">Se ajusta la descripci&oacute;n del campo &ldquo;Tipo de identificaci&oacute;n del receptor&rdquo; aclarando cuando usar el tipo de identificaci&oacute;n &ldquo;Extranjero No Domiciliado&rdquo; en cada comprobante; cuando se use el c&oacute;digo 05 de la nota 4.</span></p> </td> <td style="width: 196.406px; text-align: center; height: 60px; border-color: #000000; border-style: solid;"><span style="font-weight: 400;">No aplica</span></td> <td style="width: 199.422px; text-align: center; height: 60px; border-color: #000000; border-style: solid;"><span style="font-weight: 400;">No aplica</span></td> <td style="width: 107.219px; border-color: #000000; border-style: solid; text-align: center; height: 60px;"><span style="font-weight: 400;">No aplica</span></td> <td style="width: 421.953px; height: 60px; border-color: #000000; border-style: solid;">&nbsp;</td> </tr> <tr style="height: 39px;"> <td style="width: 25.0469px; height: 39px; border-color: #000000; border-style: solid;"> <p><span style="font-weight: 400;">28</span></p> </td> <td style="width: 447.953px; height: 39px; border-color: #000000; border-style: solid;"> <p><span style="font-weight: 400;">Se ajusta la descripci&oacute;n y se ampl&iacute;a el tama&ntilde;o del campo &ldquo;N&uacute;mero de c&eacute;dula f&iacute;sica/ jur&iacute;dica/NITE/DIMEX/Extranjero No domiciliado, del receptor&rdquo; a 20 caracteres</span></p> </td> <td style="width: 196.406px; text-align: center; height: 39px; border-color: #000000; border-style: solid;">En caso de requerir</td> <td style="width: 199.422px; text-align: center; height: 39px; border-color: #000000; border-style: solid;">Cliente, Proveedor</td> <td style="width: 107.219px; border-color: #000000; border-style: solid; text-align: center; height: 39px;">SI</td> <td style="width: 421.953px; height: 39px; border-color: #000000; border-style: solid;">Se expande el tama&ntilde;o m&aacute;ximo del campo</td> </tr> <tr style="height: 39px;"> <td style="width: 25.0469px; height: 39px; border-color: #000000; border-style: solid;"> <p><span style="font-weight: 400;">29</span></p> </td> <td style="width: 447.953px; height: 39px; border-color: #000000; border-style: solid;"> <p><span style="font-weight: 400;">Se elimina el campo &ldquo;N&uacute;mero de identificaci&oacute;n en caso que el Receptor sea Extranjero&rdquo;.</span></p> </td> <td style="width: 196.406px; text-align: center; height: 39px; border-color: #000000; border-style: solid;">NO</td> <td style="width: 199.422px; text-align: center; height: 39px; border-color: #000000; border-style: solid;">NINGUNA</td> <td style="width: 107.219px; border-color: #000000; border-style: solid; text-align: center; height: 39px;">SI</td> <td style="width: 421.953px; height: 39px; border-color: #000000; border-style: solid;">Se ajusta internamente el XML para eliminar el nodo</td> </tr> <tr style="height: 39px;"> <td style="width: 25.0469px; height: 39px; border-color: #000000; border-style: solid;"> <p><span style="font-weight: 400;">30</span></p> </td> <td style="width: 447.953px; height: 39px; border-color: #000000; border-style: solid;"> <p><span style="font-weight: 400;">Se ajusta condici&oacute;n del campo &ldquo;Nombre Comercial Receptor&rdquo; a opcional.</span></p> </td> <td style="width: 196.406px; text-align: center; height: 39px; border-color: #000000; border-style: solid;"><span style="font-weight: 400;">No aplica</span></td> <td style="width: 199.422px; text-align: center; height: 39px; border-color: #000000; border-style: solid;"><span style="font-weight: 400;">No aplica</span></td> <td style="width: 107.219px; border-color: #000000; border-style: solid; text-align: center; height: 39px;"><span style="font-weight: 400;">No aplica</span></td> <td style="width: 421.953px; height: 39px; border-color: #000000; border-style: solid;">&nbsp;</td> </tr> <tr style="height: 60px;"> <td style="width: 25.0469px; height: 60px; border-color: #000000; border-style: solid;"> <p><span style="font-weight: 400;">31</span></p> </td> <td style="width: 447.953px; height: 60px; border-color: #000000; border-style: solid;"> <p><span style="font-weight: 400;">Se ampl&iacute;a descripci&oacute;n de la condici&oacute;n del nodo &ldquo;Ubicaci&oacute;n&rdquo; para el receptor, deshabilitando su uso para el tipo de identificaci&oacute;n &ldquo;Extranjero No Domiciliado&rdquo; y se pasa a opcional en caso de Tiquete Electr&oacute;nico.</span></p> </td> <td style="width: 196.406px; text-align: center; height: 60px; border-color: #000000; border-style: solid;">NO</td> <td style="width: 199.422px; text-align: center; height: 60px; border-color: #000000; border-style: solid;">NINGUNA</td> <td style="width: 107.219px; border-color: #000000; border-style: solid; text-align: center; height: 60px;">SI</td> <td style="width: 421.953px; height: 60px; border-color: #000000; border-style: solid;">&nbsp;</td> </tr> <tr style="height: 60px;"> <td style="width: 25.0469px; height: 60px; border-color: #000000; border-style: solid;"> <p><span style="font-weight: 400;">32</span></p> </td> <td style="width: 447.953px; height: 60px; border-color: #000000; border-style: solid;"> <p><span style="font-weight: 400;">Se ajusta la condici&oacute;n del campo &ldquo;Otras se&ntilde;as Extranjero&rdquo; a condicional en el comprobante Factura Electr&oacute;nica, cuando el tipo de identificaci&oacute;n es &ldquo;Extranjero No Domiciliado&rdquo; e inexistente para el comprobante Factura Electr&oacute;nica de Compra.</span></p> </td> <td style="width: 196.406px; text-align: center; height: 60px; border-color: #000000; border-style: solid;"><span style="font-weight: 400;">No aplica</span></td> <td style="width: 199.422px; text-align: center; height: 60px; border-color: #000000; border-style: solid;"><span style="font-weight: 400;">No aplica</span></td> <td style="width: 107.219px; border-color: #000000; border-style: solid; text-align: center; height: 60px;"><span style="font-weight: 400;">No aplica</span></td> <td style="width: 421.953px; height: 60px; border-color: #000000; border-style: solid;">&nbsp;</td> </tr> <tr style="height: 39px;"> <td style="width: 25.0469px; height: 39px; border-color: #000000; border-style: solid;"> <p><span style="font-weight: 400;">33</span></p> </td> <td style="width: 447.953px; height: 39px; border-color: #000000; border-style: solid;"> <p><span style="font-weight: 400;">Se ajusta descripci&oacute;n del campo &ldquo;Condiciones de la Venta&rdquo; especificando el uso exclusivo del c&oacute;digo 12 de la nota 5, en el comprobante Factura Electr&oacute;nica</span></p> </td> <td style="width: 196.406px; text-align: center; height: 39px; border-color: #000000; border-style: solid;"><span style="font-weight: 400;">No aplica</span></td> <td style="width: 199.422px; text-align: center; height: 39px; border-color: #000000; border-style: solid;"><span style="font-weight: 400;">No aplica</span></td> <td style="width: 107.219px; border-color: #000000; border-style: solid; text-align: center; height: 39px;"><span style="font-weight: 400;">No aplica</span></td> <td style="width: 421.953px; height: 39px; border-color: #000000; border-style: solid;">&nbsp;</td> </tr> <tr style="height: 39px;"> <td style="width: 25.0469px; height: 39px; border-color: #000000; border-style: solid;"> <p><span style="font-weight: 400;">34</span></p> </td> <td style="width: 447.953px; height: 39px; border-color: #000000; border-style: solid;"> <p><span style="font-weight: 400;">Se incluye el campo &ldquo;Detalle Condici&oacute;n de la Venta OTRO&rdquo; de uso obligatorio en caso de utilizar el c&oacute;digo 99 de &ldquo;Otros&rdquo; de la nota 5.&nbsp;</span></p> </td> <td style="width: 196.406px; text-align: center; height: 39px; border-color: #000000; border-style: solid;">NO</td> <td style="width: 199.422px; text-align: center; height: 39px; border-color: #000000; border-style: solid;">NINGUNA</td> <td style="width: 107.219px; border-color: #000000; border-style: solid; text-align: center; height: 39px;">SI</td> <td style="width: 421.953px; height: 39px; border-color: #000000; border-style: solid;">Se ajusta internamente el XML para reflejar un detalle gen&eacute;rico en el nodo</td> </tr> <tr style="height: 39px;"> <td style="width: 25.0469px; height: 39px; border-color: #000000; border-style: solid;"> <p><span style="font-weight: 400;">35</span></p> </td> <td style="width: 447.953px; height: 39px; border-color: #000000; border-style: solid;"> <p><span style="font-weight: 400;">Se modifica el campo &ldquo;Plazo de cr&eacute;dito&rdquo; a un campo &ldquo;Interger&rdquo; de 5 posiciones, debiendo expresarse en d&iacute;as.</span></p> </td> <td style="width: 196.406px; text-align: center; height: 39px; border-color: #000000; border-style: solid;">NO</td> <td style="width: 199.422px; text-align: center; height: 39px; border-color: #000000; border-style: solid;">NINGUNA</td> <td style="width: 107.219px; border-color: #000000; border-style: solid; text-align: center; height: 39px;">SI</td> <td style="width: 421.953px; height: 39px; border-color: #000000; border-style: solid;">Se verifica que el nodo se env&iacute;e como un n&uacute;mero entero que refleja la cantidad de d&iacute;as y no una fecha</td> </tr> <tr style="height: 60px;"> <td style="width: 25.0469px; height: 60px; border-color: #000000; border-style: solid;"> <p><span style="font-weight: 400;">36</span></p> </td> <td style="width: 447.953px; height: 60px; border-color: #000000; border-style: solid;"> <p><span style="font-weight: 400;">Se traslada el nodo de &ldquo;Medio de Pago&rdquo; al Apartado &ldquo;Resumen del Comprobante/Total del Comprobante&rdquo; el nodo de &ldquo;Medio de Pago&rdquo;. P&aacute;gina 5 de 98 Detalle de la mercanc&iacute;a o servicio prestado</span></p> </td> <td style="width: 196.406px; text-align: center; height: 60px; border-color: #000000; border-style: solid;">NO</td> <td style="width: 199.422px; text-align: center; height: 60px; border-color: #000000; border-style: solid;">NINGUNA</td> <td style="width: 107.219px; border-color: #000000; border-style: solid; text-align: center; height: 60px;">SI</td> <td style="width: 421.953px; height: 60px; border-color: #000000; border-style: solid;">Se ajusta internamente el XML para mover el nodo a la secci&oacute;n indicada</td> </tr> <tr style="height: 60px;"> <td style="width: 25.0469px; height: 60px; border-color: #000000; border-style: solid;"> <p><span style="font-weight: 400;">37</span></p> </td> <td style="width: 447.953px; height: 60px; border-color: #000000; border-style: solid;"> <p><span style="font-weight: 400;">Se ajusta la descripci&oacute;n del nodo &ldquo;Detalle del Servicio, Mercanc&iacute;a u otro&rdquo; aclarando la condicionalidad de su uso obligatorio en el comprobante Factura Electr&oacute;nica, excepto cuando se use se seleccione el c&oacute;digo 04, 08, 09 y 10 de la nota 16 en el campo &ldquo;Tipo de documento otros cargos&rdquo; y no cuente con una l&iacute;nea de servicio o producto.</span></p> </td> <td style="width: 196.406px; text-align: center; height: 60px; border-color: #000000; border-style: solid;"><span style="font-weight: 400;">No aplica</span></td> <td style="width: 199.422px; text-align: center; height: 60px; border-color: #000000; border-style: solid;"><span style="font-weight: 400;">No aplica</span></td> <td style="width: 107.219px; border-color: #000000; border-style: solid; text-align: center; height: 60px;"><span style="font-weight: 400;">No aplica</span></td> <td style="width: 421.953px; height: 60px; border-color: #000000; border-style: solid;">&nbsp;</td> </tr> <tr style="height: 39px;"> <td style="width: 25.0469px; height: 39px; border-color: #000000; border-style: solid;"> <p><span style="font-weight: 400;">38</span></p> </td> <td style="width: 447.953px; height: 39px; border-color: #000000; border-style: solid;"> <p><span style="font-weight: 400;">Se ajusta la descripci&oacute;n del campo &ldquo;Partida Arancelaria&rdquo; aclarando su condici&oacute;n obligatoria cuando se utilice un c&oacute;digo CAByS de mercanc&iacute;as, en la factura de exportaci&oacute;n</span></p> </td> <td style="width: 196.406px; text-align: center; height: 39px; border-color: #000000; border-style: solid;">En caso de requerir</td> <td style="width: 199.422px; text-align: center; height: 39px; border-color: #000000; border-style: solid;">Partida arancelaria, Facturaci&oacute;n&nbsp;</td> <td style="width: 107.219px; border-color: #000000; border-style: solid; text-align: center; height: 39px;">SI</td> <td style="width: 421.953px; height: 39px; border-color: #000000; border-style: solid;">Se verifica la obligatoriedad del campo al facturar</td> </tr> <tr style="height: 60px;"> <td style="width: 25.0469px; height: 60px; border-color: #000000; border-style: solid;"> <p><span style="font-weight: 400;">39</span></p> </td> <td style="width: 447.953px; height: 60px; border-color: #000000; border-style: solid;"> <p><span style="font-weight: 400;">Se ajusta la etiqueta y descripci&oacute;n del campo &ldquo;C&oacute;digo de Producto/Servicio&rdquo;, aclarando la condici&oacute;n obligatoria de este campo en las notas de cr&eacute;dito y d&eacute;bito, as&iacute; como sus excepciones</span></p> </td> <td style="width: 196.406px; text-align: center; height: 60px; border-color: #000000; border-style: solid;">NO</td> <td style="width: 199.422px; text-align: center; height: 60px; border-color: #000000; border-style: solid;">NINGUNA</td> <td style="width: 107.219px; border-color: #000000; border-style: solid; text-align: center; height: 60px;">SI</td> <td style="width: 421.953px; height: 60px; border-color: #000000; border-style: solid;">Se verifica la obligatoriedad del campo al facturar</td> </tr> <tr style="height: 39px;"> <td style="width: 25.0469px; height: 39px; border-color: #000000; border-style: solid;"> <p><span style="font-weight: 400;">40</span></p> </td> <td style="width: 447.953px; height: 39px; border-color: #000000; border-style: solid;"> <p><span style="font-weight: 400;">Se ajusta la descripci&oacute;n y la condici&oacute;n del nodo &ldquo;C&oacute;digo Comercial&rdquo;, a condicional cuando se utilicen c&oacute;digos CAByS de combos/surtidos/paquetes.</span></p> </td> <td style="width: 196.406px; text-align: center; height: 39px; border-color: #000000; border-style: solid;"><span style="font-weight: 400;">No aplica</span></td> <td style="width: 199.422px; text-align: center; height: 39px; border-color: #000000; border-style: solid;"><span style="font-weight: 400;">No aplica</span></td> <td style="width: 107.219px; border-color: #000000; border-style: solid; text-align: center; height: 39px;"><span style="font-weight: 400;">No aplica</span></td> <td style="width: 421.953px; height: 39px; border-color: #000000; border-style: solid;">&nbsp;</td> </tr> <tr style="height: 39px;"> <td style="width: 25.0469px; height: 39px; border-color: #000000; border-style: solid;"> <p><span style="font-weight: 400;">41</span></p> </td> <td style="width: 447.953px; height: 39px; border-color: #000000; border-style: solid;"> <p><span style="font-weight: 400;">Se ajusta la descripci&oacute;n del campo &ldquo;Tipo de C&oacute;digo de producto/servicio&rdquo; del nodo &ldquo;C&oacute;digo Comercial&rdquo; para cuando se utilicen c&oacute;digos CAByS de combos/surtidos/paquetes</span></p> </td> <td style="width: 196.406px; text-align: center; height: 39px; border-color: #000000; border-style: solid;"><span style="font-weight: 400;">No aplica</span></td> <td style="width: 199.422px; text-align: center; height: 39px; border-color: #000000; border-style: solid;"><span style="font-weight: 400;">No aplica</span></td> <td style="width: 107.219px; border-color: #000000; border-style: solid; text-align: center; height: 39px;"><span style="font-weight: 400;">No aplica</span></td> <td style="width: 421.953px; height: 39px; border-color: #000000; border-style: solid;">&nbsp;</td> </tr> <tr style="height: 39px;"> <td style="width: 25.0469px; height: 39px; border-color: #000000; border-style: solid;"> <p><span style="font-weight: 400;">42</span></p> </td> <td style="width: 447.953px; height: 39px; border-color: #000000; border-style: solid;"> <p><span style="font-weight: 400;">Se ajusta la descripci&oacute;n del campo &ldquo;C&oacute;digo&rdquo; del Nodo &ldquo;C&oacute;digo Comercial&rdquo; para cuando se utilicen c&oacute;digos CAByS de combos/surtidos/paquetes</span></p> </td> <td style="width: 196.406px; text-align: center; height: 39px; border-color: #000000; border-style: solid;"><span style="font-weight: 400;">No aplica</span></td> <td style="width: 199.422px; text-align: center; height: 39px; border-color: #000000; border-style: solid;"><span style="font-weight: 400;">No aplica</span></td> <td style="width: 107.219px; border-color: #000000; border-style: solid; text-align: center; height: 39px;"><span style="font-weight: 400;">No aplica</span></td> <td style="width: 421.953px; height: 39px; border-color: #000000; border-style: solid;">&nbsp;</td> </tr> <tr style="height: 39px;"> <td style="width: 25.0469px; height: 39px; border-color: #000000; border-style: solid;"> <p><span style="font-weight: 400;">43</span></p> </td> <td style="width: 447.953px; height: 39px; border-color: #000000; border-style: solid;"> <p><span style="font-weight: 400;">Se ajusta la nota 15, con las unidades de medida para servicios y mercanc&iacute;as</span></p> </td> <td style="width: 196.406px; text-align: center; height: 39px; border-color: #000000; border-style: solid;"><span style="font-weight: 400;">No aplica</span></td> <td style="width: 199.422px; text-align: center; height: 39px; border-color: #000000; border-style: solid;"><span style="font-weight: 400;">No aplica</span></td> <td style="width: 107.219px; border-color: #000000; border-style: solid; text-align: center; height: 39px;"><span style="font-weight: 400;">No aplica</span></td> <td style="width: 421.953px; height: 39px; border-color: #000000; border-style: solid;">&nbsp;</td> </tr> <tr style="height: 39px;"> <td style="width: 25.0469px; height: 39px; border-color: #000000; border-style: solid;"> <p><span style="font-weight: 400;">44</span></p> </td> <td style="width: 447.953px; height: 39px; border-color: #000000; border-style: solid;"> <p><span style="font-weight: 400;">Se incluyen en la nota 15, las siguientes unidades de medida: Acv, Fa, Cc, Cu y Qq.</span></p> </td> <td style="width: 196.406px; text-align: center; height: 39px; border-color: #000000; border-style: solid;">En caso de requerir</td> <td style="width: 199.422px; text-align: center; height: 39px; border-color: #000000; border-style: solid;">Productos, Facturaci&oacute;n&nbsp;</td> <td style="width: 107.219px; border-color: #000000; border-style: solid; text-align: center; height: 39px;">SI</td> <td style="width: 421.953px; height: 39px; border-color: #000000; border-style: solid;">Se agregaron nuevas unidades de medida</td> </tr> <tr style="height: 39px;"> <td style="width: 25.0469px; height: 39px; border-color: #000000; border-style: solid;"> <p><span style="font-weight: 400;">45</span></p> </td> <td style="width: 447.953px; height: 39px; border-color: #000000; border-style: solid;"> <p><span style="font-weight: 400;">Se incluye el campo &ldquo;Tipo de transacci&oacute;n&rdquo; de condici&oacute;n condicional, para el caso de transacciones con tratamientos tributarios espec&iacute;ficos seg&uacute;n la necesidad de las partes.</span></p> </td> <td style="width: 196.406px; text-align: center; height: 39px; border-color: #000000; border-style: solid;">En caso de requerir</td> <td style="width: 199.422px; text-align: center; height: 39px; border-color: #000000; border-style: solid;">Facturaci&oacute;n&nbsp;</td> <td style="width: 107.219px; border-color: #000000; border-style: solid; text-align: center; height: 39px;">SI</td> <td style="width: 421.953px; height: 39px; border-color: #000000; border-style: solid;">Se agrega el campo en la pantalla de facturaci&oacute;n</td> </tr> <tr style="height: 39px;"> <td style="width: 25.0469px; height: 39px; border-color: #000000; border-style: solid;"> <p><span style="font-weight: 400;">46</span></p> </td> <td style="width: 447.953px; height: 39px; border-color: #000000; border-style: solid;"> <p><span style="font-weight: 400;">Se incluye la nota 22 para Tipo de Transacci&oacute;n</span></p> </td> <td style="width: 196.406px; text-align: center; height: 39px; border-color: #000000; border-style: solid;"><span style="font-weight: 400;">No aplica</span></td> <td style="width: 199.422px; text-align: center; height: 39px; border-color: #000000; border-style: solid;"><span style="font-weight: 400;">No aplica</span></td> <td style="width: 107.219px; border-color: #000000; border-style: solid; text-align: center; height: 39px;"><span style="font-weight: 400;">No aplica</span></td> <td style="width: 421.953px; height: 39px; border-color: #000000; border-style: solid;">&nbsp;</td> </tr> <tr style="height: 39px;"> <td style="width: 25.0469px; height: 39px; border-color: #000000; border-style: solid;"> <p><span style="font-weight: 400;">47</span></p> </td> <td style="width: 447.953px; height: 39px; border-color: #000000; border-style: solid;"> <p><span style="font-weight: 400;">Se ajusta la condici&oacute;n del campo &ldquo;Detalle de la mercanc&iacute;a transferida o servicio prestado&rdquo; a obligatorio en todos los comprobantes.</span></p> </td> <td style="width: 196.406px; text-align: center; height: 39px; border-color: #000000; border-style: solid;">NO</td> <td style="width: 199.422px; text-align: center; height: 39px; border-color: #000000; border-style: solid;">NINGUNA</td> <td style="width: 107.219px; border-color: #000000; border-style: solid; text-align: center; height: 39px;">SI</td> <td style="width: 421.953px; height: 39px; border-color: #000000; border-style: solid;">Se valida la obligatoriedad para el XML</td> </tr> <tr style="height: 39px;"> <td style="width: 25.0469px; height: 39px; border-color: #000000; border-style: solid;"> <p><span style="font-weight: 400;">48</span></p> </td> <td style="width: 447.953px; height: 39px; border-color: #000000; border-style: solid;"> <p><span style="font-weight: 400;">Se incluye el campo de &ldquo;N&uacute;mero de VIN o Serie&rdquo; de los veh&iacute;culos de transporte y se incluye notas explicativas al pie de p&aacute;gina.</span></p> </td> <td style="width: 196.406px; text-align: center; height: 39px; border-color: #000000; border-style: solid;">En caso de ser necesario</td> <td style="width: 199.422px; text-align: center; height: 39px; border-color: #000000; border-style: solid;">Productos</td> <td style="width: 107.219px; border-color: #000000; border-style: solid; text-align: center; height: 39px;">SI</td> <td style="width: 421.953px; height: 39px; border-color: #000000; border-style: solid;">Falta el mantenimiento en Cronus</td> </tr> <tr style="height: 60px;"> <td style="width: 25.0469px; height: 60px; border-color: #000000; border-style: solid;"> <p><span style="font-weight: 400;">49</span></p> </td> <td style="width: 447.953px; height: 60px; border-color: #000000; border-style: solid;"> <p><span style="font-weight: 400;">Se incluye el Nodo de &ldquo;Detalle de Productos del Surtido&rdquo; que ser&aacute; de condici&oacute;n obligatoria para cuando se utilicen c&oacute;digos CAByS de combos/surtidos/paquetes, junto con nota explicativa al pie de p&aacute;gina. Cuenta con la posibilidad de tener hasta 20 repeticiones</span></p> </td> <td style="width: 196.406px; text-align: center; height: 60px; border-color: #000000; border-style: solid;">No aplica</td> <td style="width: 199.422px; text-align: center; height: 60px; border-color: #000000; border-style: solid;">No aplica</td> <td style="width: 107.219px; border-color: #000000; border-style: solid; text-align: center; height: 60px;">No Aplica</td> <td style="width: 421.953px; height: 60px; border-color: #000000; border-style: solid;">Esto aplica &uacute;nicamente cuando se fabrican combos de forma masiva, donde cada combo tiene un c&oacute;digo propio e inventario. Actualmente Cronus ERP env&iacute;a el detalle de los productos que componen el combo de forma independiente (Lo requerido por la DGT)</td> </tr> <tr style="height: 39px;"> <td style="width: 25.0469px; height: 39px; border-color: #000000; border-style: solid;"> <p><span style="font-weight: 400;">50</span></p> </td> <td style="width: 447.953px; height: 39px; border-color: #000000; border-style: solid;"> <p><span style="font-weight: 400;">Se ajusta la descripci&oacute;n de campo &ldquo;Monto de descuentos concedidos&rdquo;, y la condici&oacute;n del campo a obligatorio.</span></p> </td> <td style="width: 196.406px; text-align: center; height: 39px; border-color: #000000; border-style: solid;">NO</td> <td style="width: 199.422px; text-align: center; height: 39px; border-color: #000000; border-style: solid;">NINGUNA</td> <td style="width: 107.219px; border-color: #000000; border-style: solid; text-align: center; height: 39px;">SI</td> <td style="width: 421.953px; height: 39px; border-color: #000000; border-style: solid;">Se valida la obligatoriedad para el XML</td> </tr> <tr style="height: 39px;"> <td style="width: 25.0469px; height: 39px; border-color: #000000; border-style: solid;"> <p><span style="font-weight: 400;">51</span></p> </td> <td style="width: 447.953px; height: 39px; border-color: #000000; border-style: solid;"> <p><span style="font-weight: 400;">Se incluye la nota 20 para los tipos de descuentos a utilizar en el campo de &ldquo;C&oacute;digo del Descuento&rdquo;</span></p> </td> <td style="width: 196.406px; text-align: center; height: 39px; border-color: #000000; border-style: solid;">En caso de requerir</td> <td style="width: 199.422px; text-align: center; height: 39px; border-color: #000000; border-style: solid;">Descuentos</td> <td style="width: 107.219px; border-color: #000000; border-style: solid; text-align: center; height: 39px;">SI</td> <td style="width: 421.953px; height: 39px; border-color: #000000; border-style: solid;">Se agrega un tipo de descuento al mantenimiento de descuentos</td> </tr> <tr style="height: 39px;"> <td style="width: 25.0469px; height: 39px; border-color: #000000; border-style: solid;"> <p><span style="font-weight: 400;">52</span></p> </td> <td style="width: 447.953px; height: 39px; border-color: #000000; border-style: solid;"> <p><span style="font-weight: 400;">Se incluye el campo &ldquo;C&oacute;digo del descuento&rdquo; de condici&oacute;n obligatoria para la identificaci&oacute;n de los descuentos detallados en la nota 20.</span></p> </td> <td style="width: 196.406px; text-align: center; height: 39px; border-color: #000000; border-style: solid;">NO</td> <td style="width: 199.422px; text-align: center; height: 39px; border-color: #000000; border-style: solid;">NINGUNA</td> <td style="width: 107.219px; border-color: #000000; border-style: solid; text-align: center; height: 39px;">SI</td> <td style="width: 421.953px; height: 39px; border-color: #000000; border-style: solid;">Se valida la obligatoriedad para el XML</td> </tr> <tr style="height: 39px;"> <td style="width: 25.0469px; height: 39px; border-color: #000000; border-style: solid;"> <p><span style="font-weight: 400;">53</span></p> </td> <td style="width: 447.953px; height: 39px; border-color: #000000; border-style: solid;"> <p><span style="font-weight: 400;">Se incluye el campo &ldquo;C&oacute;digo del descuento OTRO&rdquo; de uso obligatorio en caso de utilizar el c&oacute;digo 99 de &ldquo;Otros Descuentos&rdquo; de la nota 20</span></p> </td> <td style="width: 196.406px; text-align: center; height: 39px; border-color: #000000; border-style: solid;">NO</td> <td style="width: 199.422px; text-align: center; height: 39px; border-color: #000000; border-style: solid;">NINGUNA</td> <td style="width: 107.219px; border-color: #000000; border-style: solid; text-align: center; height: 39px;">SI</td> <td style="width: 421.953px; height: 39px; border-color: #000000; border-style: solid;">Se inserta el nodo en XML&nbsp;con un contenido gen&eacute;rico, esto cuando se utiliza el c&oacute;digo 99&nbsp;</td> </tr> <tr style="height: 39px;"> <td style="width: 25.0469px; height: 39px; border-color: #000000; border-style: solid;"> <p><span style="font-weight: 400;">54</span></p> </td> <td style="width: 447.953px; height: 39px; border-color: #000000; border-style: solid;"> <p><span style="font-weight: 400;">Se ajusta la descripci&oacute;n del campo &ldquo;Naturaleza del Descuento&rdquo; de uso obligatorio cuando se utilice el c&oacute;digo 99 de la nota 20</span></p> </td> <td style="width: 196.406px; text-align: center; height: 39px; border-color: #000000; border-style: solid;">NO</td> <td style="width: 199.422px; text-align: center; height: 39px; border-color: #000000; border-style: solid;">NINGUNA</td> <td style="width: 107.219px; border-color: #000000; border-style: solid; text-align: center; height: 39px;">SI</td> <td style="width: 421.953px; height: 39px; border-color: #000000; border-style: solid;">Se valida la obligatoriedad para el XML</td> </tr> <tr style="height: 39px;"> <td style="width: 25.0469px; height: 39px; border-color: #000000; border-style: solid;"> <p><span style="font-weight: 400;">55</span></p> </td> <td style="width: 447.953px; height: 39px; border-color: #000000; border-style: solid;"> <p><span style="font-weight: 400;">Se incluye el campo denominado &ldquo;IVA cobrado a nivel de f&aacute;brica&rdquo;</span></p> </td> <td style="width: 196.406px; text-align: center; height: 39px; border-color: #000000; border-style: solid;">En revisi&oacute;n&nbsp;</td> <td style="width: 199.422px; text-align: center; height: 39px; border-color: #000000; border-style: solid;">En revisi&oacute;n&nbsp;</td> <td style="width: 107.219px; border-color: #000000; border-style: solid; text-align: center; height: 39px;">En revisi&oacute;n&nbsp;</td> <td style="width: 421.953px; height: 39px; border-color: #000000; border-style: solid;">&nbsp;</td> </tr> <tr style="height: 39px;"> <td style="width: 25.0469px; height: 39px; border-color: #000000; border-style: solid;"> <p><span style="font-weight: 400;">56</span></p> </td> <td style="width: 447.953px; height: 39px; border-color: #000000; border-style: solid;"> <p><span style="font-weight: 400;">Se incluye la nota 21 para el &ldquo;IVA cobrado a nivel de f&aacute;brica&rdquo;</span></p> </td> <td style="width: 196.406px; text-align: center; height: 39px; border-color: #000000; border-style: solid;">En revisi&oacute;n&nbsp;</td> <td style="width: 199.422px; text-align: center; height: 39px; border-color: #000000; border-style: solid;">En revisi&oacute;n&nbsp;</td> <td style="width: 107.219px; border-color: #000000; border-style: solid; text-align: center; height: 39px;">En revisi&oacute;n&nbsp;</td> <td style="width: 421.953px; height: 39px; border-color: #000000; border-style: solid;">&nbsp;</td> </tr> <tr style="height: 39px;"> <td style="width: 25.0469px; height: 39px; border-color: #000000; border-style: solid;"> <p><span style="font-weight: 400;">57</span></p> </td> <td style="width: 447.953px; height: 39px; border-color: #000000; border-style: solid;"> <p><span style="font-weight: 400;">Se ajusta el nombre del campo &ldquo;Base Imponible Especial&rdquo; a &ldquo;Base Imponible&rdquo;</span></p> </td> <td style="width: 196.406px; text-align: center; height: 39px; border-color: #000000; border-style: solid;">NO</td> <td style="width: 199.422px; text-align: center; height: 39px; border-color: #000000; border-style: solid;">NINGUNA</td> <td style="width: 107.219px; border-color: #000000; border-style: solid; text-align: center; height: 39px;">SI</td> <td style="width: 421.953px; height: 39px; border-color: #000000; border-style: solid;">Se ajusta internamente el nombre del nodo en el XML</td> </tr> <tr style="height: 39px;"> <td style="width: 25.0469px; height: 39px; border-color: #000000; border-style: solid;"> <p><span style="font-weight: 400;">58</span></p> </td> <td style="width: 447.953px; height: 39px; border-color: #000000; border-style: solid;"> <p><span style="font-weight: 400;">Se ajusta la condici&oacute;n del campo &ldquo;Base Imponible&rdquo; a obligatorio y se ampl&iacute;a la descripci&oacute;n para su uso</span></p> </td> <td style="width: 196.406px; text-align: center; height: 39px; border-color: #000000; border-style: solid;">NO</td> <td style="width: 199.422px; text-align: center; height: 39px; border-color: #000000; border-style: solid;">NINGUNA</td> <td style="width: 107.219px; border-color: #000000; border-style: solid; text-align: center; height: 39px;">SI</td> <td style="width: 421.953px; height: 39px; border-color: #000000; border-style: solid;">Se valida la obligatoriedad para el XML</td> </tr> <tr style="height: 39px;"> <td style="width: 25.0469px; height: 39px; border-color: #000000; border-style: solid;"> <p><span style="font-weight: 400;">59</span></p> </td> <td style="width: 447.953px; height: 39px; border-color: #000000; border-style: solid;"> <p><span style="font-weight: 400;">Se ajusta el n&uacute;mero de repeticiones del campo &ldquo;Impuesto&rdquo; a {1,1000}, se hace campo obligatorio y se ampl&iacute;a su descripci&oacute;n</span></p> </td> <td style="width: 196.406px; text-align: center; height: 39px; border-color: #000000; border-style: solid;">No aplica</td> <td style="width: 199.422px; text-align: center; height: 39px; border-color: #000000; border-style: solid;">No aplica</td> <td style="width: 107.219px; border-color: #000000; border-style: solid; text-align: center; height: 39px;">No aplica</td> <td style="width: 421.953px; height: 39px; border-color: #000000; border-style: solid;">Cronus Erp no permite incluir varios impuestos en una misma l&iacute;nea de detalle.</td> </tr> <tr style="height: 39px;"> <td style="width: 25.0469px; height: 39px; border-color: #000000; border-style: solid;"> <p><span style="font-weight: 400;">60</span></p> </td> <td style="width: 447.953px; height: 39px; border-color: #000000; border-style: solid;"> <p><span style="font-weight: 400;">Se ajusta la descripci&oacute;n &ldquo;C&oacute;digo de Impuesto&rdquo; indicando para el caso de las Regal&iacute;as y Bonificaciones los campos a usar para el c&aacute;lculo del IVA</span></p> </td> <td style="width: 196.406px; text-align: center; height: 39px; border-color: #000000; border-style: solid;">No aplica</td> <td style="width: 199.422px; text-align: center; height: 39px; border-color: #000000; border-style: solid;">No aplica</td> <td style="width: 107.219px; border-color: #000000; border-style: solid; text-align: center; height: 39px;">No aplica</td> <td style="width: 421.953px; height: 39px; border-color: #000000; border-style: solid;">&nbsp;</td> </tr> <tr style="height: 39px;"> <td style="width: 25.0469px; height: 39px; border-color: #000000; border-style: solid;"> <p><span style="font-weight: 400;">61</span></p> </td> <td style="width: 447.953px; height: 39px; border-color: #000000; border-style: solid;"> <p><span style="font-weight: 400;">Se incluye el campo &ldquo;C&oacute;digo de impuesto OTRO&rdquo; de uso obligatorio en caso de utilizar el c&oacute;digo 99 de &ldquo;Otros&rdquo; de la nota 8.</span></p> </td> <td style="width: 196.406px; text-align: center; height: 39px; border-color: #000000; border-style: solid;">NO</td> <td style="width: 199.422px; text-align: center; height: 39px; border-color: #000000; border-style: solid;">NINGUNA</td> <td style="width: 107.219px; border-color: #000000; border-style: solid; text-align: center; height: 39px;">SI</td> <td style="width: 421.953px; height: 39px; border-color: #000000; border-style: solid;">Se inserta el nodo en XML&nbsp;con un contenido gen&eacute;rico, esto cuando se utiliza el c&oacute;digo 99&nbsp;</td> </tr> <tr style="height: 60px;"> <td style="width: 25.0469px; height: 60px; border-color: #000000; border-style: solid;"> <p><span style="font-weight: 400;">62</span></p> </td> <td style="width: 447.953px; height: 60px; border-color: #000000; border-style: solid;"> <p><span style="font-weight: 400;">Se ajusta la etiqueta &ldquo;C&oacute;digo Tarifa&rdquo; por &ldquo;C&oacute;digo Tarifa IVA&rdquo; y el nombre del Campo &ldquo;C&oacute;digo de la Tarifa del impuesto&rdquo; por &ldquo;C&oacute;digo de la tarifa del Impuesto al Valor Agregado&rdquo;. P&aacute;gina 6 de 98</span></p> </td> <td style="width: 196.406px; text-align: center; height: 60px; border-color: #000000; border-style: solid;">NO</td> <td style="width: 199.422px; text-align: center; height: 60px; border-color: #000000; border-style: solid;">NINGUNA</td> <td style="width: 107.219px; border-color: #000000; border-style: solid; text-align: center; height: 60px;">SI</td> <td style="width: 421.953px; height: 60px; border-color: #000000; border-style: solid;">Se ajusta internamente el nombre del nodo en el XML</td> </tr> <tr style="height: 39px;"> <td style="width: 25.0469px; height: 39px; border-color: #000000; border-style: solid;"> <p><span style="font-weight: 400;">63</span></p> </td> <td style="width: 447.953px; height: 39px; border-color: #000000; border-style: solid;"> <p><span style="font-weight: 400;">Se incluye en la nota 8, nota explicativa al pie de p&aacute;gina, para el uso del c&oacute;digo de impuesto 07 &ldquo;IVA c&aacute;lculo especial&rdquo;</span></p> </td> <td style="width: 196.406px; text-align: center; height: 39px; border-color: #000000; border-style: solid;">No aplica</td> <td style="width: 199.422px; text-align: center; height: 39px; border-color: #000000; border-style: solid;">No aplica</td> <td style="width: 107.219px; border-color: #000000; border-style: solid; text-align: center; height: 39px;">No aplica</td> <td style="width: 421.953px; height: 39px; border-color: #000000; border-style: solid;">&nbsp;</td> </tr> <tr style="height: 39px;"> <td style="width: 25.0469px; height: 39px; border-color: #000000; border-style: solid;"> <p><span style="font-weight: 400;">64</span></p> </td> <td style="width: 447.953px; height: 39px; border-color: #000000; border-style: solid;"> <p><span style="font-weight: 400;">Se ajusta la descripci&oacute;n del campo &ldquo;C&oacute;digo de la tarifa del Impuesto al Valor Agregado&rdquo;</span></p> </td> <td style="width: 196.406px; text-align: center; height: 39px; border-color: #000000; border-style: solid;">No aplica</td> <td style="width: 199.422px; text-align: center; height: 39px; border-color: #000000; border-style: solid;">No aplica</td> <td style="width: 107.219px; border-color: #000000; border-style: solid; text-align: center; height: 39px;">No aplica</td> <td style="width: 421.953px; height: 39px; border-color: #000000; border-style: solid;">&nbsp;</td> </tr> <tr style="height: 39px;"> <td style="width: 25.0469px; height: 39px; border-color: #000000; border-style: solid;"> <p><span style="font-weight: 400;">65</span></p> </td> <td style="width: 447.953px; height: 39px; border-color: #000000; border-style: solid;"> <p><span style="font-weight: 400;">Se modifica en la nota 8.1 el nombre del c&oacute;digo 01 de &ldquo;Tarifa 0% (Exento)&rdquo; por &ldquo;Tarifa 0% (Art&iacute;culo 32, num 1, RLIVA)&rdquo; junto con nota explicativa al pie de p&aacute;gina</span></p> </td> <td style="width: 196.406px; text-align: center; height: 39px; border-color: #000000; border-style: solid;">NO</td> <td style="width: 199.422px; text-align: center; height: 39px; border-color: #000000; border-style: solid;">NINGUNA</td> <td style="width: 107.219px; border-color: #000000; border-style: solid; text-align: center; height: 39px;">SI</td> <td style="width: 421.953px; height: 39px; border-color: #000000; border-style: solid;">Se cambia la descripci&oacute;n en el mantenimiento de impuestos</td> </tr> <tr style="height: 39px;"> <td style="width: 25.0469px; height: 39px; border-color: #000000; border-style: solid;"> <p><span style="font-weight: 400;">66</span></p> </td> <td style="width: 447.953px; height: 39px; border-color: #000000; border-style: solid;"> <p><span style="font-weight: 400;">Se incluye para la nota 8.1 notas explicativas para el uso exclusivo del c&oacute;digo 05 de &ldquo;Transitorio 0%&rdquo; y del c&oacute;digo 06 de &ldquo;Transitorio 4%&rdquo; en notas de cr&eacute;dito y d&eacute;bito</span></p> </td> <td style="width: 196.406px; text-align: center; height: 39px; border-color: #000000; border-style: solid;">No aplica</td> <td style="width: 199.422px; text-align: center; height: 39px; border-color: #000000; border-style: solid;">No aplica</td> <td style="width: 107.219px; border-color: #000000; border-style: solid; text-align: center; height: 39px;">No aplica</td> <td style="width: 421.953px; height: 39px; border-color: #000000; border-style: solid;">&nbsp;</td> </tr> <tr style="height: 39px;"> <td style="width: 25.0469px; height: 39px; border-color: #000000; border-style: solid;"> <p><span style="font-weight: 400;">67</span></p> </td> <td style="width: 447.953px; height: 39px; border-color: #000000; border-style: solid;"> <p><span style="font-weight: 400;">Se modifica en la nota 8.1 el nombre del c&oacute;digo 07 de &ldquo;Transitorio 8%&rdquo; por tarifa transitoria 8%. (C&oacute;digo Inhabilitado)&nbsp;</span></p> </td> <td style="width: 196.406px; text-align: center; height: 39px; border-color: #000000; border-style: solid;">NO</td> <td style="width: 199.422px; text-align: center; height: 39px; border-color: #000000; border-style: solid;">NINGUNA</td> <td style="width: 107.219px; border-color: #000000; border-style: solid; text-align: center; height: 39px;">SI</td> <td style="width: 421.953px; height: 39px; border-color: #000000; border-style: solid;">Se cambia la descripci&oacute;n en el mantenimiento de impuestos</td> </tr> <tr style="height: 39px;"> <td style="width: 25.0469px; height: 39px; border-color: #000000; border-style: solid;"> <p><span style="font-weight: 400;">68</span></p> </td> <td style="width: 447.953px; height: 39px; border-color: #000000; border-style: solid;"> <p><span style="font-weight: 400;">Se incluye en la nota 8.1 el c&oacute;digo 09 de &ldquo;Tarifa reducida 0.5%&rdquo;.</span></p> </td> <td style="width: 196.406px; text-align: center; height: 39px; border-color: #000000; border-style: solid;">En caso de requerir</td> <td style="width: 199.422px; text-align: center; height: 39px; border-color: #000000; border-style: solid;">Facturaci&oacute;n&nbsp;</td> <td style="width: 107.219px; border-color: #000000; border-style: solid; text-align: center; height: 39px;">SI</td> <td style="width: 421.953px; height: 39px; border-color: #000000; border-style: solid;">Se incluye un nuevo tipo de impuesto</td> </tr> <tr style="height: 39px;"> <td style="width: 25.0469px; height: 39px; border-color: #000000; border-style: solid;"> <p><span style="font-weight: 400;">69</span></p> </td> <td style="width: 447.953px; height: 39px; border-color: #000000; border-style: solid;"> <p><span style="font-weight: 400;">Se incluye en la nota 8.1 el c&oacute;digo 10 de &ldquo;Tarifa Exenta&rdquo; y se incluye notas explicativas al pie de p&aacute;gina para el uso exclusivo del c&oacute;digo 10.</span></p> </td> <td style="width: 196.406px; text-align: center; height: 39px; border-color: #000000; border-style: solid;">En caso de requerir</td> <td style="width: 199.422px; text-align: center; height: 39px; border-color: #000000; border-style: solid;">Facturaci&oacute;n&nbsp;</td> <td style="width: 107.219px; border-color: #000000; border-style: solid; text-align: center; height: 39px;">SI</td> <td style="width: 421.953px; height: 39px; border-color: #000000; border-style: solid;">Se incluye un nuevo tipo de impuesto</td> </tr> <tr style="height: 39px;"> <td style="width: 25.0469px; height: 39px; border-color: #000000; border-style: solid;"> <p><span style="font-weight: 400;">70</span></p> </td> <td style="width: 447.953px; height: 39px; border-color: #000000; border-style: solid;"> <p><span style="font-weight: 400;">Se incluye en la nota 8.1 el c&oacute;digo 11 de &ldquo;Tarifa 0% sin derecho a cr&eacute;dito&rdquo; y se incluye nota explicativa al pie de p&aacute;gina.</span></p> </td> <td style="width: 196.406px; text-align: center; height: 39px; border-color: #000000; border-style: solid;">En caso de requerir</td> <td style="width: 199.422px; text-align: center; height: 39px; border-color: #000000; border-style: solid;">Facturaci&oacute;n&nbsp;</td> <td style="width: 107.219px; border-color: #000000; border-style: solid; text-align: center; height: 39px;">SI</td> <td style="width: 421.953px; height: 39px; border-color: #000000; border-style: solid;">Se incluye un nuevo tipo de impuesto</td> </tr> <tr style="height: 60px;"> <td style="width: 25.0469px; height: 60px; border-color: #000000; border-style: solid;"> <p><span style="font-weight: 400;">71</span></p> </td> <td style="width: 447.953px; height: 60px; border-color: #000000; border-style: solid;"> <p><span style="font-weight: 400;">Se ampl&iacute;a la descripci&oacute;n del campo &ldquo;Tarifa del Impuesto&rdquo; para efectos del uso y condici&oacute;n del campo de acuerdo con cada c&oacute;digo de impuesto de la nota 8 que utilice tarifa para su c&aacute;lculo.</span></p> </td> <td style="width: 196.406px; text-align: center; height: 60px; border-color: #000000; border-style: solid;">No aplica</td> <td style="width: 199.422px; text-align: center; height: 60px; border-color: #000000; border-style: solid;">No aplica</td> <td style="width: 107.219px; border-color: #000000; border-style: solid; text-align: center; height: 60px;">No aplica</td> <td style="width: 421.953px; height: 60px; border-color: #000000; border-style: solid;">&nbsp;</td> </tr> <tr style="height: 39px;"> <td style="width: 25.0469px; height: 39px; border-color: #000000; border-style: solid;"> <p><span style="font-weight: 400;">72</span></p> </td> <td style="width: 447.953px; height: 39px; border-color: #000000; border-style: solid;"> <p><span style="font-weight: 400;">Se modifica el nombre del campo &ldquo;Factor del impuesto&rdquo; por &ldquo;Factor C&aacute;lculo IVA&rdquo; y se ampl&iacute;a la descripci&oacute;n sobre el formato de uso decimal.</span></p> </td> <td style="width: 196.406px; text-align: center; height: 39px; border-color: #000000; border-style: solid;">No aplica</td> <td style="width: 199.422px; text-align: center; height: 39px; border-color: #000000; border-style: solid;">No aplica</td> <td style="width: 107.219px; border-color: #000000; border-style: solid; text-align: center; height: 39px;">No aplica</td> <td style="width: 421.953px; height: 39px; border-color: #000000; border-style: solid;">&nbsp;</td> </tr> <tr style="height: 60px;"> <td style="width: 25.0469px; height: 60px; border-color: #000000; border-style: solid;"> <p><span style="font-weight: 400;">73</span></p> </td> <td style="width: 447.953px; height: 60px; border-color: #000000; border-style: solid;"> <p><span style="font-weight: 400;">Se incluye el nodo &ldquo;Datos para Impuestos Espec&iacute;ficos&rdquo; de condici&oacute;n obligatoria, cuando se utilicen los c&oacute;digos de impuesto 03, 04, 05, 06 de la nota 8 y agrupar&aacute; los campos requeridos para el c&aacute;lculo de estos impuestos.</span></p> </td> <td style="width: 196.406px; text-align: center; height: 60px; border-color: #000000; border-style: solid;">En revisi&oacute;n&nbsp;</td> <td style="width: 199.422px; text-align: center; height: 60px; border-color: #000000; border-style: solid;">En revisi&oacute;n&nbsp;</td> <td style="width: 107.219px; border-color: #000000; border-style: solid; text-align: center; height: 60px;">En revisi&oacute;n&nbsp;</td> <td style="width: 421.953px; height: 60px; border-color: #000000; border-style: solid;">&nbsp;</td> </tr> <tr style="height: 39px;"> <td style="width: 25.0469px; height: 39px; border-color: #000000; border-style: solid;"> <p><span style="font-weight: 400;">74</span></p> </td> <td style="width: 447.953px; height: 39px; border-color: #000000; border-style: solid;"> <p><span style="font-weight: 400;">Se ajusta la descripci&oacute;n del campo &ldquo;Monto del Impuesto&rdquo; explicando el c&aacute;lculo correspondiente para cada c&oacute;digo de impuesto de la nota 8.</span></p> </td> <td style="width: 196.406px; text-align: center; height: 39px; border-color: #000000; border-style: solid;">No aplica</td> <td style="width: 199.422px; text-align: center; height: 39px; border-color: #000000; border-style: solid;">No aplica</td> <td style="width: 107.219px; border-color: #000000; border-style: solid; text-align: center; height: 39px;">No aplica</td> <td style="width: 421.953px; height: 39px; border-color: #000000; border-style: solid;">&nbsp;</td> </tr> </tbody> </table> <p><br /><br /></p>

# CRONUS Mantenimiento Inventario Productos Integración de cabys

# CABYS

<div class="editable content mb-3" id="bkmrk-cronus-6.1.562-o-sup">***Cronus 6.1.562 o superior***

<span style="font-size: 12pt; font-family: arial, helvetica, sans-serif;">El catálogo de Bienes y Servicios (Cabys) asigna un código único a cada producto con un impuesto fijo. El uso de estos es obligatorio a partir del 01 de Diciembre del 2020 (Costa Rica).</span>

<span style="font-size: 12pt; font-family: arial, helvetica, sans-serif;">Puede encontrar más información sobre su uso **[aquí](https://www.hacienda.go.cr/contenido/15808-catalogo-de-bienes-y-servicios-cabys)**</span>

<span style="font-size: 12pt; font-family: arial, helvetica, sans-serif;">En Cronus se aplicaron los siguientes cambios para adaptarse al uso de ellos:</span>

- <span style="font-size: 12pt; font-family: arial, helvetica, sans-serif;">Código Cabys en todos los productos.</span>
- <span style="font-size: 12pt; font-family: arial, helvetica, sans-serif;">Lector masivo de Cabys desde archivo XLS.</span>
- <span style="font-size: 12pt; font-family: arial, helvetica, sans-serif;">Búsqueda de CABYS por código.</span>
- <span style="font-size: 12pt; font-family: arial, helvetica, sans-serif;">Búsqueda de CABYS por descripción.</span>
- <span style="font-size: 12pt; font-family: arial, helvetica, sans-serif;">Si la importación es masiva o incluso asignado manual lo único visible en el producto una vez asignado el CABYS es el código como tal, la descripción no va aparecer en pantalla. </span>
 
<span style="font-size: 12pt; font-family: arial, helvetica, sans-serif;">El código de Cabys lo puede localizar en el detalle del producto, en la cejilla "11. Códigos", puede digitar la clave asignada y presionar el botón "validar Cabys", luego de esto si hay conexión con Internet va a poder validar la descripción y el impuesto asignado.</span>

<span style="font-size: 12pt; font-family: arial, helvetica, sans-serif;"></span>

<span style="font-size: 12pt; font-family: arial, helvetica, sans-serif;">El impuesto es cargado por defecto (opción sugerida) pero puede ser alterado por el usuario si así lo desea.</span>

<span style="font-size: 12pt; font-family: arial, helvetica, sans-serif;"></span>

<span style="font-size: 12pt; font-family: arial, helvetica, sans-serif;">El buscador de CABYS permite en la sección de descripción digitar lo que se desea buscar, tome en cuenta las siguientes reglas:</span>

1. <span style="font-size: 12pt; font-family: arial, helvetica, sans-serif;">Hasta 10 palabras claves para consultar.</span>
2. <span style="font-size: 12pt; font-family: arial, helvetica, sans-serif;">Un máximo de 500 registros van a ser presentados en pantalla.</span>
3. <span style="font-size: 12pt; font-family: arial, helvetica, sans-serif;">En la sección de color amarillo va a poder ver la descripción completa del Cabys (por el momento un máximo de 650 caracteres).</span>
4. <span style="font-size: 12pt; font-family: arial, helvetica, sans-serif;">En la sección naranja podrá localizar la estructura clasificatoria que conforma el Cabys.</span>
5. <span style="font-size: 12pt; font-family: arial, helvetica, sans-serif;">La cejilla de "Actividades Económicas" va a mostrar cuales de estas son sugeridas para el uso de este código.</span>
6. <span style="font-size: 12pt; font-family: arial, helvetica, sans-serif;">La cejilla de "Productos asociados" muestra todos los artículos de la compañía actual que tienen ya este código Cabys asignado.</span>
 
<span style="font-size: 12pt; font-family: arial, helvetica, sans-serif;"></span>

<span style="font-size: 12pt; font-family: arial, helvetica, sans-serif;">Para elegir el Código de Cabys que desea cargar solamente ocupa hacer doble click sobre la línea que desea y le será presentado el siguiente mensaje:</span>

<span style="font-size: 12pt; font-family: arial, helvetica, sans-serif;"></span>

---

<span style="font-size: 12pt; font-family: arial, helvetica, sans-serif;">En el mantenimiento a productos pantalla principal =&gt; en el submenú Utilitarios/Importar-Exportar podrá localizar la opción para masivamente cargar todos los códigos a los productos de la compañía.</span>

<span style="font-size: 12pt; font-family: arial, helvetica, sans-serif;">Derecho de seguridad requerido "MPRODUCTOS\_CBY"</span>

<span style="font-size: 12pt; font-family: arial, helvetica, sans-serif;"> </span>

</div>

# CRONUS Otros Analisis de credito Aplicar

Desde esta pantalla podrá visualizar lo siguiente:

- Saldos de todas las cuentas por cobrar a la fecha elegida.
- Resumen por cliente, incluyendo Incobrables.
- Bitácora de anotaciones.
 
Con esto desde un solo lugar podrá tener un mejor control del crédito general.

---

Desde CRONUS se debe ingresar al menú = &gt; Otros = &gt; Análisis de Crédito:

 ![](https://ayuda.cronuserp.com/uploads/images/migrated/Screenshot_1.png)En esta pantalla se puede realizar el análisis para esto se debe ingresar la fecha que se desea y presionar "aplicar " :

 ![](https://ayuda.cronuserp.com/uploads/images/migrated/Screenshot_2.png)Una vez presionado el botón de "**Aplicar**" el sistema le cargará toda la información de clientes (pantalla de arriba ) y facturas de crédito ( pantalla de abajo ) esto según el límite de fecha que fue definido en la pantalla anterior:

 [![Screenshot_3.png](https://ayuda.cronuserp.com/uploads/images/gallery/2025-08/scaled-1680-/screenshot-3.png)](https://ayuda.cronuserp.com/uploads/images/gallery/2025-08/screenshot-3.png)Se puede observar tambien en dicha pantalla únicamente los clientes con plan de pagos y/o con plan de pagos con problemas:

 ![](https://ayuda.cronuserp.com/uploads/images/migrated/Screenshot_4.png)<span style="font-size: 12pt;">Para ver las opciones y análisis de crédito detallado desde la pantalla de clientes,haga click <span style="text-decoration: underline;">**[aquí ](https://ayuda.cronuserp.com/books/wiki-cronus-erp/page/Anlisis-de-Crdito-en-pantalla-de-clientes)**</span></span>

# CRONUS Movimientos Documentos Boletas de Despacho

**<span style="font-size: 14pt;">La Boleta de Despacho</span>** tiene como función presentar la información relevante para el despacho de mercadería de las bodegas.

1. La información se presenta en la impresión física y en las pantallas de Alisto
2. Ahora puede enviar links por email o Whatsapp para que el cliente confirme su dirección en Google Maps
3. Puede crear un QR token para que el usuario certifique que puede retirar la mercadería. (**Requiere CRONUS Cs 7.0.4 +**)
 
<span style="font-size: 14pt;">**Derechos y bloqueos**</span>

1. Para Imprimir la boleta requiere "REIMP\_BOLETA1"
2. Reimprimir (2da vez en adelante) requiere "PBDESPACH1"
3. Los datos de entrega solo se habilitan si se elige la 2da alternativa
 
<span style="font-size: 14pt;">**Confirmación de Ubicación Física**</span>

Cuando desea que un cliente le confirme la ubicación física directo en Google Maps para poder pasar el link por Whatsapp al transportista o encargado de entrega, puede hacerlo de la siguiente manera:

1. Confirme que sea de tipo "Entrega" y que ya haya sido incluida la factura
2. Confirme el email del cliente
3. Ahora si desea enviar el LINK de confirmación puede usar cualquiera de las opciones para esto. 
    1. Si usa email, se utiliza el que tiene en pantalla
    2. Si usa LINK se copia a memoria de la PC y con CTRL + V puede pegar en su cuenta de Whatsapp con el contacto
    3. Una vez listo esto el cliente puede hacer un click en el link rellenar sus datos.
    4. Cuando el cliente lo haya confirmado el botón de la derecha cambiará de mensaje a LINK confirmado y ahora presionando sobre este pueden ver el lugar exacto de entrega.
    5. Este link puede ser enviado a otras personas (ya no se puede alterar)
 
**QR Token**

El token de QR (APP ) se utiliza para corroborar el encargado de retiro de \[arte del cliente, si llega una persona a retirar solo con el # de factura/boleta sin el documento físico entonces este debe hacerlo mediante el QR token

Pasos a seguir:

1. Se genera el QR Token en CRONUS
2. Se presiona CTRL + V y este se le envía por email o Whatsapp al cliente
3. El cliente manda este QR a la persona que está recogiendo el material
4. El bodeguero o encargado de entrega debe solicitarlo y usar el APP de Cronus Erp Móvil para leerlo. (Requiere derecho "MBODEGUEROS1")
5. Use el menú de Movimientos / B. Despacho / Consulta 
    1. Use el Botón de QR
    2. Y vea los datos del despacho en la pantalla
    3. Deben usar versión 9.3.47 o superior. (APP )
 
 <table border="0" id="bkmrk--3" style="height: 196px; width: 67.5252%; border-collapse: collapse;"> <tbody> <tr style="height: 196px;"> <td style="width: 50%; border-style: none; height: 196px;"></td> <td style="width: 36.5031%; height: 196px;"></td> </tr> </tbody> </table>

# CRONUS Otros Consulta General de Alertas

<span style="font-size: 12pt; font-family: arial, helvetica, sans-serif;">Dicha pantalla se llama de forma automática al ingresar a CRONUS y CXP en el inicio se sesión.</span>

<span style="font-size: 12pt; font-family: arial, helvetica, sans-serif;">Los derechos asociados a la pantalla de "Consulta General de Alertas" son los siguientes:</span>

- <span style="font-size: 12pt; font-family: arial, helvetica, sans-serif;">Apartados Vencidos "APARTADOS1A".</span>
- <span style="font-size: 12pt; font-family: arial, helvetica, sans-serif;">Topes de Crédito Alcanzados "CREDITO\_REV02" + Opciones Generales con Tope configurado.</span>
- <span style="font-size: 12pt; font-family: arial, helvetica, sans-serif;">Garantías de Crédito Expiradas "RAGARVNC01".</span>
- <span style="font-size: 12pt; font-family: arial, helvetica, sans-serif;">Precios cambiados "RPIMPET2".</span>
- <span style="font-size: 12pt; font-family: arial, helvetica, sans-serif;">Pedidos No Facturados "ALARMPCPNF".</span>
- <span style="font-size: 12pt; font-family: arial, helvetica, sans-serif;">Productos sin Saldo en Exhibición "ALARMPENEX".</span>
- <span style="font-size: 12pt; font-family: arial, helvetica, sans-serif;">Productos en Pedir a Fábrica "PPEDIRFABRICA2".</span>
- <span style="font-size: 12pt; font-family: arial, helvetica, sans-serif;">Documentos Vencidos en CXP "RCXPDOCG1".</span>
 
<span style="font-size: 12pt; font-family: arial, helvetica, sans-serif;">Adicionalmente puede ser accedida (luego de cerrada) desde el menú "OTROS\\Consulta general de Alertas"</span>

<span style="font-size: 12pt; font-family: arial, helvetica, sans-serif;"></span>

# CRONUS-Mantenimiento-Inventario-Productos-relaciones

<span style="font-size: 12pt; font-family: arial, helvetica, sans-serif;">Este proceso nos ayudará con una base para que el usuario en caso de requerir un producto que no tenga disponible la empresa para la venta por faltante de inventario o "X" razón, pueda ofrecerle a su cliente varias opciones en relación al mismo y quizás con una similar o hasta mejor función de lo que el cliente requiere comprar. </span>

<span style="font-size: 12pt; font-family: arial, helvetica, sans-serif;">Desde el mantenimiento de productos, ingresamos al producto que deseamos ingresarle crearle el dato y nos vamos a la sub-pestaña de "relaciones" : </span>

 ![](https://ayuda.cronuserp.com/uploads/images/migrated/Screenshot_2.png)<span style="font-size: 12pt; font-family: arial, helvetica, sans-serif;"></span>

<span style="font-size: 12pt; font-family: arial, helvetica, sans-serif;">En esta pantalla debemos hacer la búsqueda del producto que deseamos relacionar, para ello digitamos palabra clave en el campo y presionamos buscar: </span>

[![Screenshot_3.png](https://ayuda.cronuserp.com/uploads/images/gallery/2025-08/scaled-1680-/screenshot-3.png)](https://ayuda.cronuserp.com/uploads/images/gallery/2025-08/screenshot-3.png)<span style="font-size: 12pt; font-family: arial, helvetica, sans-serif;"></span>

<span style="font-size: 12pt; font-family: arial, helvetica, sans-serif;">De esta manera el sistema nos mostrará toda la información que coincida con la palabra digitada: </span>

 ![](https://ayuda.cronuserp.com/uploads/images/migrated/Screenshot_9.png)<span style="font-size: 12pt; font-family: arial, helvetica, sans-serif;"></span>

<span style="font-size: 12pt; font-family: arial, helvetica, sans-serif;">Aquí únicamente debemos presionar la línea del producto que deseamos ingresar para que quede relacionado, para ellos presionamos con un doble click el producto, con eso el sistema emerge una ventana de confirmación a la cual debemos presionar "aceptar": </span>

 ![](https://ayuda.cronuserp.com/uploads/images/migrated/Screenshot_5.png)<span style="font-size: 12pt; font-family: arial, helvetica, sans-serif;"></span>

<span style="font-size: 12pt; font-family: arial, helvetica, sans-serif;">Posteriormente debemos presionar " aceptar " en la pantalla principal: </span>

 ![](https://ayuda.cronuserp.com/uploads/images/migrated/Screenshot_10.png)<span style="font-size: 12pt; font-family: arial, helvetica, sans-serif;"></span>

<span style="font-size: 12pt; font-family: arial, helvetica, sans-serif;">Con esto, ya quedará ligado en la pantalla de relaciones: </span>

 ![](https://ayuda.cronuserp.com/uploads/images/migrated/Screenshot_7.png)<span style="font-size: 12pt; font-family: arial, helvetica, sans-serif;"></span>

<span style="font-size: 12pt; font-family: arial, helvetica, sans-serif;">Por último, podremos visualizarlo en la pantalla de consulta de saldos: </span>

 ![](https://ayuda.cronuserp.com/uploads/images/migrated/Screenshot_8.png)<span style="font-size: 12pt; font-family: arial, helvetica, sans-serif;"></span>

# CRONUS Otros Ficha Técnica

<span style="font-size: 12pt; font-family: arial, helvetica, sans-serif;">La Ficha Técnica es un link con la información de saldos, precios e imágenes de un producto.</span>

<span style="font-size: 12pt; font-family: arial, helvetica, sans-serif;">Es generado mediante una etiqueta de precios QR en los formatos (configurables en la Sucursal):</span>

- <span style="font-size: 12pt; font-family: arial, helvetica, sans-serif;">12</span>
- <span style="font-size: 12pt; font-family: arial, helvetica, sans-serif;">13</span>
- <span style="font-size: 12pt; font-family: arial, helvetica, sans-serif;">14</span>
 
<span style="font-size: 12pt; font-family: arial, helvetica, sans-serif;">Estas deben ser impresas usando en el submenú de Utilitarios, en el check de "Usar ficha técnica si está disponible", disponible a partir de la versión 7.0.2 y en un futuro cercano en la versión WEB.</span>

<span style="font-size: 12pt; font-family: arial, helvetica, sans-serif;"></span>

El link es dinámico, por lo que, cualquier cambio en la información del producto, se vera reflejado en tiempo en real en la pagina, sin necesidad de generar un nuevo link.  
![Captura de pantalla 2025-03-24 094109.png](/files/CRONUS-Otros-Ficha-Tecnica-WEB/Captura%20de%20pantalla%202025-03-24%20094109.png)

# CRONUS Erp DGT 4.4 Página 2

<p>&nbsp;</p> <p>P&aacute;gina 2, <a href="https://crfusion.editme.com/CRONUSEPDGTD44">ir a la p&aacute;gina 1 aqu&iacute;</a> (145 puntos en total)</p> <table style="height: 3071px; width: 1404px;"> <tbody> <tr style="height: 29px;"> <td style="width: 29.75px; height: 29px; border-color: #000000; border-style: solid; background-color: #298dd9;"> <p><span style="color: #ffffff;"><strong><span style="font-size: 12pt;">#</span></strong></span></p> </td> <td style="width: 445.016px; height: 29px; border-color: #000000; border-style: solid; background-color: #298dd9;"> <p><span style="color: #ffffff;"><strong><span style="font-size: 12pt;">Descripci&oacute;n</span></strong></span></p> </td> <td style="width: 197.438px; text-align: center; height: 29px; border-color: #000000; border-style: solid; background-color: #298dd9;"> <p style="text-align: center;"><span style="color: #ffffff;"><strong><span style="font-size: 12pt;">&iquest;Cliente debe configurar?</span></strong></span></p> </td> <td style="width: 195.438px; text-align: center; height: 29px; border-color: #000000; border-style: solid; background-color: #298dd9;"> <p><span style="color: #ffffff;"><strong><span style="font-size: 12pt;">Pantallas que afecta</span></strong></span></p> </td> <td style="width: 146.344px; border-color: #000000; border-style: solid; text-align: center; background-color: #298dd9; height: 29px;"> <p><span style="color: #ffffff;"><strong><span style="font-size: 12pt;">Finalizado</span></strong></span></p> </td> <td style="width: 389.016px; height: 29px; border-color: #000000; border-style: solid; background-color: #298dd9;"> <p><span style="color: #ffffff;"><strong><span style="font-size: 12pt;">Otras consideraciones</span></strong></span></p> </td> </tr> <tr style="height: 39px;"> <td style="width: 29.75px; height: 39px; border-color: #000000; border-style: solid;"> <p><span style="font-weight: 400;">75</span></p> </td> <td style="width: 445.016px; height: 39px; border-color: #000000; border-style: solid;"> <p><span style="font-weight: 400;">Se modifica en la nota 10.1 el nombre del c&oacute;digo 01 de &ldquo;Compras autorizadas por la Direcci&oacute;n General de Tributaci&oacute;n&rdquo;. (C&oacute;digo Inhabilitado).</span></p> </td> <td style="width: 197.438px; text-align: center; height: 39px; border-color: #000000; border-style: solid;">NO</td> <td style="width: 195.438px; text-align: center; height: 39px; border-color: #000000; border-style: solid;">Exoneraciones</td> <td style="width: 146.344px; border-color: #000000; border-style: solid; text-align: center; height: 39px;">SI</td> <td style="width: 389.016px; height: 39px; border-color: #000000; border-style: solid;">Se cambia la descripci&oacute;n del nodo</td> </tr> <tr style="height: 60px;"> <td style="width: 29.75px; height: 60px; border-color: #000000; border-style: solid;"> <p><span style="font-weight: 400;">76</span></p> </td> <td style="width: 445.016px; height: 60px; border-color: #000000; border-style: solid;"> <p><span style="font-weight: 400;">Se modifica en la nota 10.1 el nombre del c&oacute;digo 04 de &ldquo;Exenciones Direcci&oacute;n General de Hacienda&rdquo; por &ldquo;Exenciones Direcci&oacute;n General de Hacienda Autorizaci&oacute;n Local Gen&eacute;rica&rdquo;.</span></p> </td> <td style="width: 197.438px; text-align: center; height: 60px; border-color: #000000; border-style: solid;">NO</td> <td style="width: 195.438px; text-align: center; height: 60px; border-color: #000000; border-style: solid;">Exoneraciones</td> <td style="width: 146.344px; border-color: #000000; border-style: solid; text-align: center; height: 60px;">SI</td> <td style="width: 389.016px; height: 60px; border-color: #000000; border-style: solid;">&nbsp;</td> </tr> <tr style="height: 60px;"> <td style="width: 29.75px; height: 60px; border-color: #000000; border-style: solid;"> <p><span style="font-weight: 400;">77</span></p> </td> <td style="width: 445.016px; height: 60px; border-color: #000000; border-style: solid;"> <p><span style="font-weight: 400;">Se modifica en la nota 10.1 el nombre del c&oacute;digo 05 de &ldquo;Transitorio V&rdquo; por &ldquo;Exenciones Direcci&oacute;n General de Hacienda Transitorio V (servicios de ingenier&iacute;a, arquitectura, topograf&iacute;a obra civil)&rdquo;. (C&oacute;digo Inhabilitado)</span></p> </td> <td style="width: 197.438px; text-align: center; height: 60px; border-color: #000000; border-style: solid;">NO</td> <td style="width: 195.438px; text-align: center; height: 60px; border-color: #000000; border-style: solid;">Exoneraciones</td> <td style="width: 146.344px; border-color: #000000; border-style: solid; text-align: center; height: 60px;">SI</td> <td style="width: 389.016px; height: 60px; border-color: #000000; border-style: solid;">&nbsp;</td> </tr> <tr style="height: 39px;"> <td style="width: 29.75px; height: 39px; border-color: #000000; border-style: solid;"> <p><span style="font-weight: 400;">78</span></p> </td> <td style="width: 445.016px; height: 39px; border-color: #000000; border-style: solid;"> <p><span style="font-weight: 400;">Se modifica en la nota 10.1 el nombre del c&oacute;digo 06 de &ldquo;Transitorio IX&rdquo; por &ldquo;Servicios tur&iacute;sticos inscritos ante el Instituto Costarricense de Turismo (ICT)&rdquo;. (C&oacute;digo Inhabilitado)&nbsp;</span></p> </td> <td style="width: 197.438px; text-align: center; height: 39px; border-color: #000000; border-style: solid;">NO</td> <td style="width: 195.438px; text-align: center; height: 39px; border-color: #000000; border-style: solid;">Exoneraciones</td> <td style="width: 146.344px; border-color: #000000; border-style: solid; text-align: center; height: 39px;">SI</td> <td style="width: 389.016px; height: 39px; border-color: #000000; border-style: solid;">&nbsp;</td> </tr> <tr style="height: 60px;"> <td style="width: 29.75px; height: 60px; border-color: #000000; border-style: solid;"> <p><span style="font-weight: 400;">79</span></p> </td> <td style="width: 445.016px; height: 60px; border-color: #000000; border-style: solid;"> <p><span style="font-weight: 400;">Se modifica en la nota 10.1 el nombre del c&oacute;digo 07 de &ldquo;Transitorio XVII&rdquo; por &ldquo;Transitorio XVII (Recolecci&oacute;n, Clasificaci&oacute;n, almacenamiento de Reciclaje y reutilizable)&rdquo;. (C&oacute;digo Inhabilitado)&nbsp;</span></p> </td> <td style="width: 197.438px; text-align: center; height: 60px; border-color: #000000; border-style: solid;">NO</td> <td style="width: 195.438px; text-align: center; height: 60px; border-color: #000000; border-style: solid;">Exoneraciones</td> <td style="width: 146.344px; border-color: #000000; border-style: solid; text-align: center; height: 60px;">SI</td> <td style="width: 389.016px; height: 60px; border-color: #000000; border-style: solid;">&nbsp;</td> </tr> <tr style="height: 39px;"> <td style="width: 29.75px; height: 39px; border-color: #000000; border-style: solid;"> <p><span style="font-weight: 400;">80</span></p> </td> <td style="width: 445.016px; height: 39px; border-color: #000000; border-style: solid;"> <p><span style="font-weight: 400;">Se incluye en la nota 10.1 el c&oacute;digo 08 de &ldquo;Exoneraci&oacute;n a Zona Franca&rdquo;.</span></p> </td> <td style="width: 197.438px; text-align: center; height: 39px; border-color: #000000; border-style: solid;">NO</td> <td style="width: 195.438px; text-align: center; height: 39px; border-color: #000000; border-style: solid;">Exoneraciones</td> <td style="width: 146.344px; border-color: #000000; border-style: solid; text-align: center; height: 39px;">SI</td> <td style="width: 389.016px; height: 39px; border-color: #000000; border-style: solid;">&nbsp;</td> </tr> <tr style="height: 39px;"> <td style="width: 29.75px; height: 39px; border-color: #000000; border-style: solid;"> <p><span style="font-weight: 400;">81</span></p> </td> <td style="width: 445.016px; height: 39px; border-color: #000000; border-style: solid;"> <p><span style="font-weight: 400;">Se incluye en la nota 10.1 el c&oacute;digo 09 de &ldquo;Exoneraci&oacute;n de servicios complementarios para la exportaci&oacute;n seg&uacute;n articulo 11 RLIVA&rdquo;.</span></p> </td> <td style="width: 197.438px; text-align: center; height: 39px; border-color: #000000; border-style: solid;">NO</td> <td style="width: 195.438px; text-align: center; height: 39px; border-color: #000000; border-style: solid;">Exoneraciones</td> <td style="width: 146.344px; border-color: #000000; border-style: solid; text-align: center; height: 39px;">SI</td> <td style="width: 389.016px; height: 39px; border-color: #000000; border-style: solid;">&nbsp;</td> </tr> <tr style="height: 39px;"> <td style="width: 29.75px; height: 39px; border-color: #000000; border-style: solid;"> <p><span style="font-weight: 400;">82</span></p> </td> <td style="width: 445.016px; height: 39px; border-color: #000000; border-style: solid;"> <p><span style="font-weight: 400;">Se incluye en la nota 10.1 el c&oacute;digo 10 de &ldquo;&Oacute;rgano de las corporaciones municipales&rdquo;</span></p> </td> <td style="width: 197.438px; text-align: center; height: 39px; border-color: #000000; border-style: solid;">NO</td> <td style="width: 195.438px; text-align: center; height: 39px; border-color: #000000; border-style: solid;">Exoneraciones</td> <td style="width: 146.344px; border-color: #000000; border-style: solid; text-align: center; height: 39px;">SI</td> <td style="width: 389.016px; height: 39px; border-color: #000000; border-style: solid;">&nbsp;</td> </tr> <tr style="height: 60px;"> <td style="width: 29.75px; height: 60px; border-color: #000000; border-style: solid;"> <p><span style="font-weight: 400;">83</span></p> </td> <td style="width: 445.016px; height: 60px; border-color: #000000; border-style: solid;"> <p><span style="font-weight: 400;">Se incluye para la nota 10.1 el c&oacute;digo 11 de &ldquo;Exenciones Direcci&oacute;n General de Hacienda Autorizaci&oacute;n de Impuesto Local Concreta&rdquo; y se incluye notas explicativas al pie de p&aacute;gina para el uso exclusivo del c&oacute;digo 11.</span></p> </td> <td style="width: 197.438px; text-align: center; height: 60px; border-color: #000000; border-style: solid;">NO</td> <td style="width: 195.438px; text-align: center; height: 60px; border-color: #000000; border-style: solid;">Exoneraciones</td> <td style="width: 146.344px; border-color: #000000; border-style: solid; text-align: center; height: 60px;">SI</td> <td style="width: 389.016px; height: 60px; border-color: #000000; border-style: solid;">&nbsp;</td> </tr> <tr style="height: 39px;"> <td style="width: 29.75px; height: 39px; border-color: #000000; border-style: solid;"> <p><span style="font-weight: 400;">84</span></p> </td> <td style="width: 445.016px; height: 39px; border-color: #000000; border-style: solid;"> <p><span style="font-weight: 400;">Se ajusta la etiqueta del campo &ldquo;TipoDocumento&rdquo; a &ldquo;TipoDocumentoEX&rdquo;.</span></p> </td> <td style="width: 197.438px; text-align: center; height: 39px; border-color: #000000; border-style: solid;">NO</td> <td style="width: 195.438px; text-align: center; height: 39px; border-color: #000000; border-style: solid;">NINGUNA</td> <td style="width: 146.344px; border-color: #000000; border-style: solid; text-align: center; height: 39px;">SI</td> <td style="width: 389.016px; height: 39px; border-color: #000000; border-style: solid;">Se ajusta internamente el nombre del nodo en el XML</td> </tr> <tr style="height: 39px;"> <td style="width: 29.75px; height: 39px; border-color: #000000; border-style: solid;"> <p><span style="font-weight: 400;">85</span></p> </td> <td style="width: 445.016px; height: 39px; border-color: #000000; border-style: solid;"> <p><span style="font-weight: 400;">Se incluye el campo &ldquo;Tipo de documento de exoneraci&oacute;n o de autorizaci&oacute;n OTRO&rdquo; de uso obligatorio en caso de utilizar el c&oacute;digo 99 de &ldquo;Otros&rdquo; de la nota 10.1.</span></p> </td> <td style="width: 197.438px; text-align: center; height: 39px; border-color: #000000; border-style: solid;">NO</td> <td style="width: 195.438px; text-align: center; height: 39px; border-color: #000000; border-style: solid;">NINGUNA</td> <td style="width: 146.344px; border-color: #000000; border-style: solid; text-align: center; height: 39px;">SI</td> <td style="width: 389.016px; height: 39px; border-color: #000000; border-style: solid;">Se inserta el nodo en XML&nbsp;con un contenido gen&eacute;rico, esto cuando se utiliza el c&oacute;digo 99 en&nbsp;<span style="font-weight: 400;">TipoDocumentoEX</span></td> </tr> <tr style="height: 60px;"> <td style="width: 29.75px; height: 60px; border-color: #000000; border-style: solid;"> <p><span style="font-weight: 400;">86</span></p> </td> <td style="width: 445.016px; height: 60px; border-color: #000000; border-style: solid;"> <p><span style="font-weight: 400;">Se incluye el campo &ldquo;N&uacute;mero de art&iacute;culo que establece la exoneraci&oacute;n o autorizaci&oacute;n&rdquo; que ser&aacute; de condici&oacute;n obligatoria cuando se usen los c&oacute;digos 02, 03 o 08 de la nota 10.1. P&aacute;gina 7 de 98</span></p> </td> <td style="width: 197.438px; text-align: center; height: 60px; border-color: #000000; border-style: solid;">En caso de requerir</td> <td style="width: 195.438px; text-align: center; height: 60px; border-color: #000000; border-style: solid;">Exoneraciones</td> <td style="width: 146.344px; border-color: #000000; border-style: solid; text-align: center; height: 60px;">SI</td> <td style="width: 389.016px; height: 60px; border-color: #000000; border-style: solid;">Se agrega un nuevo campo en la exoneraci&oacute;n</td> </tr> <tr style="height: 60px;"> <td style="width: 29.75px; height: 60px; border-color: #000000; border-style: solid;"> <p><span style="font-weight: 400;">87</span></p> </td> <td style="width: 445.016px; height: 60px; border-color: #000000; border-style: solid;"> <p><span style="font-weight: 400;">Se incluye el campo &ldquo;N&uacute;mero de inciso que establece la exoneraci&oacute;n o autorizaci&oacute;n&rdquo; que ser&aacute; de condici&oacute;n obligatoria cuando se use el campo &ldquo;N&uacute;mero de art&iacute;culo que establece la exoneraci&oacute;n o autorizaci&oacute;n&rdquo;</span></p> </td> <td style="width: 197.438px; text-align: center; height: 60px; border-color: #000000; border-style: solid;">En caso de requerir</td> <td style="width: 195.438px; text-align: center; height: 60px; border-color: #000000; border-style: solid;">Exoneraciones</td> <td style="width: 146.344px; border-color: #000000; border-style: solid; text-align: center; height: 60px;">SI</td> <td style="width: 389.016px; height: 60px; border-color: #000000; border-style: solid;">Se agrega un nuevo campo en la exoneraci&oacute;n</td> </tr> <tr style="height: 39px;"> <td style="width: 29.75px; height: 39px; border-color: #000000; border-style: solid;"> <p><span style="font-weight: 400;">88</span></p> </td> <td style="width: 445.016px; height: 39px; border-color: #000000; border-style: solid;"> <p><span style="font-weight: 400;">Se ajusta la descripci&oacute;n del campo &ldquo;Nombre de Instituci&oacute;n o dependencia que emiti&oacute; la exoneraci&oacute;n&rdquo; para aplicar la codificaci&oacute;n de la nota 23.</span></p> </td> <td style="width: 197.438px; text-align: center; height: 39px; border-color: #000000; border-style: solid;">NO APLICA</td> <td style="width: 195.438px; text-align: center; height: 39px; border-color: #000000; border-style: solid;">NO APLICA</td> <td style="width: 146.344px; border-color: #000000; border-style: solid; text-align: center; height: 39px;">NO APLICA</td> <td style="width: 389.016px; height: 39px; border-color: #000000; border-style: solid;">&nbsp;</td> </tr> <tr style="height: 39px;"> <td style="width: 29.75px; height: 39px; border-color: #000000; border-style: solid;"> <p><span style="font-weight: 400;">89</span></p> </td> <td style="width: 445.016px; height: 39px; border-color: #000000; border-style: solid;"> <p><span style="font-weight: 400;">Se incluye la nota 23 para el campo &ldquo;Nombre de Instituci&oacute;n o dependencia que emiti&oacute; la exoneraci&oacute;n&rdquo;</span></p> </td> <td style="width: 197.438px; text-align: center; height: 39px; border-color: #000000; border-style: solid;">En caso de requerir</td> <td style="width: 195.438px; text-align: center; height: 39px; border-color: #000000; border-style: solid;">Exoneraciones</td> <td style="width: 146.344px; border-color: #000000; border-style: solid; text-align: center; height: 39px;">SI</td> <td style="width: 389.016px; height: 39px; border-color: #000000; border-style: solid;">Se inactivan todas las exoneraciones, el cliente debe volver a configurar, y elegir la instituci&oacute;n de una lista predefinida por la DGT</td> </tr> <tr style="height: 39px;"> <td style="width: 29.75px; height: 39px; border-color: #000000; border-style: solid;"> <p><span style="font-weight: 400;">90</span></p> </td> <td style="width: 445.016px; height: 39px; border-color: #000000; border-style: solid;"> <p><span style="font-weight: 400;">Se incluye el campo &ldquo;Nombre Instituci&oacute;n Otros&rdquo; que ser&aacute; de condici&oacute;n obligatoria en el caso de utilizar el c&oacute;digo 99 de &ldquo;OTRO&rdquo; de la nota 23</span></p> </td> <td style="width: 197.438px; text-align: center; height: 39px; border-color: #000000; border-style: solid;">NO</td> <td style="width: 195.438px; text-align: center; height: 39px; border-color: #000000; border-style: solid;">NINGUNA</td> <td style="width: 146.344px; border-color: #000000; border-style: solid; text-align: center; height: 39px;">SI</td> <td style="width: 389.016px; height: 39px; border-color: #000000; border-style: solid;">Se inserta el nodo en XML&nbsp;con un contenido gen&eacute;rico, esto cuando se utiliza el c&oacute;digo 99 en el&nbsp;<span style="font-weight: 400;">Nombre de Instituci&oacute;n </span></td> </tr> <tr style="height: 39px;"> <td style="width: 29.75px; height: 39px; border-color: #000000; border-style: solid;"> <p><span style="font-weight: 400;">91</span></p> </td> <td style="width: 445.016px; height: 39px; border-color: #000000; border-style: solid;"> <p><span style="font-weight: 400;">Se ajusta la etiqueta del campo &ldquo;FechaEmision&rdquo; a FechaEmisionEX.</span></p> </td> <td style="width: 197.438px; text-align: center; height: 39px; border-color: #000000; border-style: solid;">NO</td> <td style="width: 195.438px; text-align: center; height: 39px; border-color: #000000; border-style: solid;">NINGUNA</td> <td style="width: 146.344px; border-color: #000000; border-style: solid; text-align: center; height: 39px;">SI</td> <td style="width: 389.016px; height: 39px; border-color: #000000; border-style: solid;">Se ajusta internamente el nombre del nodo en el XML</td> </tr> <tr style="height: 39px;"> <td style="width: 29.75px; height: 39px; border-color: #000000; border-style: solid;"> <p><span style="font-weight: 400;">92</span></p> </td> <td style="width: 445.016px; height: 39px; border-color: #000000; border-style: solid;"> <p><span style="font-weight: 400;">Se ajusta en la descripci&oacute;n del campo &ldquo;Monto del Impuesto Exonerado&rdquo; el c&aacute;lculo al establecido en la bit&aacute;cora del 21 de mayo del 2020.</span></p> </td> <td style="width: 197.438px; text-align: center; height: 39px; border-color: #000000; border-style: solid;">NO APLICA</td> <td style="width: 195.438px; text-align: center; height: 39px; border-color: #000000; border-style: solid;">NO APLICA</td> <td style="width: 146.344px; border-color: #000000; border-style: solid; text-align: center; height: 39px;">NO APLICA</td> <td style="width: 389.016px; height: 39px; border-color: #000000; border-style: solid;">&nbsp;</td> </tr> <tr style="height: 39px;"> <td style="width: 29.75px; height: 39px; border-color: #000000; border-style: solid;"> <p><span style="font-weight: 400;">93</span></p> </td> <td style="width: 445.016px; height: 39px; border-color: #000000; border-style: solid;"> <p><span style="font-weight: 400;">Se incluye el campo &ldquo;Impuestos Asumidos por el Emisor o cobrado a Nivel de F&aacute;brica&rdquo;</span></p> </td> <td style="width: 197.438px; text-align: center; height: 39px; border-color: #000000; border-style: solid;">NO</td> <td style="width: 195.438px; text-align: center; height: 39px; border-color: #000000; border-style: solid;">NINGUNA</td> <td style="width: 146.344px; border-color: #000000; border-style: solid; text-align: center; height: 39px;">SI</td> <td style="width: 389.016px; height: 39px; border-color: #000000; border-style: solid;">Se ajusta internamente el XML para agregar el nodo</td> </tr> <tr style="height: 60px;"> <td style="width: 29.75px; height: 60px; border-color: #000000; border-style: solid;"> <p><span style="font-weight: 400;">94</span></p> </td> <td style="width: 445.016px; height: 60px; border-color: #000000; border-style: solid;"> <p><span style="font-weight: 400;">Se ajusta la descripci&oacute;n sobre el c&aacute;lculo del campo &ldquo;Impuesto Neto&rdquo; incorporando la resta del monto del campo &ldquo;Impuestos Asumidos por el Emisor o cobrado a Nivel de F&aacute;brica&rdquo;.</span></p> </td> <td style="width: 197.438px; text-align: center; height: 60px; border-color: #000000; border-style: solid;">NO APLICA</td> <td style="width: 195.438px; text-align: center; height: 60px; border-color: #000000; border-style: solid;">NO APLICA</td> <td style="width: 146.344px; border-color: #000000; border-style: solid; text-align: center; height: 60px;">NO APLICA</td> <td style="width: 389.016px; height: 60px; border-color: #000000; border-style: solid;">&nbsp;</td> </tr> <tr style="height: 60px;"> <td style="width: 29.75px; height: 60px; border-color: #000000; border-style: solid;"> <p><span style="font-weight: 400;">95</span></p> </td> <td style="width: 445.016px; height: 60px; border-color: #000000; border-style: solid;"> <p><span style="font-weight: 400;">Se ajusta la descripci&oacute;n sobre el c&aacute;lculo del campo &ldquo;Total por L&iacute;nea de Detalle&rdquo; considerando &uacute;nicamente la sumatoria entre el &ldquo;Subtotal&rdquo; y el &ldquo;Impuesto Neto&rdquo; en las reglas de c&aacute;lculo</span></p> </td> <td style="width: 197.438px; text-align: center; height: 60px; border-color: #000000; border-style: solid;">NO</td> <td style="width: 195.438px; text-align: center; height: 60px; border-color: #000000; border-style: solid;">NINGUNA</td> <td style="width: 146.344px; border-color: #000000; border-style: solid; text-align: center; height: 60px;">SI</td> <td style="width: 389.016px; height: 60px; border-color: #000000; border-style: solid;">Se ajusta la formula en el XML</td> </tr> <tr style="height: 39px;"> <td style="width: 29.75px; height: 39px; border-color: #000000; border-style: solid;"> <p><span style="font-weight: 400;">96</span></p> </td> <td style="width: 445.016px; height: 39px; border-color: #000000; border-style: solid;"> <p><span style="font-weight: 400;">Se ajusta la etiqueta del campo &ldquo;TipoDocumento&rdquo; a &ldquo;TipoDocumentoOC&rdquo;</span></p> </td> <td style="width: 197.438px; text-align: center; height: 39px; border-color: #000000; border-style: solid;">NO</td> <td style="width: 195.438px; text-align: center; height: 39px; border-color: #000000; border-style: solid;">NINGUNA</td> <td style="width: 146.344px; border-color: #000000; border-style: solid; text-align: center; height: 39px;">SI</td> <td style="width: 389.016px; height: 39px; border-color: #000000; border-style: solid;">Se ajusta internamente el nombre del nodo en el XML</td> </tr> <tr style="height: 39px;"> <td style="width: 29.75px; height: 39px; border-color: #000000; border-style: solid;"> <p><span style="font-weight: 400;">97</span></p> </td> <td style="width: 445.016px; height: 39px; border-color: #000000; border-style: solid;"> <p><span style="font-weight: 400;">Se ajusta el nombre del campo a &ldquo;Tipo de documento otros cargos&rdquo;.</span></p> </td> <td style="width: 197.438px; text-align: center; height: 39px; border-color: #000000; border-style: solid;">NO APLICA</td> <td style="width: 195.438px; text-align: center; height: 39px; border-color: #000000; border-style: solid;">NO APLICA</td> <td style="width: 146.344px; border-color: #000000; border-style: solid; text-align: center; height: 39px;">NO APLICA</td> <td style="width: 389.016px; height: 39px; border-color: #000000; border-style: solid;">&nbsp;</td> </tr> <tr style="height: 39px;"> <td style="width: 29.75px; height: 39px; border-color: #000000; border-style: solid;"> <p><span style="font-weight: 400;">98</span></p> </td> <td style="width: 445.016px; height: 39px; border-color: #000000; border-style: solid;"> <p><span style="font-weight: 400;">Se incluye el campo &ldquo;Tipo de documento OTRO&rdquo; de uso obligatorio en caso de utilizar el c&oacute;digo 99 de &ldquo;Otros&rdquo; de la nota 16.&nbsp;</span></p> </td> <td style="width: 197.438px; text-align: center; height: 39px; border-color: #000000; border-style: solid;">NO</td> <td style="width: 195.438px; text-align: center; height: 39px; border-color: #000000; border-style: solid;">NINGUNA</td> <td style="width: 146.344px; border-color: #000000; border-style: solid; text-align: center; height: 39px;">SI</td> <td style="width: 389.016px; height: 39px; border-color: #000000; border-style: solid;">Se inserta el nodo en XML&nbsp;con un contenido gen&eacute;rico, esto cuando se utiliza el c&oacute;digo 99 en el&nbsp;<span style="font-weight: 400;">TipoDocumentoOC</span></td> </tr> <tr style="height: 39px;"> <td style="width: 29.75px; height: 39px; border-color: #000000; border-style: solid;"> <p><span style="font-weight: 400;">99</span></p> </td> <td style="width: 445.016px; height: 39px; border-color: #000000; border-style: solid;"> <p><span style="font-weight: 400;">Se crea anidamiento para la identificaci&oacute;n del tercero e incluye el campo denominado &ldquo;Tipo de identificaci&oacute;n del Tercero&rdquo; al nodo de &ldquo;Otros Cargos&rdquo;.</span></p> </td> <td style="width: 197.438px; text-align: center; height: 39px; border-color: #000000; border-style: solid;">NO</td> <td style="width: 195.438px; text-align: center; height: 39px; border-color: #000000; border-style: solid;">NINGUNA</td> <td style="width: 146.344px; border-color: #000000; border-style: solid; text-align: center; height: 39px;">SI</td> <td style="width: 389.016px; height: 39px; border-color: #000000; border-style: solid;">Se ajusta el XML internamente</td> </tr> <tr style="height: 39px;"> <td style="width: 29.75px; height: 39px; border-color: #000000; border-style: solid;"> <p><span style="font-weight: 400;">100</span></p> </td> <td style="width: 445.016px; height: 39px; border-color: #000000; border-style: solid;"> <p><span style="font-weight: 400;">Se ajusta la etiqueta del campo &ldquo;Porcentaje&rdquo; a &ldquo;PorcentajeOC&rdquo;</span></p> </td> <td style="width: 197.438px; text-align: center; height: 39px; border-color: #000000; border-style: solid;">NO APLICA</td> <td style="width: 195.438px; text-align: center; height: 39px; border-color: #000000; border-style: solid;">NO APLICA</td> <td style="width: 146.344px; border-color: #000000; border-style: solid; text-align: center; height: 39px;">NO APLICA</td> <td style="width: 389.016px; height: 39px; border-color: #000000; border-style: solid;">&nbsp;</td> </tr> <tr style="height: 39px;"> <td style="width: 29.75px; height: 39px; border-color: #000000; border-style: solid;"> <p><span style="font-weight: 400;">101</span></p> </td> <td style="width: 445.016px; height: 39px; border-color: #000000; border-style: solid;"> <p><span style="font-weight: 400;">Se ajusta el nombre del campo &ldquo;Porcentaje otros cargos&rdquo;</span></p> </td> <td style="width: 197.438px; text-align: center; height: 39px; border-color: #000000; border-style: solid;">NO APLICA</td> <td style="width: 195.438px; text-align: center; height: 39px; border-color: #000000; border-style: solid;">NO APLICA</td> <td style="width: 146.344px; border-color: #000000; border-style: solid; text-align: center; height: 39px;">NO APLICA</td> <td style="width: 389.016px; height: 39px; border-color: #000000; border-style: solid;">&nbsp;</td> </tr> <tr style="height: 39px;"> <td style="width: 29.75px; height: 39px; border-color: #000000; border-style: solid;"> <p><span style="font-weight: 400;">102</span></p> </td> <td style="width: 445.016px; height: 39px; border-color: #000000; border-style: solid;"> <p><span style="font-weight: 400;">Se incluye en la nota 16 el c&oacute;digo 08 de &ldquo;Dep&oacute;sitos de Garant&iacute;a&rdquo;</span></p> </td> <td style="width: 197.438px; text-align: center; height: 39px; border-color: #000000; border-style: solid;">NO</td> <td style="width: 195.438px; text-align: center; height: 39px; border-color: #000000; border-style: solid;">NINGUNA</td> <td style="width: 146.344px; border-color: #000000; border-style: solid; text-align: center; height: 39px;">SI</td> <td style="width: 389.016px; height: 39px; border-color: #000000; border-style: solid;">&nbsp;</td> </tr> <tr style="height: 39px;"> <td style="width: 29.75px; height: 39px; border-color: #000000; border-style: solid;"> <p><span style="font-weight: 400;">103</span></p> </td> <td style="width: 445.016px; height: 39px; border-color: #000000; border-style: solid;"> <p><span style="font-weight: 400;">Se incluye en la nota 16 el c&oacute;digo 09 de &ldquo;Multas o Penalizaciones&rdquo;</span></p> </td> <td style="width: 197.438px; text-align: center; height: 39px; border-color: #000000; border-style: solid;">NO</td> <td style="width: 195.438px; text-align: center; height: 39px; border-color: #000000; border-style: solid;">NINGUNA</td> <td style="width: 146.344px; border-color: #000000; border-style: solid; text-align: center; height: 39px;">SI</td> <td style="width: 389.016px; height: 39px; border-color: #000000; border-style: solid;">&nbsp;</td> </tr> <tr style="height: 39px;"> <td style="width: 29.75px; height: 39px; border-color: #000000; border-style: solid;"> <p><span style="font-weight: 400;">104</span></p> </td> <td style="width: 445.016px; height: 39px; border-color: #000000; border-style: solid;"> <p><span style="font-weight: 400;">Se incluye en la nota 16 el c&oacute;digo 10 de &ldquo;Intereses Moratorios&rdquo; Resumen del comprobante /Total de comprobante</span></p> </td> <td style="width: 197.438px; text-align: center; height: 39px; border-color: #000000; border-style: solid;">NO</td> <td style="width: 195.438px; text-align: center; height: 39px; border-color: #000000; border-style: solid;">NINGUNA</td> <td style="width: 146.344px; border-color: #000000; border-style: solid; text-align: center; height: 39px;">SI</td> <td style="width: 389.016px; height: 39px; border-color: #000000; border-style: solid;">&nbsp;</td> </tr> <tr style="height: 39px;"> <td style="width: 29.75px; height: 39px; border-color: #000000; border-style: solid;"> <p><span style="font-weight: 400;">105</span></p> </td> <td style="width: 445.016px; height: 39px; border-color: #000000; border-style: solid;"> <p><span style="font-weight: 400;">Se ajusta la condicionalidad del nodo &ldquo;C&oacute;digo y Tipo de Moneda&rdquo; a obligatorio en todos los comprobantes.</span></p> </td> <td style="width: 197.438px; text-align: center; height: 39px; border-color: #000000; border-style: solid;">NO</td> <td style="width: 195.438px; text-align: center; height: 39px; border-color: #000000; border-style: solid;">NINGUNA</td> <td style="width: 146.344px; border-color: #000000; border-style: solid; text-align: center; height: 39px;">SI</td> <td style="width: 389.016px; height: 39px; border-color: #000000; border-style: solid;">Se verifica la obligatoriedad de los nodos en el XML</td> </tr> <tr style="height: 39px;"> <td style="width: 29.75px; height: 39px; border-color: #000000; border-style: solid;"> <p><span style="font-weight: 400;">106</span></p> </td> <td style="width: 445.016px; height: 39px; border-color: #000000; border-style: solid;"> <p><span style="font-weight: 400;">Se ajusta el texto de la nota 13</span></p> </td> <td style="width: 197.438px; text-align: center; height: 39px; border-color: #000000; border-style: solid;">NO APLICA</td> <td style="width: 195.438px; text-align: center; height: 39px; border-color: #000000; border-style: solid;">NO APLICA</td> <td style="width: 146.344px; border-color: #000000; border-style: solid; text-align: center; height: 39px;">NO APLICA</td> <td style="width: 389.016px; height: 39px; border-color: #000000; border-style: solid;">&nbsp;</td> </tr> <tr style="height: 39px;"> <td style="width: 29.75px; height: 39px; border-color: #000000; border-style: solid;"> <p><span style="font-weight: 400;">107</span></p> </td> <td style="width: 445.016px; height: 39px; border-color: #000000; border-style: solid;"> <p><span style="font-weight: 400;">Se ajusta texto en la nota 13.1 actualizando la versi&oacute;n del documento donde se encuentran los c&oacute;digos de moneda &ldquo;Codigodemoneda_V4.4&rdquo;</span></p> </td> <td style="width: 197.438px; text-align: center; height: 39px; border-color: #000000; border-style: solid;">NO APLICA</td> <td style="width: 195.438px; text-align: center; height: 39px; border-color: #000000; border-style: solid;">NO APLICA</td> <td style="width: 146.344px; border-color: #000000; border-style: solid; text-align: center; height: 39px;">NO APLICA</td> <td style="width: 389.016px; height: 39px; border-color: #000000; border-style: solid;">&nbsp;</td> </tr> <tr style="height: 39px;"> <td style="width: 29.75px; height: 39px; border-color: #000000; border-style: solid;"> <p><span style="font-weight: 400;">108</span></p> </td> <td style="width: 445.016px; height: 39px; border-color: #000000; border-style: solid;"> <p><span style="font-weight: 400;">Se ajusta condicionalidad del campo &ldquo;C&oacute;digo de la Moneda&rdquo; a obligatoria en los comprobantes &ldquo;Nota de Cr&eacute;dito Electr&oacute;nica&rdquo; y &ldquo;Nota de D&eacute;bito Electr&oacute;nica&rdquo;</span></p> </td> <td style="width: 197.438px; text-align: center; height: 39px; border-color: #000000; border-style: solid;">NO</td> <td style="width: 195.438px; text-align: center; height: 39px; border-color: #000000; border-style: solid;">NINGUNA</td> <td style="width: 146.344px; border-color: #000000; border-style: solid; text-align: center; height: 39px;">SI</td> <td style="width: 389.016px; height: 39px; border-color: #000000; border-style: solid;">Se verifica la obligatoriedad de los nodos en el XML</td> </tr> <tr style="height: 39px;"> <td style="width: 29.75px; height: 39px; border-color: #000000; border-style: solid;"> <p><span style="font-weight: 400;">109</span></p> </td> <td style="width: 445.016px; height: 39px; border-color: #000000; border-style: solid;"> <p><span style="font-weight: 400;">Se ajusta la descripci&oacute;n y condici&oacute;n del campo &ldquo;Tipo de Cambio&rdquo; a obligatorio en los comprobantes &ldquo;Nota de Cr&eacute;dito Electr&oacute;nica&rdquo; y Nota de D&eacute;bito Electr&oacute;nica&rdquo;</span></p> </td> <td style="width: 197.438px; text-align: center; height: 39px; border-color: #000000; border-style: solid;">NO</td> <td style="width: 195.438px; text-align: center; height: 39px; border-color: #000000; border-style: solid;">NINGUNA</td> <td style="width: 146.344px; border-color: #000000; border-style: solid; text-align: center; height: 39px;">SI</td> <td style="width: 389.016px; height: 39px; border-color: #000000; border-style: solid;">Se verifica la obligatoriedad de los nodos en el XML</td> </tr> <tr style="height: 39px;"> <td style="width: 29.75px; height: 39px; border-color: #000000; border-style: solid;"> <p><span style="font-weight: 400;">110</span></p> </td> <td style="width: 445.016px; height: 39px; border-color: #000000; border-style: solid;"> <p><span style="font-weight: 400;">Se ajusta descripci&oacute;n del campo &ldquo;Total servicios gravados con IVA&rdquo; ampliando la explicaci&oacute;n sobre el c&aacute;lculo del campo</span></p> </td> <td style="width: 197.438px; text-align: center; height: 39px; border-color: #000000; border-style: solid;">NO APLICA</td> <td style="width: 195.438px; text-align: center; height: 39px; border-color: #000000; border-style: solid;">NO APLICA</td> <td style="width: 146.344px; border-color: #000000; border-style: solid; text-align: center; height: 39px;">NO APLICA</td> <td style="width: 389.016px; height: 39px; border-color: #000000; border-style: solid;">&nbsp;</td> </tr> <tr style="height: 39px;"> <td style="width: 29.75px; height: 39px; border-color: #000000; border-style: solid;"> <p><span style="font-weight: 400;">111</span></p> </td> <td style="width: 445.016px; height: 39px; border-color: #000000; border-style: solid;"> <p><span style="font-weight: 400;">Se ajusta descripci&oacute;n del campo &ldquo;Total servicios exentos de IVA&rdquo; ampliando la explicaci&oacute;n sobre el c&aacute;lculo del campo</span></p> </td> <td style="width: 197.438px; text-align: center; height: 39px; border-color: #000000; border-style: solid;">NO APLICA</td> <td style="width: 195.438px; text-align: center; height: 39px; border-color: #000000; border-style: solid;">NO APLICA</td> <td style="width: 146.344px; border-color: #000000; border-style: solid; text-align: center; height: 39px;">NO APLICA</td> <td style="width: 389.016px; height: 39px; border-color: #000000; border-style: solid;">&nbsp;</td> </tr> <tr style="height: 39px;"> <td style="width: 29.75px; height: 39px; border-color: #000000; border-style: solid;"> <p><span style="font-weight: 400;">112</span></p> </td> <td style="width: 445.016px; height: 39px; border-color: #000000; border-style: solid;"> <p><span style="font-weight: 400;">Se incluye el campo &ldquo;Total servicios No Sujetos de IVA&rdquo; con la explicaci&oacute;n sobre el c&aacute;lculo del campo</span></p> </td> <td style="width: 197.438px; text-align: center; height: 39px; border-color: #000000; border-style: solid;">NO</td> <td style="width: 195.438px; text-align: center; height: 39px; border-color: #000000; border-style: solid;">NINGUNA</td> <td style="width: 146.344px; border-color: #000000; border-style: solid; text-align: center; height: 39px;">SI</td> <td style="width: 389.016px; height: 39px; border-color: #000000; border-style: solid;">Se agrega nuevo nodo al XML</td> </tr> <tr style="height: 39px;"> <td style="width: 29.75px; height: 39px; border-color: #000000; border-style: solid;"> <p><span style="font-weight: 400;">113</span></p> </td> <td style="width: 445.016px; height: 39px; border-color: #000000; border-style: solid;"> <p><span style="font-weight: 400;">Se aclara el c&aacute;lculo del campo &ldquo;Total mercanc&iacute;as gravadas con IVA&rdquo; ampliando la explicaci&oacute;n sobre el c&aacute;lculo de campo</span></p> </td> <td style="width: 197.438px; text-align: center; height: 39px; border-color: #000000; border-style: solid;">NO APLICA</td> <td style="width: 195.438px; text-align: center; height: 39px; border-color: #000000; border-style: solid;">NO APLICA</td> <td style="width: 146.344px; border-color: #000000; border-style: solid; text-align: center; height: 39px;">NO APLICA</td> <td style="width: 389.016px; height: 39px; border-color: #000000; border-style: solid;">Se agrega nuevo nodo al XML</td> </tr> <tr style="height: 39px;"> <td style="width: 29.75px; height: 39px; border-color: #000000; border-style: solid;"> <p><span style="font-weight: 400;">114</span></p> </td> <td style="width: 445.016px; height: 39px; border-color: #000000; border-style: solid;"> <p><span style="font-weight: 400;">Se ajusta descripci&oacute;n del campo &ldquo;Total mercanc&iacute;as exentas de IVA&rdquo; ampliando la explicaci&oacute;n sobre el c&aacute;lculo del campo. P&aacute;gina 8 de 98</span></p> </td> <td style="width: 197.438px; text-align: center; height: 39px; border-color: #000000; border-style: solid;">NO APLICA</td> <td style="width: 195.438px; text-align: center; height: 39px; border-color: #000000; border-style: solid;">NO APLICA</td> <td style="width: 146.344px; border-color: #000000; border-style: solid; text-align: center; height: 39px;">NO APLICA</td> <td style="width: 389.016px; height: 39px; border-color: #000000; border-style: solid;">&nbsp;</td> </tr> <tr style="height: 39px;"> <td style="width: 29.75px; height: 39px; border-color: #000000; border-style: solid;"> <p><span style="font-weight: 400;">115</span></p> </td> <td style="width: 445.016px; height: 39px; border-color: #000000; border-style: solid;"> <p><span style="font-weight: 400;">Se ajusta descripci&oacute;n del campo &ldquo;Total mercanc&iacute;as exoneradas de IVA&rdquo; ampliando la explicaci&oacute;n sobre el c&aacute;lculo del campo</span></p> </td> <td style="width: 197.438px; text-align: center; height: 39px; border-color: #000000; border-style: solid;">NO APLICA</td> <td style="width: 195.438px; text-align: center; height: 39px; border-color: #000000; border-style: solid;">NO APLICA</td> <td style="width: 146.344px; border-color: #000000; border-style: solid; text-align: center; height: 39px;">NO APLICA</td> <td style="width: 389.016px; height: 39px; border-color: #000000; border-style: solid;">&nbsp;</td> </tr> <tr style="height: 39px;"> <td style="width: 29.75px; height: 39px; border-color: #000000; border-style: solid;"> <p><span style="font-weight: 400;">116</span></p> </td> <td style="width: 445.016px; height: 39px; border-color: #000000; border-style: solid;"> <p><span style="font-weight: 400;">Se incluye el campo &ldquo;Total mercanc&iacute;as No Sujetas de IVA&rdquo; con la explicaci&oacute;n sobre el c&aacute;lculo del campo</span></p> </td> <td style="width: 197.438px; text-align: center; height: 39px; border-color: #000000; border-style: solid;">NO</td> <td style="width: 195.438px; text-align: center; height: 39px; border-color: #000000; border-style: solid;">NINGUNA</td> <td style="width: 146.344px; border-color: #000000; border-style: solid; text-align: center; height: 39px;">SI</td> <td style="width: 389.016px; height: 39px; border-color: #000000; border-style: solid;">Se agrega nuevo nodo al XML</td> </tr> <tr style="height: 39px;"> <td style="width: 29.75px; height: 39px; border-color: #000000; border-style: solid;"> <p><span style="font-weight: 400;">117</span></p> </td> <td style="width: 445.016px; height: 39px; border-color: #000000; border-style: solid;"> <p><span style="font-weight: 400;">Se incluye el campo &ldquo;Total No Sujeto&rdquo; con la explicaci&oacute;n sobre el c&aacute;lculo del campo</span></p> </td> <td style="width: 197.438px; text-align: center; height: 39px; border-color: #000000; border-style: solid;">NO</td> <td style="width: 195.438px; text-align: center; height: 39px; border-color: #000000; border-style: solid;">NINGUNA</td> <td style="width: 146.344px; border-color: #000000; border-style: solid; text-align: center; height: 39px;">SI</td> <td style="width: 389.016px; height: 39px; border-color: #000000; border-style: solid;">Se agrega nuevo nodo al XML</td> </tr> <tr style="height: 39px;"> <td style="width: 29.75px; height: 39px; border-color: #000000; border-style: solid;"> <p><span style="font-weight: 400;">118</span></p> </td> <td style="width: 445.016px; height: 39px; border-color: #000000; border-style: solid;"> <p><span style="font-weight: 400;">Se ajusta la descripci&oacute;n del campo &ldquo;Total Venta&rdquo; ampliando la explicaci&oacute;n sobre el c&aacute;lculo del campo</span></p> </td> <td style="width: 197.438px; text-align: center; height: 39px; border-color: #000000; border-style: solid;">NO</td> <td style="width: 195.438px; text-align: center; height: 39px; border-color: #000000; border-style: solid;">NINGUNA</td> <td style="width: 146.344px; border-color: #000000; border-style: solid; text-align: center; height: 39px;">SI</td> <td style="width: 389.016px; height: 39px; border-color: #000000; border-style: solid;">Se ajusta la formula del nodo</td> </tr> <tr style="height: 39px;"> <td style="width: 29.75px; height: 39px; border-color: #000000; border-style: solid;"> <p><span style="font-weight: 400;">119</span></p> </td> <td style="width: 445.016px; height: 39px; border-color: #000000; border-style: solid;"> <p><span style="font-weight: 400;">Se ajusta la descripci&oacute;n del campo &ldquo;Total de Impuesto&rdquo; ampliando la explicaci&oacute;n sobre el c&aacute;lculo del campo</span></p> </td> <td style="width: 197.438px; text-align: center; height: 39px; border-color: #000000; border-style: solid;">NO APLICA</td> <td style="width: 195.438px; text-align: center; height: 39px; border-color: #000000; border-style: solid;">NO APLICA</td> <td style="width: 146.344px; border-color: #000000; border-style: solid; text-align: center; height: 39px;">NO APLICA</td> <td style="width: 389.016px; height: 39px; border-color: #000000; border-style: solid;">&nbsp;</td> </tr> <tr style="height: 39px;"> <td style="width: 29.75px; height: 39px; border-color: #000000; border-style: solid;"> <p><span style="font-weight: 400;">120</span></p> </td> <td style="width: 445.016px; height: 39px; border-color: #000000; border-style: solid;"> <p><span style="font-weight: 400;">Se incluye el nodo &ldquo;Total Desglose por Impuesto Cobrado&rdquo; con la explicaci&oacute;n sobre el c&aacute;lculo del campo</span></p> </td> <td style="width: 197.438px; text-align: center; height: 39px; border-color: #000000; border-style: solid;">NO</td> <td style="width: 195.438px; text-align: center; height: 39px; border-color: #000000; border-style: solid;">NINGUNA</td> <td style="width: 146.344px; border-color: #000000; border-style: solid; text-align: center; height: 39px;">SI</td> <td style="width: 389.016px; height: 39px; border-color: #000000; border-style: solid;">Se agrega sumarizaci&oacute;n por tipo de impuesto en el XML.</td> </tr> <tr style="height: 39px;"> <td style="width: 29.75px; height: 39px; border-color: #000000; border-style: solid;"> <p><span style="font-weight: 400;">121</span></p> </td> <td style="width: 445.016px; height: 39px; border-color: #000000; border-style: solid;"> <p><span style="font-weight: 400;">Se ajusta el campo &ldquo;Total de Impuestos Asumidos por el Emisor o cobrado a Nivel de F&aacute;brica&rdquo; con la explicaci&oacute;n sobre el c&aacute;lculo del campo</span></p> </td> <td style="width: 197.438px; text-align: center; height: 39px; border-color: #000000; border-style: solid;">NO APLICA</td> <td style="width: 195.438px; text-align: center; height: 39px; border-color: #000000; border-style: solid;">NO APLICA</td> <td style="width: 146.344px; border-color: #000000; border-style: solid; text-align: center; height: 39px;">NO APLICA</td> <td style="width: 389.016px; height: 39px; border-color: #000000; border-style: solid;">&nbsp;</td> </tr> <tr style="height: 39px;"> <td style="width: 29.75px; height: 39px; border-color: #000000; border-style: solid;"> <p><span style="font-weight: 400;">122</span></p> </td> <td style="width: 445.016px; height: 39px; border-color: #000000; border-style: solid;"> <p><span style="font-weight: 400;">Se incluye en la nota 6 de medios de pago el c&oacute;digo 6 &ldquo;SINPE MOVIL&rdquo;, el c&oacute;digo 07 &ldquo;Plataforma Digital&rdquo;</span></p> </td> <td style="width: 197.438px; text-align: center; height: 39px; border-color: #000000; border-style: solid;">En caso de requerir</td> <td style="width: 195.438px; text-align: center; height: 39px; border-color: #000000; border-style: solid;">Facturaci&oacute;n</td> <td style="width: 146.344px; border-color: #000000; border-style: solid; text-align: center; height: 39px;">SI</td> <td style="width: 389.016px; height: 39px; border-color: #000000; border-style: solid;">Se agregan los nuevos tipos de medios de pago</td> </tr> <tr style="height: 39px;"> <td style="width: 29.75px; height: 39px; border-color: #000000; border-style: solid;"> <p><span style="font-weight: 400;">123</span></p> </td> <td style="width: 445.016px; height: 39px; border-color: #000000; border-style: solid;"> <p><span style="font-weight: 400;">Se incluye el nodo de &ldquo;Medio de Pago&rdquo; con la explicaci&oacute;n sobre el c&aacute;lculo del campo</span></p> </td> <td style="width: 197.438px; text-align: center; height: 39px; border-color: #000000; border-style: solid;">NO</td> <td style="width: 195.438px; text-align: center; height: 39px; border-color: #000000; border-style: solid;">NINGUNA</td> <td style="width: 146.344px; border-color: #000000; border-style: solid; text-align: center; height: 39px;">SI</td> <td style="width: 389.016px; height: 39px; border-color: #000000; border-style: solid;">Se ajusta la nueva estructura del nodo en el XML</td> </tr> <tr style="height: 60px;"> <td style="width: 29.75px; height: 60px; border-color: #000000; border-style: solid;"> <p><span style="font-weight: 400;">124</span></p> </td> <td style="width: 445.016px; height: 60px; border-color: #000000; border-style: solid;"> <p><span style="font-weight: 400;">Se ampl&iacute;a la descripci&oacute;n del campo &ldquo;Total del Comprobante&rdquo; ajustando la regla del campo para que el resultado del c&aacute;lculo coincida con la sumatoria de los montos por &ldquo;Medio de Pago&rdquo;. Informaci&oacute;n de Referencia</span></p> </td> <td style="width: 197.438px; text-align: center; height: 60px; border-color: #000000; border-style: solid;">NO APLICA</td> <td style="width: 195.438px; text-align: center; height: 60px; border-color: #000000; border-style: solid;">NO APLICA</td> <td style="width: 146.344px; border-color: #000000; border-style: solid; text-align: center; height: 60px;">NO APLICA</td> <td style="width: 389.016px; height: 60px; border-color: #000000; border-style: solid;">&nbsp;</td> </tr> <tr style="height: 60px;"> <td style="width: 29.75px; height: 60px; border-color: #000000; border-style: solid;"> <p><span style="font-weight: 400;">125</span></p> </td> <td style="width: 445.016px; height: 60px; border-color: #000000; border-style: solid;"> <p><span style="font-weight: 400;">Se ampl&iacute;a la descripci&oacute;n y se ajusta la condicionalidad del apartado de Informaci&oacute;n de Referencia, en &ldquo;Factura Electr&oacute;nica&rdquo; cuando se utilic&eacute; el c&oacute;digo 11 de la nota 10.1 en el campo &ldquo;&ldquo;Tipo de documento de autorizaci&oacute;n o exoneraci&oacute;n, as&iacute; como en &ldquo;Factura Electr&oacute;nica de Compra&rdquo;</span></p> </td> <td style="width: 197.438px; text-align: center; height: 60px; border-color: #000000; border-style: solid;">NO</td> <td style="width: 195.438px; text-align: center; height: 60px; border-color: #000000; border-style: solid;">NINGUNA</td> <td style="width: 146.344px; border-color: #000000; border-style: solid; text-align: center; height: 60px;">SI</td> <td style="width: 389.016px; height: 60px; border-color: #000000; border-style: solid;">Se verifica la obligatoriedad del nodo en el XML</td> </tr> <tr style="height: 39px;"> <td style="width: 29.75px; height: 39px; border-color: #000000; border-style: solid;"> <p><span style="font-weight: 400;">126</span></p> </td> <td style="width: 445.016px; height: 39px; border-color: #000000; border-style: solid;"> <p><span style="font-weight: 400;">Se ajusta la etiqueta del campo &ldquo;TipoDoc&rdquo; a &ldquo;TipoDocIR&rdquo;</span></p> </td> <td style="width: 197.438px; text-align: center; height: 39px; border-color: #000000; border-style: solid;">NO</td> <td style="width: 195.438px; text-align: center; height: 39px; border-color: #000000; border-style: solid;">NINGUNA</td> <td style="width: 146.344px; border-color: #000000; border-style: solid; text-align: center; height: 39px;">SI</td> <td style="width: 389.016px; height: 39px; border-color: #000000; border-style: solid;">Se ajusta internamente el nombre del nodo en el XML</td> </tr> <tr style="height: 39px;"> <td style="width: 29.75px; height: 39px; border-color: #000000; border-style: solid;"> <p><span style="font-weight: 400;">127</span></p> </td> <td style="width: 445.016px; height: 39px; border-color: #000000; border-style: solid;"> <p><span style="font-weight: 400;">Se incluye el campo &ldquo;Tipo de documento de referencia OTRO&rdquo; de uso obligatorio en caso de utilizar el c&oacute;digo 99 de &ldquo;Otros&rdquo; de la nota 10</span></p> </td> <td style="width: 197.438px; text-align: center; height: 39px; border-color: #000000; border-style: solid;">NO</td> <td style="width: 195.438px; text-align: center; height: 39px; border-color: #000000; border-style: solid;">NINGUNA</td> <td style="width: 146.344px; border-color: #000000; border-style: solid; text-align: center; height: 39px;">SI</td> <td style="width: 389.016px; height: 39px; border-color: #000000; border-style: solid;">Se inserta el nodo en XML&nbsp;con un contenido gen&eacute;rico, esto cuando se utiliza el c&oacute;digo 99 en el <span style="font-weight: 400;">TipoDocIR</span></td> </tr> <tr style="height: 39px;"> <td style="width: 29.75px; height: 39px; border-color: #000000; border-style: solid;"> <p><span style="font-weight: 400;">128</span></p> </td> <td style="width: 445.016px; height: 39px; border-color: #000000; border-style: solid;"> <p><span style="font-weight: 400;">Se ajusta la etiqueta del campo &ldquo;FechaEmision&rdquo; a &ldquo;FechaEmisionIR&rdquo;</span></p> </td> <td style="width: 197.438px; text-align: center; height: 39px; border-color: #000000; border-style: solid;">NO</td> <td style="width: 195.438px; text-align: center; height: 39px; border-color: #000000; border-style: solid;">NINGUNA</td> <td style="width: 146.344px; border-color: #000000; border-style: solid; text-align: center; height: 39px;">SI</td> <td style="width: 389.016px; height: 39px; border-color: #000000; border-style: solid;">Se ajusta internamente el nombre del nodo en el XML</td> </tr> <tr style="height: 39px;"> <td style="width: 29.75px; height: 39px; border-color: #000000; border-style: solid;"> <p><span style="font-weight: 400;">129</span></p> </td> <td style="width: 445.016px; height: 39px; border-color: #000000; border-style: solid;"> <p><span style="font-weight: 400;">Se incluye en la nota 9 el c&oacute;digo 06 &ldquo;Devoluci&oacute;n de mercanc&iacute;a&rdquo;&nbsp;</span></p> </td> <td style="width: 197.438px; text-align: center; height: 39px; border-color: #000000; border-style: solid;">NO</td> <td style="width: 195.438px; text-align: center; height: 39px; border-color: #000000; border-style: solid;">Facturaci&oacute;n, Recepci&oacute;n XML</td> <td style="width: 146.344px; border-color: #000000; border-style: solid; text-align: center; height: 39px;">SI</td> <td style="width: 389.016px; height: 39px; border-color: #000000; border-style: solid;">Se agrega el nuevo c&oacute;digo&nbsp;en el mantenimiento</td> </tr> <tr style="height: 39px;"> <td style="width: 29.75px; height: 39px; border-color: #000000; border-style: solid;"> <p><span style="font-weight: 400;">130</span></p> </td> <td style="width: 445.016px; height: 39px; border-color: #000000; border-style: solid;"> <p><span style="font-weight: 400;">Se incluye en la nota 9 el c&oacute;digo 07 &ldquo;Sustituye Comprobante electr&oacute;nico&rdquo;</span></p> </td> <td style="width: 197.438px; text-align: center; height: 39px; border-color: #000000; border-style: solid;">NO</td> <td style="width: 195.438px; text-align: center; height: 39px; border-color: #000000; border-style: solid;">Facturaci&oacute;n, Recepci&oacute;n XML</td> <td style="width: 146.344px; border-color: #000000; border-style: solid; text-align: center; height: 39px;">SI</td> <td style="width: 389.016px; height: 39px; border-color: #000000; border-style: solid;">Se agrega el nuevo c&oacute;digo&nbsp;en el mantenimiento</td> </tr> <tr style="height: 39px;"> <td style="width: 29.75px; height: 39px; border-color: #000000; border-style: solid;"> <p><span style="font-weight: 400;">131</span></p> </td> <td style="width: 445.016px; height: 39px; border-color: #000000; border-style: solid;"> <p><span style="font-weight: 400;">Se incluye en la nota 9 el c&oacute;digo 08 &ldquo;Factura Endosada&rdquo;</span></p> </td> <td style="width: 197.438px; text-align: center; height: 39px; border-color: #000000; border-style: solid;">NO</td> <td style="width: 195.438px; text-align: center; height: 39px; border-color: #000000; border-style: solid;">Facturaci&oacute;n, Recepci&oacute;n XML</td> <td style="width: 146.344px; border-color: #000000; border-style: solid; text-align: center; height: 39px;">SI</td> <td style="width: 389.016px; height: 39px; border-color: #000000; border-style: solid;">Se agrega el nuevo c&oacute;digo&nbsp;en el mantenimiento</td> </tr> <tr style="height: 39px;"> <td style="width: 29.75px; height: 39px; border-color: #000000; border-style: solid;"> <p><span style="font-weight: 400;">132</span></p> </td> <td style="width: 445.016px; height: 39px; border-color: #000000; border-style: solid;"> <p><span style="font-weight: 400;">Se incluye en la nota 9 el c&oacute;digo 09 &ldquo;Nota de cr&eacute;dito financiera&rdquo;</span></p> </td> <td style="width: 197.438px; text-align: center; height: 39px; border-color: #000000; border-style: solid;">NO</td> <td style="width: 195.438px; text-align: center; height: 39px; border-color: #000000; border-style: solid;">Facturaci&oacute;n, Recepci&oacute;n XML</td> <td style="width: 146.344px; border-color: #000000; border-style: solid; text-align: center; height: 39px;">SI</td> <td style="width: 389.016px; height: 39px; border-color: #000000; border-style: solid;">Se agrega el nuevo c&oacute;digo&nbsp;en el mantenimiento</td> </tr> <tr style="height: 39px;"> <td style="width: 29.75px; height: 39px; border-color: #000000; border-style: solid;"> <p><span style="font-weight: 400;">133</span></p> </td> <td style="width: 445.016px; height: 39px; border-color: #000000; border-style: solid;"> <p><span style="font-weight: 400;">Se incluye en la nota 9 el c&oacute;digo 10 &ldquo;Nota de d&eacute;bito financiera&rdquo;</span></p> </td> <td style="width: 197.438px; text-align: center; height: 39px; border-color: #000000; border-style: solid;">NO</td> <td style="width: 195.438px; text-align: center; height: 39px; border-color: #000000; border-style: solid;">Facturaci&oacute;n, Recepci&oacute;n XML</td> <td style="width: 146.344px; border-color: #000000; border-style: solid; text-align: center; height: 39px;">SI</td> <td style="width: 389.016px; height: 39px; border-color: #000000; border-style: solid;">Se agrega el nuevo c&oacute;digo&nbsp;en el mantenimiento</td> </tr> <tr style="height: 39px;"> <td style="width: 29.75px; height: 39px; border-color: #000000; border-style: solid;"> <p><span style="font-weight: 400;">134</span></p> </td> <td style="width: 445.016px; height: 39px; border-color: #000000; border-style: solid;"> <p><span style="font-weight: 400;">Se incluye en la nota 9 el c&oacute;digo 11 &ldquo;Proveedor No Domiciliado&rdquo;</span></p> </td> <td style="width: 197.438px; text-align: center; height: 39px; border-color: #000000; border-style: solid;">NO</td> <td style="width: 195.438px; text-align: center; height: 39px; border-color: #000000; border-style: solid;">Facturaci&oacute;n, Recepci&oacute;n XML</td> <td style="width: 146.344px; border-color: #000000; border-style: solid; text-align: center; height: 39px;">SI</td> <td style="width: 389.016px; height: 39px; border-color: #000000; border-style: solid;">Se agrega el nuevo c&oacute;digo&nbsp;en el mantenimiento</td> </tr> <tr style="height: 39px;"> <td style="width: 29.75px; height: 39px; border-color: #000000; border-style: solid;"> <p><span style="font-weight: 400;">135</span></p> </td> <td style="width: 445.016px; height: 39px; border-color: #000000; border-style: solid;"> <p><span style="font-weight: 400;">Se incluye en la nota 9 el c&oacute;digo 12 &ldquo;Cr&eacute;dito por exoneraci&oacute;n posterior a la facturaci&oacute;n&rdquo;</span></p> </td> <td style="width: 197.438px; text-align: center; height: 39px; border-color: #000000; border-style: solid;">NO</td> <td style="width: 195.438px; text-align: center; height: 39px; border-color: #000000; border-style: solid;">Facturaci&oacute;n, Recepci&oacute;n XML</td> <td style="width: 146.344px; border-color: #000000; border-style: solid; text-align: center; height: 39px;">SI</td> <td style="width: 389.016px; height: 39px; border-color: #000000; border-style: solid;">Se agrega el nuevo c&oacute;digo en el mantenimiento</td> </tr> <tr style="height: 39px;"> <td style="width: 29.75px; height: 39px; border-color: #000000; border-style: solid;"> <p><span style="font-weight: 400;">136</span></p> </td> <td style="width: 445.016px; height: 39px; border-color: #000000; border-style: solid;"> <p><span style="font-weight: 400;">Se incluye el campo &ldquo;C&oacute;digo de referencia OTRO&rdquo; de uso obligatorio en caso de utilizar el c&oacute;digo 99 de la nota 9.</span></p> </td> <td style="width: 197.438px; text-align: center; height: 39px; border-color: #000000; border-style: solid;">NO</td> <td style="width: 195.438px; text-align: center; height: 39px; border-color: #000000; border-style: solid;">NINGUNA</td> <td style="width: 146.344px; border-color: #000000; border-style: solid; text-align: center; height: 39px;">SI</td> <td style="width: 389.016px; height: 39px; border-color: #000000; border-style: solid;">Se inserta el nodo en XML&nbsp;con un contenido gen&eacute;rico, esto cuando se utiliza el c&oacute;digo 99 en el <span style="font-weight: 400;">CodigoRef</span></td> </tr> <tr style="height: 39px;"> <td style="width: 29.75px; height: 39px; border-color: #000000; border-style: solid;"> <p><span style="font-weight: 400;">137</span></p> </td> <td style="width: 445.016px; height: 39px; border-color: #000000; border-style: solid;"> <p><span style="font-weight: 400;">Se inhabilita en la nota 10 el c&oacute;digo &ldquo;Devoluci&oacute;n mercader&iacute;a&rdquo; y se incluye notas explicativas al pie de p&aacute;gina</span></p> </td> <td style="width: 197.438px; text-align: center; height: 39px; border-color: #000000; border-style: solid;">NO APLICA</td> <td style="width: 195.438px; text-align: center; height: 39px; border-color: #000000; border-style: solid;">NO APLICA</td> <td style="width: 146.344px; border-color: #000000; border-style: solid; text-align: center; height: 39px;">NO APLICA</td> <td style="width: 389.016px; height: 39px; border-color: #000000; border-style: solid;">&nbsp;</td> </tr> <tr style="height: 60px;"> <td style="width: 29.75px; height: 60px; border-color: #000000; border-style: solid;"> <p><span style="font-weight: 400;">138</span></p> </td> <td style="width: 445.016px; height: 60px; border-color: #000000; border-style: solid;"> <p><span style="font-weight: 400;">Se ajusta en la nota 10 el nombre del c&oacute;digo 10 &ldquo;Sustituye factura rechazada por el Ministerio de Hacienda&rdquo; por &ldquo;Comprobante electr&oacute;nico rechazado por el Ministerio de Hacienda&rdquo;</span></p> </td> <td style="width: 197.438px; text-align: center; height: 60px; border-color: #000000; border-style: solid;">NO</td> <td style="width: 195.438px; text-align: center; height: 60px; border-color: #000000; border-style: solid;">NCs, Recepci&oacute;n XML</td> <td style="width: 146.344px; border-color: #000000; border-style: solid; text-align: center; height: 60px;">SI</td> <td style="width: 389.016px; height: 60px; border-color: #000000; border-style: solid;">Se modifica el nombre del codigo</td> </tr> <tr style="height: 60px;"> <td style="width: 29.75px; height: 60px; border-color: #000000; border-style: solid;"> <p><span style="font-weight: 400;">139</span></p> </td> <td style="width: 445.016px; height: 60px; border-color: #000000; border-style: solid;"> <p><span style="font-weight: 400;">Se ajusta en la nota 10 el nombre del c&oacute;digo 14 &ldquo;Comprobante aportado por contribuyente del R&eacute;gimen de Tributaci&oacute;n Simplificado&rdquo; por &ldquo;Comprobante aportado por contribuyente de R&eacute;gimen Especial&rdquo;</span></p> </td> <td style="width: 197.438px; text-align: center; height: 60px; border-color: #000000; border-style: solid;">NO</td> <td style="width: 195.438px; text-align: center; height: 60px; border-color: #000000; border-style: solid;">NCs, Recepci&oacute;n XML</td> <td style="width: 146.344px; border-color: #000000; border-style: solid; text-align: center; height: 60px;">SI</td> <td style="width: 389.016px; height: 60px; border-color: #000000; border-style: solid;">Se modifica el nombre del codigo</td> </tr> <tr style="height: 39px;"> <td style="width: 29.75px; height: 39px; border-color: #000000; border-style: solid;"> <p><span style="font-weight: 400;">140</span></p> </td> <td style="width: 445.016px; height: 39px; border-color: #000000; border-style: solid;"> <p><span style="font-weight: 400;">Se incluye en la nota 10 el c&oacute;digo 16 &ldquo;Comprobante de Proveedor No Domiciliado&rdquo;. P&aacute;gina 9 de 98</span></p> </td> <td style="width: 197.438px; text-align: center; height: 39px; border-color: #000000; border-style: solid;">NO</td> <td style="width: 195.438px; text-align: center; height: 39px; border-color: #000000; border-style: solid;">NCs, Recepci&oacute;n XML</td> <td style="width: 146.344px; border-color: #000000; border-style: solid; text-align: center; height: 39px;">SI</td> <td style="width: 389.016px; height: 39px; border-color: #000000; border-style: solid;">Se agrega el c&oacute;digo nuevo</td> </tr> <tr style="height: 39px;"> <td style="width: 29.75px; height: 39px; border-color: #000000; border-style: solid;"> <p><span style="font-weight: 400;">141</span></p> </td> <td style="width: 445.016px; height: 39px; border-color: #000000; border-style: solid;"> <p><span style="font-weight: 400;">Se incluye en la nota 10 el c&oacute;digo 17 &ldquo;Nota de Cr&eacute;dito a Factura Electr&oacute;nica de Compra&rdquo;</span></p> </td> <td style="width: 197.438px; text-align: center; height: 39px; border-color: #000000; border-style: solid;">NO</td> <td style="width: 195.438px; text-align: center; height: 39px; border-color: #000000; border-style: solid;">NCs, Recepci&oacute;n XML</td> <td style="width: 146.344px; border-color: #000000; border-style: solid; text-align: center; height: 39px;">SI</td> <td style="width: 389.016px; height: 39px; border-color: #000000; border-style: solid;">Se agrega el c&oacute;digo nuevo</td> </tr> <tr style="height: 39px;"> <td style="width: 29.75px; height: 39px; border-color: #000000; border-style: solid;"> <p><span style="font-weight: 400;">142</span></p> </td> <td style="width: 445.016px; height: 39px; border-color: #000000; border-style: solid;"> <p><span style="font-weight: 400;">Se incluye en la nota 10 el c&oacute;digo 18 &ldquo;Nota de D&eacute;bito a Factura Electr&oacute;nica de Compra&rdquo; Otros ( Uso comercial, no tributario.)&nbsp;</span></p> </td> <td style="width: 197.438px; text-align: center; height: 39px; border-color: #000000; border-style: solid;">NO</td> <td style="width: 195.438px; text-align: center; height: 39px; border-color: #000000; border-style: solid;">NCs, Recepci&oacute;n XML</td> <td style="width: 146.344px; border-color: #000000; border-style: solid; text-align: center; height: 39px;">SI</td> <td style="width: 389.016px; height: 39px; border-color: #000000; border-style: solid;">Se agrega el c&oacute;digo nuevo</td> </tr> <tr style="height: 39px;"> <td style="width: 29.75px; height: 39px; border-color: #000000; border-style: solid;"> <p><span style="font-weight: 400;">143</span></p> </td> <td style="width: 445.016px; height: 39px; border-color: #000000; border-style: solid;"> <p><span style="font-weight: 400;">Se ajusta el tama&ntilde;o del campo &ldquo;Otro Texto&rdquo; a 500 caracteres</span></p> </td> <td style="width: 197.438px; text-align: center; height: 39px; border-color: #000000; border-style: solid;">NO APLICA</td> <td style="width: 195.438px; text-align: center; height: 39px; border-color: #000000; border-style: solid;">NO APLICA</td> <td style="width: 146.344px; border-color: #000000; border-style: solid; text-align: center; height: 39px;">NO APLICA</td> <td style="width: 389.016px; height: 39px; border-color: #000000; border-style: solid;">&nbsp;</td> </tr> <tr style="height: 39px;"> <td style="width: 29.75px; height: 39px; border-color: #000000; border-style: solid;"> <p><span style="font-weight: 400;">144</span></p> </td> <td style="width: 445.016px; height: 39px; border-color: #000000; border-style: solid;"> <p><span style="font-weight: 400;">Se ajusta el tipo y tama&ntilde;o del campo &ldquo;Otro Contenido&rdquo; a String y 500 caracteres. Mecanismo de Seguridad</span></p> </td> <td style="width: 197.438px; text-align: center; height: 39px; border-color: #000000; border-style: solid;">NO APLICA</td> <td style="width: 195.438px; text-align: center; height: 39px; border-color: #000000; border-style: solid;">NO APLICA</td> <td style="width: 146.344px; border-color: #000000; border-style: solid; text-align: center; height: 39px;">NO APLICA</td> <td style="width: 389.016px; height: 39px; border-color: #000000; border-style: solid;">&nbsp;</td> </tr> <tr style="height: 60px;"> <td style="width: 29.75px; height: 60px; border-color: #000000; border-style: solid;"> <p><span style="font-weight: 400;">145</span></p> </td> <td style="width: 445.016px; height: 60px; border-color: #000000; border-style: solid;"> <p><span style="font-weight: 400;">Se ajusta la descripci&oacute;n del nodo de firma actual, ampliando el uso del est&aacute;ndar actual permitiendo la inclusi&oacute;n de la firma de receptor en comprobantes a cr&eacute;dito y las firmas para endoso.</span></p> </td> <td style="width: 197.438px; text-align: center; height: 60px; border-color: #000000; border-style: solid;">NO APLICA</td> <td style="width: 195.438px; text-align: center; height: 60px; border-color: #000000; border-style: solid;">NO APLICA</td> <td style="width: 146.344px; border-color: #000000; border-style: solid; text-align: center; height: 60px;">NO APLICA</td> <td style="width: 389.016px; height: 60px; border-color: #000000; border-style: solid;">&nbsp;</td> </tr> </tbody> </table> <p>&nbsp;</p>

# CRONUS Mantenimientos Inventarios Rango-de-costos de productos

<span style="font-size: 12pt; font-family: arial, helvetica, sans-serif;">Para ingresar a esta opción y realizar la carga masiva de rango de costos, ingresamos a Mantenimientos =&gt; Inventarios =&gt; Rango de costos de productos:</span>

 ![](https://ayuda.cronuserp.com/uploads/images/migrated/Screenshot_5.png)<span style="font-size: 12pt; font-family: arial, helvetica, sans-serif;"></span>

<span style="font-size: 12pt; font-family: arial, helvetica, sans-serif;">Una vez aquí, tendremos las opciones de "Importar" - "Exportar" según lo necesitemos, con esto presionamos la que requerimos. En el caso de importar debemos cumplir con las columnas que nos indica el sistema para no tener problemas al realizar la carga. </span>

 ![](https://ayuda.cronuserp.com/uploads/images/migrated/Screenshot_6.png)<span style="font-size: 12pt; font-family: arial, helvetica, sans-serif;"></span>

<span style="font-size: 12pt; font-family: arial, helvetica, sans-serif;">Por ejemplo, si necesitamos importar el XLS que vamos a subir debe cumplir estrictamente con estas columnas: </span>

 ![](https://ayuda.cronuserp.com/uploads/images/migrated/Screenshot_7.png)<span style="font-size: 12pt; font-family: arial, helvetica, sans-serif;"></span>

# CRONUS Otros Órdenes de compra

<span style="font-size: 12pt; font-family: arial, helvetica, sans-serif;">**Otros cambios asociados**</span>

- <span style="font-size: 12pt; font-family: arial, helvetica, sans-serif;">[Distribución de Fletes](https://ayuda.cronuserp.com/books/wiki-cronus-erp/page/CRONUS-CXP-OrdenCompra-Flete)</span>
 
<span style="font-size: 12pt; font-family: arial, helvetica, sans-serif;">**Puntos importantes a tomar en cuenta:** </span>

- <span style="font-size: 12pt; font-family: arial, helvetica, sans-serif;">No se pueden eliminar las ordenes de compra.</span>
- <span style="font-size: 12pt; font-family: arial, helvetica, sans-serif;">No se puede anular si ya tienen documentos ligados.</span>
- <span style="font-size: 12pt; font-family: arial, helvetica, sans-serif;">No se puede modificar si ya la orden fue aprobada e impresa. </span>
- <span style="font-size: 12pt; font-family: arial, helvetica, sans-serif;">Una vez incluida la orden de compra debe ser Aprobada e Impresa por el usuario para poder llevar a cabo la siguiente acción con esta ya sea ligarla a una importación o a una factura directamente. </span>
- <span style="font-size: 12pt; font-family: arial, helvetica, sans-serif;">La fecha no puede ser modificada. ( Queda al día de la inclusión ).</span>
- <span style="font-size: 12pt; font-family: arial, helvetica, sans-serif;">Existen dos tipos de orden de compra: </span>
 
1. <span style="font-size: 12pt; font-family: arial, helvetica, sans-serif;">**STOCK:** Para entrada a inventario y/o importación. </span>
2. <span style="font-size: 12pt; font-family: arial, helvetica, sans-serif;">**Artículos de oficina:** Para compras administrativas ( que no les va a afectar inventarios ).</span>
 
<span style="font-size: 12pt; font-family: arial, helvetica, sans-serif;">Ingresamos al menú de Otros =&gt; Órdenes de compra: </span>

 ![](https://ayuda.cronuserp.com/uploads/images/migrated/Screenshot_1.png)<span style="font-size: 12pt; font-family: arial, helvetica, sans-serif;"></span>

<span style="font-size: 12pt; font-family: arial, helvetica, sans-serif;">Una vez acá el sistema nos muestra la lista principal de ordenes de compra donde podremos visualizar las ordenes incluïdas en sistema , y ahí presionamos Incluir para agregar una nueva: </span>

[![Screenshot_14.png](https://ayuda.cronuserp.com/uploads/images/gallery/2025-08/scaled-1680-/screenshot-14.png)](https://ayuda.cronuserp.com/uploads/images/gallery/2025-08/screenshot-14.png)<span style="font-size: 12pt; font-family: arial, helvetica, sans-serif;"></span>

<span style="font-size: 12pt; font-family: arial, helvetica, sans-serif;">En la pantalla de inclusión, debemos llenar los campos requeridos y presionar aceptar una vez completado el encabezado de la OC para que el sistema habilite la pestaña de los productos a incluir en la orden de compra: </span>

<span style="font-size: 12pt; font-family: arial, helvetica, sans-serif;">**Proveedor, Bodega, Moneda, Naviera e Incoterm ( en caso de ser orden de compra para importación )** , Fecha de arribo ( ETA ) al menos una aproximada si fuera el caso que no se tiene exacta. </span>

[![Screenshot_15.png](https://ayuda.cronuserp.com/uploads/images/gallery/2025-08/scaled-1680-/screenshot-15.png)](https://ayuda.cronuserp.com/uploads/images/gallery/2025-08/screenshot-15.png)[![Screenshot_16.png](https://ayuda.cronuserp.com/uploads/images/gallery/2025-08/scaled-1680-/screenshot-16.png)](https://ayuda.cronuserp.com/uploads/images/gallery/2025-08/screenshot-16.png)<span style="font-size: 12pt; font-family: arial, helvetica, sans-serif;"></span>

<span style="font-size: 12pt; font-family: arial, helvetica, sans-serif;">Una vez en la pantalla de productos, se presiona incluir para ingresarlos. Con palabras claves podemos buscar los productos y mediante un doble click los seleccionamos para posicionarlos en la pantalla de abajo e ingresar la cantidad que corresponde y presionamos aceptar para que el sistema los incluya, y así sucesivamente en caso de tener más de un producto por incluir: </span>

<span style="font-size: 12pt; font-family: arial, helvetica, sans-serif;"></span>

<span style="font-size: 12pt; font-family: arial, helvetica, sans-serif;">Posteriormente le daremos "**aceptar**" a la pantalla principal para que la orden quede incluida como corresponde: </span>

[![Screenshot_17.png](https://ayuda.cronuserp.com/uploads/images/gallery/2025-08/scaled-1680-/screenshot-17.png)](https://ayuda.cronuserp.com/uploads/images/gallery/2025-08/screenshot-17.png)[![Screenshot_18.png](https://ayuda.cronuserp.com/uploads/images/gallery/2025-08/scaled-1680-/screenshot-18.png)](https://ayuda.cronuserp.com/uploads/images/gallery/2025-08/screenshot-18.png)<span style="font-size: 12pt; font-family: arial, helvetica, sans-serif;"></span>

<span style="font-size: 12pt; font-family: arial, helvetica, sans-serif;">Una vez incluida la orden de compra al sistema, debemos Aprobar e Imprimir la misma: </span>

<span style="font-size: 12pt; font-family: arial, helvetica, sans-serif;"></span>

[![Screenshot_19.png](https://ayuda.cronuserp.com/uploads/images/gallery/2025-08/scaled-1680-/screenshot-19.png)](https://ayuda.cronuserp.com/uploads/images/gallery/2025-08/screenshot-19.png)<span style="font-size: 12pt; font-family: arial, helvetica, sans-serif;"></span>

<span style="font-size: 12pt; font-family: arial, helvetica, sans-serif;">Ya con estos pasos concluidos, nuestra OC estará lista para ser ligada a una importación o factura del sistema. </span>

# CRONUS Otros Pedir a fábrica

<span style="font-size: 12pt; font-family: arial, helvetica, sans-serif;">En la pantalla de "Pedir a Fábrica" podrá localizar todos los productos que necesitan ser abastecidos por proveeduría. Dentro de ella podrá crear una Orden de Compra nueva o asociar productos a una ya existente.</span>

<span style="font-size: 12pt; font-family: arial, helvetica, sans-serif;">**Filtros en pantalla (Versión 6.3.4 +)**</span>

<span style="font-size: 12pt; font-family: arial, helvetica, sans-serif;">Adicional a los filtros tradicionales en el grid (Columnas de la lista), podrá contar con los filtros adicionales en el submenú "VER", ellos son:</span>

1. <span style="font-size: 12pt; font-family: arial, helvetica, sans-serif;">Ver productos sin O.C. (marcado por defecto): Permite ver solo las líneas que NO se han solicitado.</span>
2. <span style="font-size: 12pt; font-family: arial, helvetica, sans-serif;">Ver SOLO líneas de pronóstico (desmarcado por defecto) : Permite ver solamente las líneas que no tengan Nota de Pedido asociado, en otras palabras que se hayan generado desde el Pronóstico.</span>

<span style="font-size: 12pt; font-family: arial, helvetica, sans-serif;">**Pedir a Fábrica desde Pronóstico (Versión 6.3.4 +)**</span>

<span style="font-size: 12pt; font-family: arial, helvetica, sans-serif;">El proceso de insertar líneas de Pedir a Fábrica desde el Pronóstico depende de que este haya sido calculado inicialmente, puede ver como calcular el [pronóstico aquí](https://ayuda.cronuserp.com/books/wiki-cronus-erp/page/CRONUS-Otros-Pronostico-de-inventario-Avanzado).</span>

<span style="font-size: 12pt; font-family: arial, helvetica, sans-serif;">Las dos opciones son las siguientes:</span>

<span style="font-size: 12pt; font-family: arial, helvetica, sans-serif;">El proceso tiene los siguientes parámetros :</span>

<table border="0" id="bkmrk-opcionales-producto-" style="width: 100%; border-collapse: collapse;"><tbody><tr><td style="width: 40.5932%;"> </td><td style="width: 59.4068%;"><span style="font-size: 12pt; font-family: arial, helvetica, sans-serif;">**Opcionales**</span>

1. <span style="font-size: 12pt; font-family: arial, helvetica, sans-serif;">Producto específico</span>
2. <span style="font-size: 12pt; font-family: arial, helvetica, sans-serif;">Proveedor específico</span>
3. <span style="font-size: 12pt; font-family: arial, helvetica, sans-serif;">Marca específica</span>
4. <span style="font-size: 12pt; font-family: arial, helvetica, sans-serif;">Familia específica</span>

<span style="font-size: 12pt; font-family: arial, helvetica, sans-serif;">**Variables**</span>

1. <span style="font-size: 12pt; font-family: arial, helvetica, sans-serif;">El mínimo y el punto de reorden son valores distintos, y los dos pueden ser usados</span>
2. <span style="font-size: 12pt; font-family: arial, helvetica, sans-serif;">El embalaje depende de la configuración del producto, el mínimo de compra a proveedor y el Múltiplo de compra se definen por cada uno en otra pantalla.</span>
3. <span style="font-size: 12pt; font-family: arial, helvetica, sans-serif;">El proceso se puede ejecutar para todas las Sucursales que tengan Zonas de Pronóstico a la vez, pero si lo desmarca se usa la Sucursal que se tenga cargada en la pantalla anterior.</span>

</td></tr></tbody></table>

<span style="font-size: 12pt; font-family: arial, helvetica, sans-serif;">En esta pantalla puede presionar el botón "**Aceptar**" para generar los productos inmediatamente, o usar el botón "**Pruebas**" que generará un archivo XLS en donde puede tener un preliminar de lo que se va a ejecutar.</span>

<span style="font-size: 12pt; font-family: arial, helvetica, sans-serif;">Todas las líneas incluidas desde el Pronóstico tendrán como origen "PedidoAutoCRONUS". </span>

<span style="font-size: 12pt; font-family: arial, helvetica, sans-serif;">**Crear Orden de Compra:**</span>

<span style="font-size: 12pt; font-family: arial, helvetica, sans-serif;">Elija el proveedor de la lista y marque todas las filas que desea generar (la pantalla tiene un tope de líneas en pantalla).</span>

<span style="font-size: 12pt; font-family: arial, helvetica, sans-serif;">Si presiona "Nueva" F2 se generará una nueva orden, si presiona "otra" F3 podrá digitar el # de Orden en la que desea adicionar las filas.</span>

# cronuserp-centralip-configurar

1. Bajar el Microsip en la PC =&gt; [https://www.microsip.org/downloads](https://www.microsip.org/downloads)
    1. Versión completa o Lite.
    2. La actual 3.21.6 al 2025-08-08
2. Instale en su PC 
    1. Agregue los datos a la cuenta que han sido proporcionados por la administración
    2. Ver ejemplos abajo.
 
 <table border="1" id="bkmrk-%C2%A0-%C2%A0-%C2%A0" style="border-collapse: collapse; width: 100%;"> <tbody> <tr> <td style="width: 33.3333%;"></td> <td style="width: 33.3333%;"></td> <td style="width: 33.3333%;"></td> </tr> <tr> <td style="width: 33.3333%;"> </td> <td style="width: 33.3333%;"> </td> <td style="width: 33.3333%;"> </td> </tr> </tbody> </table>

# Principales Cambios DGT 4.4

- <span style="font-size: 14pt;">**Descuentos** </span>
    - <span style="font-size: 12pt;">La DGT agregó un catálogo para los tipos de descuento, se podrán elegir en la pantalla de descuentos.   
        ![Tipos de descuento.png](/files/CRONUSERPDGTD44PRINCIPALES/Tipos%20de%20descuento.png)  
          
        </span>
- **<span style="font-size: 14pt;">Exoneraciones</span>**
    - Se agregaron campos para definir el Número de Inciso y Número de Artículo.
    - El campo para el Nombre de Institución se reemplazó por un catálogo suministrado por la DGT.
    - En CRONUS Servicios y CRONUS Proyectos, las exoneraciones serán inactivadas, y el usuario deberá volver a ingresarlas. En CRONUS POS, el Nombre de la institución se marca como "Otros" por lo que deberán revisar las exoneraciones y configurar la institución correcta.  
        <span style="font-size: 12pt;">  
          
        </span>
- <span style="font-size: 14pt;">**Notas de Crédito:**</span>
    - El sistema utilizará el tipo de cambio de los documentos afectados en la NC. Ya no se podrá afectar documentos con distintos tipos de cambio en las NC. Caso contrario la DGT rechazará la NC.
    - El monto total de la NC no puede ser mayor al monto de los documentos afectados.
    - Las NC con saldo, ahora no llevan líneas de detalle en el XML, solo un monto total, el cual se verá reflejado como otro cargo, es necesario seleccionar un motivo válido por la DGT. Además, un detalle y al menos una referencia son obligatorios.  
         ![NC con saldo.png](/files/CRONUSERPDGTD44PRINCIPALES/NC%20con%20saldo.png)
- <span style="font-size: 14pt;">**Recibos Electrónicos**</span>
    - Se incluye un nuevo tipo de comprobante electrónico, Recibo Electrónico de Pago (REP).
    - Este se incluirá cuando un recibo afecta un documento (Factura o Notas de Débito) que tiene como condición de venta el código 10 "Venta a crédito en IVA hasta 90 días (Artículo 27, LIVA)".
    - El sistema convertirá los RB en REP automáticamente y los validará con la DGT.
    - Se incluye una nueva cuenta contable, para contabilizar los REP.
    - Los REP se pueden anular, mientras cumplan las condiciones de siempre (sin contabilizar, que no esté cerrado en cajas, ETC), el sistema generará un nuevo REP con monto 0, referenciando al REP que se quiere anular.
    - Las opciones electrónicas (Regenerar, ver motivo de rechazo, etc), para CRONUS POS, sólo serán accesibles desde la nueva pantalla web.
 

# CRONUS-Mantenimiento-Sucursales-Indicadores-Referidos

Para este proceso debemos ingresar a marcar el indicador a la sucursal primeramente:

 ![](https://ayuda.cronuserp.com/uploads/images/migrated/Screenshot_1.png)Una vez con este indicador marcado, el sistema mostrará la pantalla cada vez que un usuario finalice una factura, en la cuál podrán ingresar hasta un máximo de 6 referidos y una vez ingresados dichos datos presionamos aceptar para guardar los cambios:

 ![](https://ayuda.cronuserp.com/uploads/images/migrated/Screenshot_2.png)Una vez con los referidos incluidos, podremos visualizarlos posteriormente o agregar más si así lo necesitamos, para esto presionamos click derecho sobre la factura=&gt;Otras funciones=&gt;Referidos:

 [![Screenshot_3.png](https://ayuda.cronuserp.com/uploads/images/gallery/2025-08/scaled-1680-/screenshot-3.png)](https://ayuda.cronuserp.com/uploads/images/gallery/2025-08/screenshot-3.png)Y ahí tendremos la opción de volver a guardar referidos o hacer cambios y también generar el reporte como tal:

 ![](https://ayuda.cronuserp.com/uploads/images/migrated/Screenshot_4.png)

# CRONUS Erp (Distribuidores autorizados)

# <span style="font-size: 18pt;">(No tenemos afiliación ni damos soporte a Factura Tributaria.com desde septiembre del 2024)</span>

<span style="font-size: 18pt;">Distribuidores de ![CRONUS Erp - Mediano.png](https://ayuda.cronuserp.com/books/wiki-cronus-erp/page/files/Factura-Tributaria-Menu/CRONUS%20Erp%20-%20Mediano.png) </span>

 <table border="0" id="bkmrk-sitio-web-sitio-web-" style="height: 275px; width: 54.9812%; border-collapse: collapse;"> <tbody> <tr style="height: 252px;"> <td style="width: 25%; height: 252px;"></td> <td style="width: 29.9812%; height: 252px;"><span style="font-size: 18pt;"></span></td> </tr> <tr style="height: 23px;"> <td style="width: 25%; height: 23px; text-align: center;"><span style="font-size: 14pt;">[Sitio Web](https://jsasesor.com/)</span></td> <td style="width: 29.9812%; height: 23px; text-align: center;"><span style="font-size: 14pt;">[Sitio web](https://www.facebook.com/scaasesoria/)</span></td> </tr> <tr> <td style="width: 25%; text-align: center;"><span style="font-size: 10pt;">👉 Visite los sitios web de cualquiera</span></td> <td style="width: 29.9812%; text-align: center;"><span style="font-size: 10pt;">de los distribuidores y consúlteles como migrar.</span></td> </tr> </tbody> </table>

---

<span style="font-size: 14pt;"> </span><span style="font-size: 14pt;">Aplicaciones en+ navegadores , Cronus Erp tiene miles de funciones que le beneficiaran.</span>

<div class="editable content mb-3" id="bkmrk-%C2%A0-%C2%BFnecesita-cambiar-">---

<span style="font-size: 16pt;">**¿Necesita cambiar de sistema sin complicaciones?**</span>

<span style="font-size: 14pt;">Con **CRONUS ERP** obtiene un software con más de 25 años de existencia. Contamos con un equipo de ingenieros y contadores expertos listos para acompañarlo en su transición sin costos adicionales ni interrupciones en su negocio.</span>

<span style="font-size: 14pt;">**Importamos sus XML desde cualquier sistema** y lo ponemos a trabajar en nuestra plataforma en poco tiempo, con total respaldo y transparencia.</span>

<span style="font-size: 14pt;">Ofrecemos un **ERP completo desde $40 mensuales**, con mas de 20 módulos, si desea los planes anuales de Repositorio de Documentos Electrónicos (RDE) consulte con nuestros distribuidores. Ya </span><span style="font-size: 14pt;">estamos listos para la versión 4.4 de Factura Electrónica que será obligatoria a partir del **1 de septiembre de 2025**.</span>

</div>

# CRONUS-Movimientos-Inventarios-Solicitudes-de-inventario-Bloqueadas

<p style="text-align: justify;"><span style="font-size: 12pt; font-family: arial, helvetica, sans-serif;">El usuario debe crear la solicitud como habitualmente lo realiza.&nbsp;</span></p> <p style="text-align: justify;"><span style="background-color: #ffffff; color: #ff0000; font-size: 14pt; font-family: arial, helvetica, sans-serif;"><strong>Notas importantes para el proceso:&nbsp;</strong></span></p> <ul style="text-align: justify;"> <li style="text-align: justify;"><span style="background-color: #ffffff; color: #000000; font-size: 12pt; font-family: arial, helvetica, sans-serif;">Si la solicitud una o mas veces posterior a ser desbloqueada la misma se volver&aacute; a bloquear y no podr&aacute; seguir el proceso hasta que no la desbloqueen.&nbsp;</span></li> <li style="text-align: justify;"><span style="background-color: #ffffff; color: #000000; font-size: 12pt; font-family: arial, helvetica, sans-serif;">Al usuario configurado inicialmente en las opciones generales para que les llegue e-mail, est&eacute; llegar&aacute; cuando ya la solicitud haya sido aplicada.&nbsp;</span></li> </ul> <p style="text-align: justify;">&nbsp;</p> <p style="text-align: justify;"><span style="font-size: 12pt; font-family: arial, helvetica, sans-serif;">Una vez que elija alg&uacute;n producto de la lista bloqueado para la sucursal que corresponde el sistema emerge el siguiente mensaje:&nbsp;</span></p> <p style="text-align: justify;"><span style="font-size: 12pt; font-family: arial, helvetica, sans-serif;"><img style="display: block; margin-left: auto; margin-right: auto;" src="/files/CRONUS-Movimientos-Inventarios-Solicitudes-de-inventario-Bloqueadas/iamgen%203.png" alt="iamgen 3.png" width="727" height="531" /></span></p> <p style="text-align: justify;">&nbsp;</p> <p style="text-align: justify;"><span style="font-size: 12pt; font-family: arial, helvetica, sans-serif;">De esta manera ya la solicitud podr&aacute; ser incluida por el usuario, pero esta quedar&aacute; bloqueada hasta que un administrador la pueda desbloquear y ya seguir con el procedimiento habitual para estos movimientos.&nbsp;</span></p> <p style="text-align: justify;">&nbsp;</p> <p style="text-align: justify;"><span style="font-size: 12pt; font-family: arial, helvetica, sans-serif;">Ahora bien, para que el usuario administrador pueda desbloquear la solicitud. Debe ingresar a la pantalla de solicitudes de inventarios, ah&iacute; buscar la que corresponde y mediante un click derecho presiona " Desbloquear por Producto" :&nbsp;</span></p> <p style="text-align: justify;"><span style="font-size: 12pt; font-family: arial, helvetica, sans-serif;"><img style="display: block; margin-left: auto; margin-right: auto;" src="/files/CRONUS-Movimientos-Inventarios-Solicitudes-de-inventario-Bloqueadas/iamgen%204.png" alt="iamgen 4.png" width="265" height="198" /></span></p> <p style="text-align: justify;">&nbsp;</p> <p style="text-align: justify;"><span style="font-size: 12pt; font-family: arial, helvetica, sans-serif;">Cuando se presiona dicho &iacute;cono, el sistema pedir&aacute; la clave de validaci&oacute;n de permiso para el usuario:&nbsp;</span></p> <p style="text-align: justify;"><span style="font-size: 12pt; font-family: arial, helvetica, sans-serif;"><img style="display: block; margin-left: auto; margin-right: auto;" src="/files/CRONUS-Movimientos-Inventarios-Solicitudes-de-inventario-Bloqueadas/imagen%205.png" alt="imagen 5.png" width="325" height="219" /></span></p> <p style="text-align: justify;">&nbsp;</p> <p style="text-align: justify;"><span style="font-size: 12pt; font-family: arial, helvetica, sans-serif;">Una vez ingresada la clave, presionamos "Aceptar" y se realizar&aacute; el desbloqueo respectivo y de esa manera pueden continuar con el proceso habitual:&nbsp;</span></p> <p style="text-align: justify;"><span style="font-size: 12pt; font-family: arial, helvetica, sans-serif;"><img style="display: block; margin-left: auto; margin-right: auto;" src="/files/CRONUS-Movimientos-Inventarios-Solicitudes-de-inventario-Bloqueadas/imagen%206.png" alt="imagen 6.png" width="262" height="147" /></span></p> <p style="text-align: justify;">&nbsp;</p> <p style="text-align: justify;"><span style="font-size: 12pt; font-family: arial, helvetica, sans-serif;">El sistema ahora mostrar&aacute; en una ultima columna de esta pantalla, si la solicitud se encuentra o no bloqueada:&nbsp;</span></p> <p style="text-align: justify;"><span style="font-size: 12pt; font-family: arial, helvetica, sans-serif;"><img style="display: block; margin-left: auto; margin-right: auto;" src="/files/CRONUS-Movimientos-Inventarios-Solicitudes-de-inventario-Bloqueadas/imagen%207.png" alt="imagen 7.png" width="72" height="94" />.</span></p> <p style="text-align: justify;">&nbsp;</p> <p style="text-align: justify;">&nbsp;</p> <p style="text-align: justify;">&nbsp;</p> <p style="text-align: justify;">&nbsp;</p>

# CRONUS-Movimiento-Inventario-Manejo-de-bodegas

<span style="font-size: 12pt; font-family: arial, helvetica, sans-serif;">**Derechos asociados :**</span>

- <span style="font-size: 12pt; font-family: arial, helvetica, sans-serif;">"BODEGUERO1" - Ingresar a la pantalla de "Manejo de Bodegas"</span>
- <span style="font-size: 12pt; font-family: arial, helvetica, sans-serif;">"BODEGUERO3" - Permite indicar finalización de alisto de bodeguero</span>
- <span style="font-size: 12pt; font-family: arial, helvetica, sans-serif;">"BODEGUERO4" - Cambiar fecha de finalización de alisto de bodeguero</span>
- <span style="font-size: 12pt; font-family: arial, helvetica, sans-serif;">"MPROFOR1EQE" - Proformas Empaque - impresión de etiqueta</span>

<span style="font-size: 12pt; font-family: arial, helvetica, sans-serif;">**Nomenclatura de colores:**</span>

- <span style="font-size: 12pt; font-family: arial, helvetica, sans-serif;">Documento Nulo : Gris</span>
- <span style="font-size: 12pt; font-family: arial, helvetica, sans-serif;">Documento Pendiente : Rojo</span>
- <span style="font-size: 12pt; font-family: arial, helvetica, sans-serif;">Documento con productos marcados como P.Entregar : Amarillo</span>
- <span style="font-size: 12pt; font-family: arial, helvetica, sans-serif;">Documento Entregado : Verde</span>
- <span style="font-size: 12pt; font-family: arial, helvetica, sans-serif;">Si no hay bodeguero : Marrón</span>
- <span style="font-size: 12pt; font-family: arial, helvetica, sans-serif;">Si tiene productos devueltos : Lila</span>
- <span style="font-size: 12pt; font-family: arial, helvetica, sans-serif;">Dólares : Verde pastel</span>
- <span style="font-size: 12pt; font-family: arial, helvetica, sans-serif;">Tiene Bodeguero : Rojo obscuro</span>

<span style="font-size: 12pt; font-family: arial, helvetica, sans-serif;">**Configuración inicial:**</span>

<span style="font-weight: 400; font-size: 12pt; font-family: arial, helvetica, sans-serif;">Configurar los bodegueros para poder asignar a facturas y apartados. Para esto ingresamos a Inventario =&gt; Distribución =&gt; Bodegueros: </span>

[![bodegueros web.png](https://ayuda.cronuserp.com/uploads/images/gallery/2026-10/scaled-1680-/bodegueros-web.png)](https://ayuda.cronuserp.com/uploads/images/gallery/2026-10/bodegueros-web.png)

<span style="font-size: 12pt; font-family: arial, helvetica, sans-serif;">**Manejo en pantalla:**</span>

- <span style="font-weight: 400; font-size: 12pt; font-family: arial, helvetica, sans-serif;">Los documentos con un color marrón en la columna 1 se identifican como “Sin bodeguero asignado”.</span>
- <span style="font-weight: 400; font-size: 12pt; font-family: arial, helvetica, sans-serif;">Todos los documentos ahora deben tener un bodeguero para poder ser marcados como entregados.</span>
- <span style="font-weight: 400; font-size: 12pt; font-family: arial, helvetica, sans-serif;">Al asignar un bodeguero CRONUS define la fecha y hora de entrega para poder calcular los tiempos.</span>
- <span style="font-weight: 400; font-size: 12pt; font-family: arial, helvetica, sans-serif;">El tiempo de entrega de una factura se calcula basado en la fecha de asignación del bodeguero y la fecha de entrega del último producto.</span>
- <span style="font-weight: 400; font-size: 12pt; font-family: arial, helvetica, sans-serif;">Es posible quitar un bodeguero de una factura con clave adicional (no asignada por defecto a los usuarios que tengan acceso a esta pantalla).</span>
- <span style="font-weight: 400; font-size: 12pt; font-family: arial, helvetica, sans-serif;">Los datos del bodeguero y fecha se presentan al final de los campos en pantalla.</span>

<span style="font-weight: 400; font-size: 12pt; font-family: arial, helvetica, sans-serif;">[![bodegas wiki.png](https://ayuda.cronuserp.com/uploads/images/gallery/2026-10/scaled-1680-/bodegas-wiki.png)](https://ayuda.cronuserp.com/uploads/images/gallery/2026-10/bodegas-wiki.png)</span>

<span style="font-weight: 400; font-size: 12pt; font-family: arial, helvetica, sans-serif;">  
</span>

<span style="font-weight: 400; font-size: 12pt; font-family: arial, helvetica, sans-serif;">Para procesar los productos, se busca la factura en la lista y se presiona doble click, con esto nos lleva a la pantalla de los productos y presionamos el ícono de "**alistados**" para procesar los mismos: </span>

<span style="font-weight: 400; font-size: 12pt; font-family: arial, helvetica, sans-serif;">[![bodegas facturas.png](https://ayuda.cronuserp.com/uploads/images/gallery/2026-10/scaled-1680-/bodegas-facturas.png)](https://ayuda.cronuserp.com/uploads/images/gallery/2026-10/bodegas-facturas.png)</span>

<span style="font-weight: 400; font-size: 12pt; font-family: arial, helvetica, sans-serif;">Seguidamente para asignar un bodeguero, se busca el documento en la lista y se presiona click derecho =&gt; asignar bodeguero:</span>

<span style="font-weight: 400; font-size: 12pt; font-family: arial, helvetica, sans-serif;">![bo 3.png](https://ayuda.cronuserp.com/files/CRONUS-Movimiento-Inventario-Manejo-de-bodegas/bo%203.png)</span>

<span style="font-weight: 400; font-size: 12pt; font-family: arial, helvetica, sans-serif;">![bo 4.png](https://ayuda.cronuserp.com/files/CRONUS-Movimiento-Inventario-Manejo-de-bodegas/bo%204.png)</span>

<span style="font-weight: 400; font-size: 12pt; font-family: arial, helvetica, sans-serif;">También podemos marcar el documento como " Listo por bodeguero " . Y ahí le podremos cualquiera de las opciones presentadas ya sea por rango de fechas y tiempo o en ese momento. </span>

![Screenshot_4.png](https://ayuda.cronuserp.com/uploads/images/migrated/Screenshot_4.png)

![Screenshot_5.png](https://ayuda.cronuserp.com/uploads/images/migrated/Screenshot_5.png)

<span style="font-weight: 400; font-size: 12pt; font-family: arial, helvetica, sans-serif;">Para finalizar sería elegir el documento en la lista y marcar como entregado: </span>

![Screenshot_6.png](https://ayuda.cronuserp.com/uploads/images/migrated/Screenshot_6.png)

<span style="font-size: 12pt; font-family: arial, helvetica, sans-serif;"><span style="font-weight: 400;">De esta manera se irá limpiando la pantalla de maneja de bodegas y llevando un mejor control de todo el despacho de materiales. </span><span style="font-weight: 400;">En la pantalla tenemos un filtro para una mejor búsqueda o control del proceso. </span></span>

![Screenshot_7.png](https://ayuda.cronuserp.com/uploads/images/migrated/Screenshot_7.png)

<span style="font-size: 12pt; font-family: arial, helvetica, sans-serif;"><span style="font-weight: 400;"> </span>Para saber como funciona el Alisto de Proformas [haga click aquí](https://ayuda.cronuserp.com/books/wiki-cronus-erp/page/CRONUS-Inventario-Manejo-de-Bodegas-Alisto-Empaque)</span>

# CRONUS-Movimiento-Inventario-Movimientos-de-inventario-Cambio-de-fecha-de-movimientos

<span style="color: #ff0000; font-family: arial, helvetica, sans-serif; font-size: 14pt;">**Notas importantes para el proceso:** </span>

1. <span style="font-family: arial, helvetica, sans-serif; font-size: 12pt;">Requieren el permiso a "PMOVINCF1".</span>
2. <span style="font-family: arial, helvetica, sans-serif; font-size: 12pt;">Solo aplica a movimientos originados en inventario, si tiene otro origen: No funciona.</span>
3. <span style="font-family: arial, helvetica, sans-serif; font-size: 12pt;">Si está contabilizado: No funciona.</span>
4. <span style="font-family: arial, helvetica, sans-serif; font-size: 12pt;">Si hay movimientos contabilizados con fechas posteriores: No funciona.</span>
5. <span style="font-family: arial, helvetica, sans-serif; font-size: 12pt;">Si la fecha a la que quieren cambiarlo es posterior: No funciona.</span>
6. <span style="font-family: arial, helvetica, sans-serif; font-size: 12pt;">Si la fecha contable está bloqueada: No funciona.</span>
7. <span style="font-family: arial, helvetica, sans-serif; font-size: 12pt;">Si hay movimientos de ajuste de costos posteriores o iguales a la fecha: No funciona.</span>
 
<span style="font-family: arial, helvetica, sans-serif; font-size: 12pt;">Para realizar el cambio, ingresamos a la pantalla principal de inventarios: </span>

 ![](https://ayuda.cronuserp.com/uploads/images/migrated/Screenshot_1.png)<span style="font-family: arial, helvetica, sans-serif; font-size: 12pt;"></span>

<span style="font-family: arial, helvetica, sans-serif; font-size: 12pt;">Ahí, buscamos el movimiento de inventario que deseamos cambiar la fecha, presionamos click derecho sobre el mismo = &gt; Cambio de fecha de movimiento: </span>

 ![](https://ayuda.cronuserp.com/uploads/images/migrated/Screenshot_2.png)<span style="font-family: arial, helvetica, sans-serif; font-size: 12pt;"></span>

<span style="font-family: arial, helvetica, sans-serif; font-size: 12pt;">Una vez que presionemos dicha opción el sistema nos emerge una ventana de confirmación:</span>

[![Screenshot_3.png](https://ayuda.cronuserp.com/uploads/images/gallery/2025-08/scaled-1680-/screenshot-3.png)](https://ayuda.cronuserp.com/uploads/images/gallery/2025-08/screenshot-3.png)<span style="font-family: arial, helvetica, sans-serif; font-size: 12pt;"></span>

<span style="font-family: arial, helvetica, sans-serif; font-size: 12pt;">Posteriormente debemos ingresar la fecha respectiva para el cambio y presionar OK a dicha pantalla y finalmente "Aceptar" para confirmar el proceso:</span>

 ![](https://ayuda.cronuserp.com/uploads/images/migrated/Screenshot_4.png)[![cambio.png](https://ayuda.cronuserp.com/uploads/images/gallery/2025-08/scaled-1680-/cambio.png)](https://ayuda.cronuserp.com/uploads/images/gallery/2025-08/cambio.png)[](https://ayuda.cronuserp.com/uploads/images/gallery/2025-08/cambio.png)<span style="font-family: arial, helvetica, sans-serif; font-size: 12pt;"></span>

<span style="font-family: arial, helvetica, sans-serif; font-size: 12pt;"></span>

<span style="font-family: arial, helvetica, sans-serif; font-size: 12pt;">Ya con esto el movimiento quedará con la fecha respectiva: </span>

 ![](https://ayuda.cronuserp.com/uploads/images/migrated/Screenshot_5.png)<span style="font-family: arial, helvetica, sans-serif; font-size: 12pt;"></span>

# CRONUS-Movimiento-Inventario-Movimientos-de-inventario-Etiquetas-de-Inventario

<span style="font-size: 12pt; font-family: arial, helvetica, sans-serif;"><span style="font-weight: 400;">Todas las etiquetas se regeneran basadas en un movimiento de inventario, se requiere el derecho especial ”</span>**PETIQBAR01**<span style="font-weight: 400;">” no asignado por defecto a ningún grupo de seguridad.</span></span>

<span style="font-size: 12pt; font-family: arial, helvetica, sans-serif;"><span style="font-weight: 400;">Para configurar la impresión de las etiquetas de inventario, se debe de ingresar a sucursales elegir la sucursal, doble click sobre ella una vez </span><span style="font-weight: 400;">ahí selecciona la opción según el tamaño de la etiqueta. En este punto favor consultar al departamento de gerencia de su empresa o en su defecto al personal de CRFUSION el tipo que le corresponde:</span></span>

<span style="font-weight: 400; font-size: 12pt; font-family: arial, helvetica, sans-serif;">![inventario 3.png](/files/CRONUS-Movimiento-Inventario-Movimientos-de-inventario-Etiquetas-de-Inventario/inventario%203.png)</span>

<span style="font-size: 12pt; font-family: arial, helvetica, sans-serif;"><span style="font-weight: 400;">Si se tiene el derecho, podrá acceder a la generación de etiquetas una vez incluida una factura que tenga inventario o usando el menú “Utilitarios” en la pantalla de inventarios.</span><span style="font-weight: 400;"></span></span>

<span style="font-weight: 400; font-size: 12pt; font-family: arial, helvetica, sans-serif;"> </span>

<span style="font-weight: 400; font-size: 12pt; font-family: arial, helvetica, sans-serif;">Una vez que ingresa a la pantalla, CRONUS por defecto sugiere la cantidad a generar basado en el mínimo de compra y la cantidad comprada, puede cambiar los datos de la casilla “Generar” y colocar el dato que necesite:</span>

<span style="font-weight: 400; font-size: 12pt; font-family: arial, helvetica, sans-serif;">![eti 2.png](/files/CRONUS-Movimiento-Inventario-Movimientos-de-inventario-Etiquetas-de-Inventario/eti%202.png)</span>

<span style="font-size: 12pt; font-family: arial, helvetica, sans-serif;"><span style="font-weight: 400;">En la parte superior derecha de la pantalla, aparece el total de líneas del movimiento de inventario y el total de etiquetas que se imprimirán. </span><span style="font-weight: 400;">Si no desea que se generen etiquetas de un producto simplemente digite cero "0" en la casilla.</span></span>

<span style="font-weight: 400; font-size: 12pt; font-family: arial, helvetica, sans-serif;">![inventario 1.png](/files/CRONUS-Movimiento-Inventario-Movimientos-de-inventario-Etiquetas-de-Inventario/inventario%201.png)</span>

<span style="font-weight: 400; font-size: 12pt; font-family: arial, helvetica, sans-serif;">Para aumentar en + 1 la cantidad a generar simplemente haga click izquierdo en la columna de “nombre del producto” y para rebajar click derecho.</span>

<span style="font-weight: 400; font-size: 12pt; font-family: arial, helvetica, sans-serif;">En la parte inferior izquierda de la pantalla debe aparecer un código QR </span>

<span style="font-weight: 400; font-size: 12pt; font-family: arial, helvetica, sans-serif;">Una vez listo, puede presionar el botón “Imprimir” para indicar la ruta de la impresora y comenzar a generar etiquetas.</span>

<span style="font-weight: 400; font-size: 12pt; font-family: arial, helvetica, sans-serif;">Un punto importante adicional es que CRONUS le guardará el detalle de las cantidades digitadas para imprimir, si desea recuperar estos datos simplemente responda “NO” cuando aparezca el siguiente mensaje:</span>

<span style="font-weight: 400; font-size: 12pt; font-family: arial, helvetica, sans-serif;">![eti 6.png](/files/CRONUS-Movimiento-Inventario-Movimientos-de-inventario-Etiquetas-de-Inventario/eti%206.png)</span>

# CRONUS-Movimiento-Inventario-Movimientos-de-inventario-Tramos

<span style="font-size: 14pt; font-family: arial, helvetica, sans-serif;">**Configuración inicial**</span>

1. <span style="font-size: 12pt; font-family: arial, helvetica, sans-serif;">Deben tener al menos una bodega configurada como tipo "15 - Tramos o partes".</span>
2. <span style="font-size: 12pt; font-family: arial, helvetica, sans-serif;">Los productos a los que aplican los tramos deben estar marcados como "Permite Cortes".</span>
    1. <span style="font-size: 12pt; font-family: arial, helvetica, sans-serif;">Mantenimiento a Productos.</span>
    2. <span style="font-size: 12pt; font-family: arial, helvetica, sans-serif;">Cejilla "2. Indicadores".</span>
    3. <span style="font-size: 12pt; font-family: arial, helvetica, sans-serif;">Sub-Cejilla "Fijos".</span>
3. <span style="font-size: 12pt; font-family: arial, helvetica, sans-serif;">Se requiere el derecho al proceso "PINCLUIRT1" asignado por defecto a los usuarios que tengan "PINCLUIR0".</span>
 
<span style="font-size: 14pt; font-family: arial, helvetica, sans-serif;">**Movimientos por Tramos**</span>

<span style="font-size: 12pt; font-family: arial, helvetica, sans-serif;">Para acceder al proceso puede usar el botón "Lista" en el Menú Principal y buscar en el combo a la derecha la opción de "Inventario de Tramos".</span>

- <span style="font-size: 12pt; font-family: arial, helvetica, sans-serif;">Puede filtrar por 00 - TODOS.</span>
- <span style="font-size: 12pt; font-family: arial, helvetica, sans-serif;">Puede filtrar por 01 - Solo los que tienen diferencias.</span>
- <span style="font-size: 12pt; font-family: arial, helvetica, sans-serif;">No se puede utilizar el rango de fechas porque no aplica a los movimientos.</span>
- <span style="font-size: 12pt; font-family: arial, helvetica, sans-serif;">El saldo del producto es por Bodega, pero pueden haber 15 tramos de distancias distintas configurados en Cronus.</span>
- <span style="font-size: 12pt; font-family: arial, helvetica, sans-serif;">Cada Tramo puede tener N cantidad de cortes digitados.</span>
- <span style="font-size: 12pt; font-family: arial, helvetica, sans-serif;">El saldo total de la Bodega debe coincidir con la Sumatoria de Cantidad de Tramos \* Tamaño de Tramo.</span>
    - <span style="font-size: 12pt; font-family: arial, helvetica, sans-serif;">Ejemplo, 10 Cortes de cable de 2.5 metros da 25 metros en total.</span>
    - <span style="font-size: 12pt; font-family: arial, helvetica, sans-serif;">Los 25 metros son los que aparecen como saldo Total de la bodega de tramos.</span>
 
<span style="font-size: 12pt; font-family: arial, helvetica, sans-serif;"></span>

<span style="font-size: 12pt; font-family: arial, helvetica, sans-serif;">Lista de ejemplo de todos los Saldos de los productos que coinciden:</span>

1. <span style="font-size: 12pt; font-family: arial, helvetica, sans-serif;">Tamaño del tramo.</span>
2. <span style="font-size: 12pt; font-family: arial, helvetica, sans-serif;">Cantidad de unidades de ese tamaño.</span>
3. <span style="font-size: 12pt; font-family: arial, helvetica, sans-serif;">Saldo de inventario.</span>
 
<span style="font-size: 12pt; font-family: arial, helvetica, sans-serif;"></span>

<span style="font-size: 12pt; font-family: arial, helvetica, sans-serif;">Solo podrá avanzar en esta pantalla si la diferencia es cero, o sea, el total de inventario es igual a la sumatoria de unidades por tramo.</span>

<span style="font-size: 12pt; font-family: arial, helvetica, sans-serif;">Cuando el saldo de inventario de un artículo no coincida con el total de tramos podrá ver un mensaje como este en el menú principal.</span>

<span style="font-size: 12pt; font-family: arial, helvetica, sans-serif;"></span>

<span style="font-size: 12pt; font-family: arial, helvetica, sans-serif;">En las pantallas de Proformas y Notas de Pedido ahora podrá ver un mensaje como este. Adicionalmente haciendo doble click sobre la etiqueta Bodega tendrá la oportunidad de ver el saldo de tramos (sin poder variarlo).</span>

<span style="font-size: 12pt; font-family: arial, helvetica, sans-serif;"></span>

<span style="font-size: 12pt; font-family: arial, helvetica, sans-serif;">En la consulta de saldos, puede hacer doble click sobre la Bodega con el saldo para ver los Tramos de cada producto e inclusive cambiarlos si tiene derechos.</span>

<span style="font-size: 12pt; font-family: arial, helvetica, sans-serif;"></span>

# CRONUS Movimiento Inventario Produccion de composición

<span style="color: #000000;">**<span style="font-size: 14pt;">Derechos relacionados: </span>**</span>

- <span style="color: #ff0000;"><span style="font-size: 14pt;"><span style="color: #000000; font-size: 12pt; font-family: arial, helvetica, sans-serif;">PINCLUIRPC1</span></span></span>
- <span style="color: #ff0000;"><span style="font-size: 14pt;"><span style="color: #000000; font-size: 12pt; font-family: arial, helvetica, sans-serif;">PINCLUIRPC2</span></span></span>
 
<span style="color: #ff0000;">**<span style="font-size: 14pt;">Notas importantes a tomar en cuenta para dicho proceso: </span>**</span>

- <span style="color: #000000; font-size: 12pt; font-family: arial, helvetica, sans-serif;">Una vez configurado el producto final y aplicado el proceso NO podrá ser reversado de ninguna manera.</span>
- <span style="color: #000000; font-size: 12pt; font-family: arial, helvetica, sans-serif;">Podemos eliminar una línea de la producción, mediante el ícono mostrado en la pantalla al momento de la inclusión.</span>
- <span style="color: #000000; font-size: 12pt; font-family: arial, helvetica, sans-serif;">No se puede anular una composición ya aplicada. </span>
- <span style="color: #000000; font-size: 12pt; font-family: arial, helvetica, sans-serif;">Una vez aplicada, el proceso es irreversible. </span>
- <span style="color: #000000; font-size: 12pt; font-family: arial, helvetica, sans-serif;">Cuando la misma se aplica el sistema a nivel de inventarios nos realizará los respectivos movimientos ( ENTRADA Y SALIDA ) según configuraciones iniciales. </span>
- <span style="color: #000000; font-size: 12pt; font-family: arial, helvetica, sans-serif;">Recordar que dicha entrada quedará en la bodega configurada para el proceso final, el manejo interno para la facturación de esté quedará a criterio de su empresa y encargados. </span>
 
<span style="color: #000000; font-size: 12pt; font-family: arial, helvetica, sans-serif;">Para este proceso debemos ingresar a Movimientos = &gt; Inventarios = &gt; Producción de Composición: </span>

 ![](https://ayuda.cronuserp.com/uploads/images/migrated/Screenshot_1.png)<span style="color: #000000; font-size: 12pt; font-family: arial, helvetica, sans-serif;"></span>

<span style="color: #000000; font-size: 12pt; font-family: arial, helvetica, sans-serif;">El sistema nos mostrará esta pantalla donde debemos presionar el icono de **"Incluir"**: </span>

 ![](https://ayuda.cronuserp.com/uploads/images/migrated/Screenshot_2.png)<span style="color: #000000; font-size: 12pt; font-family: arial, helvetica, sans-serif;"></span>

<span style="color: #000000; font-size: 12pt; font-family: arial, helvetica, sans-serif;">Una vez en la pantalla de Incluir debemos presionar el icono de "**Aceptar"** para que nos cargue el encabezado: </span>

[![Screenshot_3.png](https://ayuda.cronuserp.com/uploads/images/gallery/2025-08/scaled-1680-/screenshot-3.png)](https://ayuda.cronuserp.com/uploads/images/gallery/2025-08/screenshot-3.png)<span style="color: #000000; font-size: 12pt; font-family: arial, helvetica, sans-serif;"></span>

<span style="color: #000000; font-size: 12pt; font-family: arial, helvetica, sans-serif;">Cuando presionamos **"Aceptar"** nos mostrará el mensaje de confirmación donde debemos presionar que **"Si"** al mismo y nos saldrá la pantalla emergente para indicarnos si deseamos agregar los productos ya mismo una vez que aceptamos dicho mensaje:</span>

 ![](https://ayuda.cronuserp.com/uploads/images/migrated/Screenshot_4.png)![](https://ayuda.cronuserp.com/uploads/images/migrated/Screenshot_5.png)<span style="color: #000000; font-size: 12pt; font-family: arial, helvetica, sans-serif;"> </span>

<span style="color: #000000; font-size: 12pt; font-family: arial, helvetica, sans-serif;">El sistema nos llevará a la pantalla de Detalle de Productos para la inclusión de los mismos: </span>

 ![](https://ayuda.cronuserp.com/uploads/images/migrated/Screenshot_6.png)<span style="color: #000000; font-size: 12pt; font-family: arial, helvetica, sans-serif;"></span>

<span style="color: #000000; font-size: 12pt; font-family: arial, helvetica, sans-serif;">De esa manera debemos elegir el producto a incluir, (con palabras o códigos claves ) podremos realizar la búsqueda de este, y una vez encontrado debemos presionar doble click sobre la línea para que el sistema nos lo posicione abajo donde digitamos la cantidad y si deseamos alguna observación ( campo no obligatorio ) y presionamos **"Aceptar"** para guardar el cambio: </span>

 ![](https://ayuda.cronuserp.com/uploads/images/migrated/Screenshot_7.png)<span style="color: #000000; font-size: 12pt; font-family: arial, helvetica, sans-serif;"></span>

<span style="color: #000000; font-size: 12pt; font-family: arial, helvetica, sans-serif;">La siguiente pantalla a completar, será la que vemos a continuación: </span>

 ![](https://ayuda.cronuserp.com/uploads/images/migrated/Screenshot_8.png)<span style="color: #000000; font-size: 12pt; font-family: arial, helvetica, sans-serif;"></span>

<span style="color: #000000; font-size: 12pt; font-family: arial, helvetica, sans-serif;">En esta pantalla debemos agregar cada composición y cantidad del producto según la receta definida para este, para esto debemos desligar el combo con la flecha ubicada a la izquierda para ver que datos conlleva dicha composición: </span>

 ![](https://ayuda.cronuserp.com/uploads/images/migrated/Screenshot_9.png)<span style="color: #000000; font-size: 12pt; font-family: arial, helvetica, sans-serif;"></span>

<span style="color: #000000; font-size: 12pt; font-family: arial, helvetica, sans-serif;">Cuando escogemos la línea deseada en la pantalla anterior mediante un click sobre la misma vamos a definir los artículos que la conformarán, presionando el icono de buscar producto para que nos lleve a la pantalla de productos:</span>

 ![](https://ayuda.cronuserp.com/uploads/images/migrated/Screenshot_10.png)<span style="color: #000000; font-size: 12pt; font-family: arial, helvetica, sans-serif;"></span>

<span style="color: #000000; font-size: 12pt; font-family: arial, helvetica, sans-serif;">Elegido el producto e ingresada la cantidad deseada el sistema nos mostrará la línea abajo como se muestra en la pantalla, donde debemos presionar el icono de "Guardar datos": </span>

 ![](https://ayuda.cronuserp.com/uploads/images/migrated/Screenshot_11.png)<span style="color: #000000; font-size: 12pt; font-family: arial, helvetica, sans-serif;"></span>

<span style="font-size: 12pt; font-family: arial, helvetica, sans-serif;"><span style="color: #000000;">Una vez,seleccionado dicho ícono nos muestra la siguiente pantalla emergente,al presionar que "**SI"** esto nos habilitará la siguiente composición y así sucesivamente para repetir los pasos anteriores por cada receta incluida para dicho producto final.</span></span>

![](https://ayuda.cronuserp.com/uploads/images/migrated/Screenshot_12.png)<span style="font-size: 12pt; font-family: arial, helvetica, sans-serif;"><span style="color: #000000;"> </span></span>

<span style="color: #000000; font-size: 12pt; font-family: arial, helvetica, sans-serif;">Cuando todas las lineas listas, el sistema nos lo mostrará en color verde y en la parte de abajo de la pantalla también nos indicará que todo está listo: </span>

 ![](https://ayuda.cronuserp.com/uploads/images/migrated/Screenshot_13.png)<span style="color: #000000; font-size: 12pt; font-family: arial, helvetica, sans-serif;"></span>

<span style="color: #000000; font-size: 12pt; font-family: arial, helvetica, sans-serif;">Una vez marcado todo como listo, únicamente debemos presionar el ícono de **"aplicar"** y tendremos la producción completada: </span>

[![Screenshot_15.png](https://ayuda.cronuserp.com/uploads/images/gallery/2025-08/scaled-1680-/screenshot-15.png)](https://ayuda.cronuserp.com/uploads/images/gallery/2025-08/screenshot-15.png)<span style="color: #000000; font-size: 12pt; font-family: arial, helvetica, sans-serif;"></span>

# Cronus_ND por devolución de efectivo

**<span style="font-size: 12pt;">Permiso relacionado: </span>**

- <span style="font-size: 12pt;">Debe tener derecho al nuevo proceso "PNDDEVEFE1"</span>
 
**<span style="font-size: 12pt;">Notas importantes a tomar en cuenta para el proceso: </span>**

- <span style="font-size: 12pt;">Permite elegir cualquier RB con saldo y crear un ND para que esta aparezca en el Cierre de Caja</span>
- <span style="font-size: 12pt;">Se usa la cuenta de Diferencia de Cajas en Sucursales, pestaña de contabilidad, cejilla "Otros"</span>
- <span style="font-size: 12pt;">Solamente es permitido sobre un RB con saldo (misma moneda que la recepción)</span>
- <span style="font-size: 12pt;">Son ND no tributarias. </span>
- <span style="font-size: 12pt;">Los montos se crearían en negativos siempre. </span>
- <span style="font-size: 12pt;">Se va a generar un aviso al abrir el documento si una ND está asociada a un Cierre de Cajas</span>
- <span style="font-size: 12pt;">Ahora bien, en la pantalla de cierres de Caja:</span>
    - <span style="font-size: 12pt;">Ahora se pueden marcar las ND de Devoluciones de efectivo para justificar la salida de dinero.</span>
    - <span style="font-size: 12pt;">Se permite un Cierre de caja con documentos marcados aunque no haya monto para depositar.</span>
 
<span style="font-size: 12pt;">Para realizar la ND que requerimos ingresamos a la pantalla de RB,buscamos el documento con saldo que deseamos procesar una vez acá presionamos sobre el mismo click derecho y elegimos la opción que indica " Convertir saldo de RB en ND de devolución de efectivo " : </span>

 ![](https://ayuda.cronuserp.com/uploads/images/migrated/1.png)<span style="font-size: 12pt;"></span>

<span style="font-size: 12pt;">El sistema nos emerge el mensaje de confirmación: </span>

 ![](https://ayuda.cronuserp.com/uploads/images/migrated/Screenshot_1.png)<span style="font-size: 12pt;"></span>

<span style="font-size: 12pt;">Cuando presionamos " Si " , nos confirmará lo realizado y presionamos aceptar para validar el cambio: </span>

 ![](https://ayuda.cronuserp.com/uploads/images/migrated/3.png)<span style="font-size: 12pt;"></span>

<span style="font-size: 12pt;">Ya con eso el proceso quedó ejecutado. Si deseamos visualizar la ND relacionada directamente en el RB, podremos abrir el documento y nos mostrará la relación: </span>

 ![](https://ayuda.cronuserp.com/uploads/images/migrated/4.png)<span style="font-size: 12pt;"></span>

<span style="font-size: 12pt;">Ahora bien, si nos dirigimos a la pantalla de ND, podremos visualizar la misma también desde ahí: </span>

 ![](https://ayuda.cronuserp.com/uploads/images/migrated/5.png)<span style="font-size: 12pt;">Al abrirla visualizamos la relación entre RB y la ND, incluso podremos notar cómo la misma en el detalle y notas nos indica a que proceso se refiere dicha ND: </span>

 ![](https://ayuda.cronuserp.com/uploads/images/migrated/7.png)<span style="font-size: 12pt;"></span>

<span style="font-size: 12pt;">Para el efecto en cierre de caja de dichos documentos los podremos visualizar de esta forma, cuando el usuario desee crear los cierres de caja saldrán las ND que existan ( dentro del rango de fecha a aplicar del cierre ) : </span>

 ![](https://ayuda.cronuserp.com/uploads/images/migrated/8.png)<span style="font-size: 12pt;"></span>

<span style="font-size: 12pt;">Si el usuario desea incluirlas en el cierre de caja el proceso sería el mismo que habitualmente realizan con el trato de los RB normales, basta con marcar el documento y este será incluido en el cierre de caja creado, ya sea solamente de las ND o en conjunto con los demás recibos diarios: </span>

 ![](https://ayuda.cronuserp.com/uploads/images/migrated/9.png)<span style="font-size: 12pt;"></span>

# CRONUS-Saldos-Utilitarios-Imprimir-etiqueta-de-inventario

<span style="font-size: 12pt; font-family: arial, helvetica, sans-serif;">Con está función podremos imprimir etiquetas de inventario sobre el producto marcado. Para esto ingresamos a Consulta de saldos, buscamos el producto que deseamos y una vez seleccionado presionamos Utilitarios= &gt; Imprimir etiquetas de inventario: </span>

![Screenshot_1.png](https://ayuda.cronuserp.com/uploads/images/migrated/Screenshot_1.png)

<span style="font-size: 12pt; font-family: arial, helvetica, sans-serif;">Una vez acá, debemos seguir los pasos acostumbrados de dicho proceso, ver manual **[aquí. ](https://ayuda.cronuserp.com/books/wiki-cronus-erp/page/CRONUS-Movimiento-Inventario-Movimientos-de-inventario-Etiquetas-de-Inventario)**</span>

# CRONUS Útil Revisar inventario con problemas

<span style="font-size: 12pt; font-family: arial, helvetica, sans-serif;">Mediante este proceso, podemos revisar el inventario rápidamente y así darnos cuenta si </span><span style="font-size: 12pt; font-family: arial, helvetica, sans-serif;">tenemos problemas( por ejemplo con negativos ) . Para esto ingresamos a ayuda = &gt; utilitarios = &gt; revisar inventario con problemas:</span>

![](https://ayuda.cronuserp.com/uploads/images/migrated/Screenshot_1.png)<span style="font-size: 12pt; font-family: arial, helvetica, sans-serif;"></span>

<span style="font-size: 12pt; font-family: arial, helvetica, sans-serif;">Una vez que presionamos dicha opción, el sistema nos muestra una pantalla por si deseamos revisar algún código de producto en especial, de lo contrario nada más presionamos **OK**: </span>

![](https://ayuda.cronuserp.com/uploads/images/migrated/Screenshot_2.png)<span style="font-size: 12pt; font-family: arial, helvetica, sans-serif;"></span>

<span style="font-size: 12pt; font-family: arial, helvetica, sans-serif;">Seguidamente, nos muestra la pantalla donde debemos presionar **EXCEL** para que se nos descargue el archivo en caso de existir productos con problemas y que de está manera podamos revisar lo que corresponde: </span>

[![Screenshot_3.png](https://ayuda.cronuserp.com/uploads/images/gallery/2025-08/scaled-1680-/screenshot-3.png)](https://ayuda.cronuserp.com/uploads/images/gallery/2025-08/screenshot-3.png)<span style="font-size: 12pt; font-family: arial, helvetica, sans-serif;"></span>

<span style="font-size: 12pt; font-family: arial, helvetica, sans-serif;">En caso de no existir problema alguno de inventario el sistema nos emerge el siguiente mensaje y con esto nada más presionar **OK** para finalizar el proceso: </span>

![](https://ayuda.cronuserp.com/uploads/images/migrated/Screenshot_4.png)<span style="font-size: 12pt; font-family: arial, helvetica, sans-serif;"></span>

# Refacturar en CRONUS

---

***<span lang="ES-CR" style="font-size: 16.0pt; line-height: 107%; font-family: 'Arial',sans-serif; mso-ansi-language: ES-CR;">Acceso y requisitos previos</span>***

**<span lang="ES-CR" style="font-size: 12.0pt; line-height: 107%; font-family: 'Arial',sans-serif; mso-ansi-language: ES-CR;"> </span><span lang="ES-CR" style="font-size: 12.0pt; line-height: 107%; font-family: 'Arial',sans-serif; mso-ansi-language: ES-CR;">Permisos de la seguridad para el proceso :</span>**

- <span style="font-size: 12.0pt; font-family: 'Arial',sans-serif; mso-fareast-font-family: 'Times New Roman'; mso-fareast-language: EN-GB;">MCLINC1</span>
- <span style="font-size: 12.0pt; font-family: 'Arial',sans-serif; mso-fareast-font-family: 'Times New Roman'; mso-fareast-language: EN-GB;">FACCAMOBS1</span>
- <span style="font-size: 12.0pt; font-family: 'Arial',sans-serif; mso-fareast-font-family: 'Times New Roman'; mso-fareast-language: EN-GB;">FACCAMBRS1</span>
- <span style="font-size: 12.0pt; font-family: 'Arial',sans-serif; mso-fareast-font-family: 'Times New Roman'; mso-fareast-language: EN-GB;">FACCAMEXO1</span>
- <span style="font-size: 12.0pt; font-family: 'Arial',sans-serif; mso-fareast-font-family: 'Times New Roman'; mso-fareast-language: EN-GB;">FACCAMAEC1</span>
- <span style="font-size: 12.0pt; font-family: 'Arial',sans-serif; mso-fareast-font-family: 'Times New Roman'; mso-fareast-language: EN-GB;">PCHANGECOST2</span>

**<span lang="ES-CR" style="font-size: 12.0pt; line-height: 107%; font-family: 'Arial',sans-serif; mso-ansi-language: ES-CR;">La opción de Refacturar se encuentra en :</span>**

- <span lang="ES-CR" style="font-size: 12.0pt; line-height: 107%; font-family: 'Arial',sans-serif; mso-ansi-language: ES-CR;">CRONUS CS =&gt; Facturas =&gt; Utilitarios / click derecho =&gt; Cambios de factura...</span>

---

***<span lang="ES-CR" style="font-size: 16.0pt; line-height: 107%; font-family: 'Arial',sans-serif; mso-ansi-language: ES-CR;">Uso de la opción: Cambios de factura</span>***

<span lang="ES-CR" style="font-size: 12.0pt; line-height: 107%; font-family: 'Arial',sans-serif; mso-ansi-language: ES-CR;">Este proceso permite realizar modificaciones de forma segura, ya que el sistema no altera ni modifica el documento original en ningún momento. En su lugar, la herramienta toma la factura existente como base y genera una copia exacta con toda la información original, aplicando únicamente el cambio específico que usted haya seleccionado. De esta manera, usted obtiene un nuevo documento actualizado mientras mantiene la integridad y el respaldo de la factura inicial sin riesgos de pérdida de datos.</span>

**<span lang="ES-CR" style="font-size: 12.0pt; line-height: 107%; font-family: 'Arial',sans-serif; mso-ansi-language: ES-CR;">Notas: </span>**

<span lang="ES-CR" style="font-size: 12.0pt; line-height: 107%; font-family: 'Arial',sans-serif; mso-ansi-language: ES-CR;">**1.** Todas las pantallas, con excepción de "Cambio de plazo/agente" reflejan un mensaje de confirmación justo al presionarla, el cuál deberemos de aceptar, con el botón **<span style="font-family: 'Arial',sans-serif;">"Sí":</span>**</span>

<span lang="ES-CR" style="font-size: 12.0pt; line-height: 107%; font-family: 'Arial',sans-serif; mso-ansi-language: ES-CR;">**<span style="font-family: 'Arial',sans-serif;">[![cambio de razon social1.png](https://ayuda.cronuserp.com/uploads/images/gallery/2026-02/scaled-1680-/cambio-de-razon-social1.png)](https://ayuda.cronuserp.com/uploads/images/gallery/2026-02/cambio-de-razon-social1.png)</span>**</span>

<span lang="ES-CR" style="font-size: 12.0pt; line-height: 107%; font-family: 'Arial',sans-serif; mso-ansi-language: ES-CR;">**<span style="font-family: 'Arial',sans-serif;">2. </span>**</span><span lang="ES-CR" style="font-size: 12.0pt; line-height: 107%; font-family: 'Arial',sans-serif; mso-ansi-language: ES-CR;">A excepción de la opción **“Cambio de plazo/agente”**, todas las pantallas mostrarán una ventana de verificación tras completar los datos y confirmar el mensaje de sistema. En esta sección, podrá validar la información ingresada y realizar los ajustes o revisiones que correspondan antes de finalizar el proceso.</span>

<span lang="ES-CR" style="font-size: 12.0pt; line-height: 107%; font-family: 'Arial',sans-serif; mso-ansi-language: ES-CR;">[![dadot documento electronico.png](https://ayuda.cronuserp.com/uploads/images/gallery/2026-02/scaled-1680-/dadot-documento-electronico.png)](https://ayuda.cronuserp.com/uploads/images/gallery/2026-02/dadot-documento-electronico.png)</span>

<span lang="ES-CR" style="font-size: 12.0pt; line-height: 107%; font-family: 'Arial',sans-serif; mso-ansi-language: ES-CR;">Para comenzar, acceda a la pantalla de Facturación y localice el documento que desea modificar. Una vez identificado, haga clic derecho sobre el registro para desplegar el menú y seleccione la opción **“Cambios de factura…”**.</span>

<span lang="ES-CR" style="font-size: 12.0pt; line-height: 107%; font-family: 'Arial',sans-serif; mso-ansi-language: ES-CR;">[![cambios de factura.png](https://ayuda.cronuserp.com/uploads/images/gallery/2026-02/scaled-1680-/cambios-de-factura.png)](https://ayuda.cronuserp.com/uploads/images/gallery/2026-02/cambios-de-factura.png)</span>

<span lang="ES-CR" style="font-size: 12.0pt; line-height: 107%; font-family: 'Arial',sans-serif; mso-ansi-language: ES-CR;">Al seleccionar dicha opción, se desplegarán las diversas modificaciones que el sistema permite aplicar al documento, las cuales se detallan a continuación:</span>

**<span lang="ES-CR" style="font-size: 12.0pt; line-height: 107%; font-family: 'Arial',sans-serif; mso-ansi-language: ES-CR;">Cambio de plazo/agente: </span>**

**<span lang="ES-CR" style="font-size: 12.0pt; line-height: 107%; font-family: 'Arial',sans-serif; mso-ansi-language: ES-CR;">[![cambio de plazo agente.png](https://ayuda.cronuserp.com/uploads/images/gallery/2026-02/scaled-1680-/cambio-de-plazo-agente.png)](https://ayuda.cronuserp.com/uploads/images/gallery/2026-02/cambio-de-plazo-agente.png)</span>**

<span lang="ES-CR" style="font-size: 12.0pt; line-height: 107%; font-family: 'Arial',sans-serif; mso-ansi-language: ES-CR;">Al seleccionar esta opción, se mostrará la siguiente ventana, en la cual podrá actualizar tanto el agente principal como el secundario vinculados a la factura. Posterior a colocar la información requerida, terminaremos el cambio con el botón de **"guardar":**</span>

[![cambio de plazo agente1.png](https://ayuda.cronuserp.com/uploads/images/gallery/2026-02/scaled-1680-/cambio-de-plazo-agente1.png)](https://ayuda.cronuserp.com/uploads/images/gallery/2026-02/cambio-de-plazo-agente1.png)

**<span style="font-size: 12.0pt; line-height: 107%; font-family: 'Arial',sans-serif;">Cambio de razón social:</span>**

**<span style="font-size: 12.0pt; line-height: 107%; font-family: 'Arial',sans-serif;">[![cambio de razon social.png](https://ayuda.cronuserp.com/uploads/images/gallery/2026-02/scaled-1680-/cambio-de-razon-social.png)](https://ayuda.cronuserp.com/uploads/images/gallery/2026-02/cambio-de-razon-social.png)</span>**

<span lang="ES-CR" style="font-size: 12.0pt; line-height: 107%; font-family: 'Arial',sans-serif; mso-ansi-language: ES-CR;">Tras confirmar el mensaje, se desplegará la pantalla de edición, donde podrá actualizar la información requerida. En esta sección se encuentran el campo de **"Cliente"** el cuál deberemos de cambiar, para así cambiar la razón socilal relacionada al documento, además, de colocar el dato correspondiente a la casilla de "**Tipo**". Una vez ingresados los datos necesarios, guarde las modificaciones presionando el botón **<span style="font-family: 'Arial',sans-serif;">“Guardar”</span>**.</span><span lang="ES-CR" style="font-size: 14.0pt; line-height: 107%; font-family: 'Arial',sans-serif; mso-ansi-language: ES-CR;"> </span>

![cambio de razon social2.png](https://ayuda.cronuserp.com/uploads/images/gallery/2026-02/scaled-1680-/cambio-de-razon-social2.png)

<span lang="ES-CR" style="font-size: 12.0pt; line-height: 107%; font-family: 'Arial',sans-serif; mso-ansi-language: ES-CR;">Posterior a guardar los cambios, veremos el mensaje de confirmación, indicándonos el dato anterior junto al actualizado, para que podamos validar se haya seleccionado el dato correcto, una vez confirmado esto, presione en **<span style="font-family: 'Arial',sans-serif;">"Sí".</span>**</span>

[![cambio de razon social3.png](https://ayuda.cronuserp.com/uploads/images/gallery/2026-02/scaled-1680-/cambio-de-razon-social3.png)](https://ayuda.cronuserp.com/uploads/images/gallery/2026-02/cambio-de-razon-social3.png)

**<span lang="ES-CR" style="font-size: 12.0pt; line-height: 107%; font-family: 'Arial',sans-serif; mso-ansi-language: ES-CR;">Cambio por refactura:</span>**

**[![cambio por refactura.png](https://ayuda.cronuserp.com/uploads/images/gallery/2026-02/scaled-1680-/cambio-por-refactura.png)](https://ayuda.cronuserp.com/uploads/images/gallery/2026-02/cambio-por-refactura.png)**

<span lang="ES-CR" style="font-size: 12.0pt; line-height: 107%; font-family: 'Arial',sans-serif; mso-ansi-language: ES-CR;">Tras confirmar el mensaje, se desplegará la pantalla de edición, donde podrá actualizar la información requerida. En esta sección se encuentran los campos de <span style="font-family: 'Arial',sans-serif;">“**Tipo**”</span>, <span style="font-family: 'Arial',sans-serif;">“**\# O. compra**”</span> y <span style="font-family: 'Arial',sans-serif;">“**Observaciones**”</span>. Una vez ingresados los datos necesarios, guarde las modificaciones presionando el botón <span style="font-family: 'Arial',sans-serif;">“**Guardar**”</span>.</span><span lang="ES-CR" style="font-size: 14.0pt; line-height: 107%; font-family: 'Arial',sans-serif; mso-ansi-language: ES-CR;"> </span>

<span lang="ES-CR" style="font-size: 14.0pt; line-height: 107%; font-family: 'Arial',sans-serif; mso-ansi-language: ES-CR;">[![cambio por refactura1.png](https://ayuda.cronuserp.com/uploads/images/gallery/2026-02/scaled-1680-/cambio-por-refactura1.png)](https://ayuda.cronuserp.com/uploads/images/gallery/2026-02/cambio-por-refactura1.png)</span>

<span lang="ES-CR" style="font-size: 14.0pt; line-height: 107%; font-family: 'Arial',sans-serif; mso-ansi-language: ES-CR;"><span lang="ES-CR" style="font-size: 12.0pt; line-height: 107%; font-family: 'Arial',sans-serif; mso-ansi-language: ES-CR;"><span lang="ES-CR" style="font-size: 14.0pt; line-height: 107%; font-family: 'Arial',sans-serif; mso-ansi-language: ES-CR;"><span lang="ES-CR" style="font-size: 12.0pt; line-height: 107%; font-family: 'Arial',sans-serif; mso-ansi-language: ES-CR;">Posterior a guardar los cambios, veremos el mensaje de confirmación, que nos indica lñas condiciones del cambio realizado, una vez confirmado esto, presione en **<span style="font-family: 'Arial',sans-serif;">"Sí".</span>**</span></span></span></span>

<span lang="ES-CR" style="font-size: 14.0pt; line-height: 107%; font-family: 'Arial',sans-serif; mso-ansi-language: ES-CR;">![cambio por refactura2.png](https://ayuda.cronuserp.com/uploads/images/gallery/2026-02/scaled-1680-/cambio-por-refactura2.png)</span>

<span lang="ES-CR" style="font-size: 14.0pt; line-height: 107%; font-family: 'Arial',sans-serif; mso-ansi-language: ES-CR;">**<span lang="ES-CR" style="font-size: 12.0pt; line-height: 107%; font-family: 'Arial',sans-serif; mso-ansi-language: ES-CR;">Cambio por exoneración:</span>**</span>

<span lang="ES-CR" style="font-size: 14.0pt; line-height: 107%; font-family: 'Arial',sans-serif; mso-ansi-language: ES-CR;">**<span lang="ES-CR" style="font-size: 12.0pt; line-height: 107%; font-family: 'Arial',sans-serif; mso-ansi-language: ES-CR;">[![cambio por exoneracion.png](https://ayuda.cronuserp.com/uploads/images/gallery/2026-02/scaled-1680-/cambio-por-exoneracion.png)](https://ayuda.cronuserp.com/uploads/images/gallery/2026-02/cambio-por-exoneracion.png)</span>**</span>

<span lang="ES-CR" style="font-size: 14.0pt; line-height: 107%; font-family: 'Arial',sans-serif; mso-ansi-language: ES-CR;"><span lang="ES-CR" style="font-size: 12.0pt; line-height: 107%; font-family: 'Arial',sans-serif; mso-ansi-language: ES-CR;">T</span><span lang="ES-CR" style="font-size: 12.0pt; line-height: 107%; font-family: 'Arial',sans-serif; mso-ansi-language: ES-CR;">ras confirmar el mensaje, se desplegará la pantalla de edición, donde podrá actualizar la información requerida. En esta sección se encuentra el campo de **"Tipo"** y el cuadro de **"Cliente"** con el cual podremos abrir la configuración del cliente y validar la exoneración de este</span><span lang="ES-CR" style="font-size: 12.0pt; line-height: 107%; font-family: 'Arial',sans-serif; mso-ansi-language: ES-CR;">. Una vez ingresados los datos necesarios, guarde las modificaciones presionando el botón <span style="font-family: 'Arial',sans-serif;">**“Guardar”**</span>**.**<span lang="ES-CR" style="font-size: 14.0pt; line-height: 107%; font-family: 'Arial',sans-serif; mso-ansi-language: ES-CR;"> </span></span></span>

<span lang="ES-CR" style="font-size: 14.0pt; line-height: 107%; font-family: 'Arial',sans-serif; mso-ansi-language: ES-CR;">**<span lang="ES-CR" style="font-size: 12.0pt; line-height: 107%; font-family: 'Arial',sans-serif; mso-ansi-language: ES-CR;">![cambio por exoneracion2.png](https://ayuda.cronuserp.com/uploads/images/gallery/2026-02/scaled-1680-/cambio-por-exoneracion2.png)</span>**</span>

<span lang="ES-CR" style="font-size: 14.0pt; line-height: 107%; font-family: 'Arial',sans-serif; mso-ansi-language: ES-CR;">**<span lang="ES-CR" style="font-size: 12.0pt; line-height: 107%; font-family: 'Arial',sans-serif; mso-ansi-language: ES-CR;">Cambio por Precios:</span>**</span>

<span lang="ES-CR" style="font-size: 14.0pt; line-height: 107%; font-family: 'Arial',sans-serif; mso-ansi-language: ES-CR;">**<span lang="ES-CR" style="font-size: 12.0pt; line-height: 107%; font-family: 'Arial',sans-serif; mso-ansi-language: ES-CR;">[![cambio por precios.png](https://ayuda.cronuserp.com/uploads/images/gallery/2026-02/scaled-1680-/cambio-por-precios.png)](https://ayuda.cronuserp.com/uploads/images/gallery/2026-02/cambio-por-precios.png)</span>**</span>

<span lang="ES-CR" style="font-size: 14.0pt; line-height: 107%; font-family: 'Arial',sans-serif; mso-ansi-language: ES-CR;"><span lang="ES-CR" style="font-size: 12.0pt; line-height: 107%; font-family: 'Arial',sans-serif; mso-ansi-language: ES-CR;">Tras confirmar el mensaje, se desplegará la pantalla de edición, donde podrá actualizar la información requerida. En esta sección se encuentran los campos de **<span style="font-family: 'Arial',sans-serif;">“Tipo”</span>,** . Una vez ingresados los datos necesarios, guarde las modificaciones presionando el botón <span style="font-family: 'Arial',sans-serif;">“Guardar”</span>.<span lang="ES-CR" style="font-size: 14.0pt; line-height: 107%; font-family: 'Arial',sans-serif; mso-ansi-language: ES-CR;"> </span></span></span>

<span lang="ES-CR" style="font-size: 14.0pt; line-height: 107%; font-family: 'Arial',sans-serif; mso-ansi-language: ES-CR;"><span lang="ES-CR" style="font-size: 12.0pt; line-height: 107%; font-family: 'Arial',sans-serif; mso-ansi-language: ES-CR;"><span lang="ES-CR" style="font-size: 14.0pt; line-height: 107%; font-family: 'Arial',sans-serif; mso-ansi-language: ES-CR;">[![cambio por precios1.png](https://ayuda.cronuserp.com/uploads/images/gallery/2026-02/scaled-1680-/cambio-por-precios1.png)](https://ayuda.cronuserp.com/uploads/images/gallery/2026-02/cambio-por-precios1.png)</span></span></span>

<span lang="ES-CR" style="font-size: 12.0pt; line-height: 107%; font-family: 'Arial',sans-serif; mso-ansi-language: ES-CR;">Tras guardar la información, se presentará la siguiente ventana, donde podrá modificar el precio de cada línea de la factura desde la columna indicada. También podrá cambiar el dato de descuento si así lo requiere. Una vez actualizados los montos, presione el botón **“Aceptar”** para confirmar los cambios.</span>

<span lang="ES-CR" style="font-size: 14.0pt; line-height: 107%; font-family: 'Arial',sans-serif; mso-ansi-language: ES-CR;"><span lang="ES-CR" style="font-size: 12.0pt; line-height: 107%; font-family: 'Arial',sans-serif; mso-ansi-language: ES-CR;"><span lang="ES-CR" style="font-size: 14.0pt; line-height: 107%; font-family: 'Arial',sans-serif; mso-ansi-language: ES-CR;">[![cambio por precios2.png](https://ayuda.cronuserp.com/uploads/images/gallery/2026-02/scaled-1680-/cambio-por-precios2.png)](https://ayuda.cronuserp.com/uploads/images/gallery/2026-02/cambio-por-precios2.png)</span></span></span>

<span lang="ES-CR" style="font-size: 14.0pt; line-height: 107%; font-family: 'Arial',sans-serif; mso-ansi-language: ES-CR;"><span lang="ES-CR" style="font-size: 12.0pt; line-height: 107%; font-family: 'Arial',sans-serif; mso-ansi-language: ES-CR;"><span lang="ES-CR" style="font-size: 14.0pt; line-height: 107%; font-family: 'Arial',sans-serif; mso-ansi-language: ES-CR;"><span lang="ES-CR" style="font-size: 12.0pt; line-height: 107%; font-family: 'Arial',sans-serif; mso-ansi-language: ES-CR;">Posterior a guardar los cambios, veremos el mensaje de confirmación, que nos indica las condiciones del cambio realizado, una vez confirmado esto, presione en **<span style="font-family: 'Arial',sans-serif;">"Sí".</span>**</span></span></span></span><span lang="ES-CR" style="font-size: 14.0pt; line-height: 107%; font-family: 'Arial',sans-serif; mso-ansi-language: ES-CR;"><span lang="ES-CR" style="font-size: 12.0pt; line-height: 107%; font-family: 'Arial',sans-serif; mso-ansi-language: ES-CR;"><span lang="ES-CR" style="font-size: 14.0pt; line-height: 107%; font-family: 'Arial',sans-serif; mso-ansi-language: ES-CR;">[![cambio por precios3.png](https://ayuda.cronuserp.com/uploads/images/gallery/2026-02/scaled-1680-/cambio-por-precios3.png)](https://ayuda.cronuserp.com/uploads/images/gallery/2026-02/cambio-por-precios3.png)</span></span></span>

<span lang="ES-CR" style="font-size: 14.0pt; line-height: 107%; font-family: 'Arial',sans-serif; mso-ansi-language: ES-CR;">**<span lang="ES-CR" style="font-size: 12.0pt; line-height: 107%; font-family: 'Arial',sans-serif; mso-ansi-language: ES-CR;">Cambio por Actividad Económica:</span>**</span>

<span lang="ES-CR" style="font-size: 14.0pt; line-height: 107%; font-family: 'Arial',sans-serif; mso-ansi-language: ES-CR;">**<span lang="ES-CR" style="font-size: 12.0pt; line-height: 107%; font-family: 'Arial',sans-serif; mso-ansi-language: ES-CR;">[![Cambio por actividad economica.png](https://ayuda.cronuserp.com/uploads/images/gallery/2026-02/scaled-1680-/cambio-por-actividad-economica.png)](https://ayuda.cronuserp.com/uploads/images/gallery/2026-02/cambio-por-actividad-economica.png)</span>**</span>

<span lang="ES-CR" style="font-size: 14.0pt; line-height: 107%; font-family: 'Arial',sans-serif; mso-ansi-language: ES-CR;"><span lang="ES-CR" style="font-size: 12.0pt; line-height: 107%; font-family: 'Arial',sans-serif; mso-ansi-language: ES-CR;">Tras confirmar el mensaje, se desplegará la pantalla de edición, donde podrá actualizar la información requerida. En esta sección se encuentran los campos de **<span style="font-family: 'Arial',sans-serif;">“Tipo”</span>,** . Una vez ingresados los datos necesarios, guarde las modificaciones presionando el botón <span style="font-family: 'Arial',sans-serif;">“**Guardar**”</span>.<span lang="ES-CR" style="font-size: 14.0pt; line-height: 107%; font-family: 'Arial',sans-serif; mso-ansi-language: ES-CR;"> </span></span></span>

<span lang="ES-CR" style="font-size: 14.0pt; line-height: 107%; font-family: 'Arial',sans-serif; mso-ansi-language: ES-CR;"><span lang="ES-CR" style="font-size: 12.0pt; line-height: 107%; font-family: 'Arial',sans-serif; mso-ansi-language: ES-CR;"><span lang="ES-CR" style="font-size: 14.0pt; line-height: 107%; font-family: 'Arial',sans-serif; mso-ansi-language: ES-CR;">[![cambio por precios1.png](https://ayuda.cronuserp.com/uploads/images/gallery/2026-02/scaled-1680-/cambio-por-precios1.png)](https://ayuda.cronuserp.com/uploads/images/gallery/2026-02/cambio-por-precios1.png)</span></span></span>

<span lang="ES-CR" style="font-size: 14.0pt; line-height: 107%; font-family: 'Arial',sans-serif; mso-ansi-language: ES-CR;"><span lang="ES-CR" style="font-size: 12.0pt; line-height: 107%; font-family: 'Arial',sans-serif; mso-ansi-language: ES-CR;"><span lang="ES-CR" style="font-size: 14.0pt; line-height: 107%; font-family: 'Arial',sans-serif; mso-ansi-language: ES-CR;"><span lang="ES-CR" style="font-size: 12.0pt; line-height: 107%; font-family: 'Arial',sans-serif; mso-ansi-language: ES-CR;"><span lang="ES-CR" style="font-size: 14.0pt; line-height: 107%; font-family: 'Arial',sans-serif; mso-ansi-language: ES-CR;"><span lang="ES-CR" style="font-size: 12.0pt; line-height: 107%; font-family: 'Arial',sans-serif; mso-ansi-language: ES-CR;">Posterior a guardar los cambios, veremos el mensaje de confirmación, que nos indica las condiciones del cambio realizado, una vez confirmado esto, presione en **<span style="font-family: 'Arial',sans-serif;">"Sí".</span>**</span></span></span></span></span></span>

<span lang="ES-CR" style="font-size: 14.0pt; line-height: 107%; font-family: 'Arial',sans-serif; mso-ansi-language: ES-CR;"><span lang="ES-CR" style="font-size: 12.0pt; line-height: 107%; font-family: 'Arial',sans-serif; mso-ansi-language: ES-CR;"><span lang="ES-CR" style="font-size: 14.0pt; line-height: 107%; font-family: 'Arial',sans-serif; mso-ansi-language: ES-CR;">[![Cambio por actividad economica1.png](https://ayuda.cronuserp.com/uploads/images/gallery/2026-02/scaled-1680-/cambio-por-actividad-economica1.png)](https://ayuda.cronuserp.com/uploads/images/gallery/2026-02/cambio-por-actividad-economica1.png)</span></span></span>

<span lang="ES-CR" style="font-size: 12.0pt; line-height: 107%; font-family: 'Arial',sans-serif; mso-ansi-language: ES-CR;">Tras guardar la información, veremos el siguiente cuadro, con el cuál podremos cambiar la Actividad Económica y demás datos en caso de ser necesario. Una vez actualizados los datos, presione el botón **<span style="font-family: 'Arial',sans-serif;">“Aceptar”</span>** para confirmar los cambios.</span>

[![dadot documento electronico.png](https://ayuda.cronuserp.com/uploads/images/gallery/2026-02/scaled-1680-/dadot-documento-electronico.png)](https://ayuda.cronuserp.com/uploads/images/gallery/2026-02/dadot-documento-electronico.png)

---

[![banner-largo.jpg](https://ayuda.cronuserp.com/uploads/images/gallery/2025-10/scaled-1680-/banner-largo.jpg)](https://ayuda.cronuserp.com/uploads/images/gallery/2025-10/banner-largo.jpg)